Hey there, fellow adventurers, crafters, and Minecraft enthusiasts! Have you ever found yourself deep in the blocky world, battling creepers, mining diamonds, and then thought, "Man, I wish I had a real-life diamond sword right now?" Or maybe you're a parent, looking for that perfect, screen-free activity to spark your child's creativity, something that bridges the digital realm with tangible fun. If so, you've landed on the right block!
I've been there, staring at a screen, imagining epic battles, and then trying to translate that digital magic into something I could hold. I remember one rainy afternoon, my nephew was absolutely obsessed with Minecraft, and all he wanted was a Diamond Sword. I tried drawing one, but it just wasn't *right*. That's when I stumbled upon the incredible world of minecraft sword printable templates. Trust me, it was a game-changer! Suddenly, crafting a pixel-perfect sword wasn't just a dream; it was a fun, achievable project that brought his favorite game to life. This guide isn't just about printing a piece of paper; it's about unlocking creativity, sharing joy, and bringing a piece of the Overworld right into your hands. We’re going to dive deep, exploring every facet of these amazing printables, from finding the perfect template to making it durable enough for epic backyard adventures.
Whether you’re a seasoned crafter looking for new challenges, a parent aiming to delight their little miner, or just curious about how to bring those iconic pixelated blades to life, this comprehensive guide has got you covered. We'll explore various types of swords, the best materials to use, step-by-step crafting instructions, and even advanced tips for making your sword truly legendary. So, grab your virtual pickaxe (or maybe a real pair of scissors!), and let’s embark on this crafting quest together!
Table of Contents

- [Why Minecraft Sword Printables Are Your Next Best Crafting Adventure](#why-minecraft-sword-printables-are-your-next-best-crafting-adventure)
- [Unearthing the Best: Types of Minecraft Sword Printables](#unearthing-the-best-types-of-minecraft-sword-printables)
- [Your Crafting Inventory: Essential Materials for Pixel Perfection](#your-crafting-inventory-essential-materials-for-pixel-perfection)
- [The Artisan's Blueprint: Step-by-Step Guide to Crafting Your Sword](#the-artisans-blueprint-step-by-step-guide-to-crafting-your-sword)
- [Beyond the Basic Blade: Advanced Customization & Durability Hacks](#beyond-the-basic-blade-advanced-customization--durability-hacks)
- [Epic Encounters: Using Minecraft Sword Printables for Parties & Play](#epic-encounters-using-minecraft-sword-printables-for-parties--play)
- [Safety First, Adventurer! Important Considerations for Play](#safety-first-adventurer-important-considerations-for-play)
- [Troubleshooting Your Crafting Quest: Common Pitfalls & Solutions](#troubleshooting-your-crafting-quest-common-pitfalls--solutions)
- [The Treasure Chest: Where to Find the Best Minecraft Sword Printables](#the-treasure-chest-where-to-find-the-best-minecraft-sword-printables)
- [Beyond Swords: Expanding Your Printable Minecraft Universe](#beyond-swords-expanding-your-printable-minecraft-universe)
- [How to Choose the Best Minecraft Sword Printable for Your Needs](#how-to-choose-the-best-minecraft-sword-printable-for-your-needs)
- [Common Pitfalls to Avoid When Crafting Your Minecraft Sword](#common-pitfalls-to-avoid-when-crafting-your-minecraft-sword)
- [Advanced Tips for Experts: Elevating Your Minecraft Crafting Game](#advanced-tips-for-experts-elevating-your-minecraft-crafting-game)
- [Your Next Adventure Awaits!](#your-next-adventure-awaits)
---
Why Minecraft Sword Printables Are Your Next Best Crafting Adventure
Let's be real, there's something uniquely satisfying about bringing a beloved digital item into the real world. Minecraft sword printable templates offer a fantastic gateway to hands-on fun, creativity, and imaginative play. They’re not just paper cut-outs; they’re keys to unlocking new adventures.
1. Affordable Fun: Forget expensive toy replicas. With a printer, some paper, and a few basic crafting supplies, you can create an entire arsenal of Minecraft swords for a fraction of the cost. It’s budget-friendly entertainment at its best.
2. Unleashing Creativity: While the templates provide the basic shape, the true magic lies in the customization. Kids (and adults!) can color, embellish, and personalize their swords, making each one unique. I once saw a kid add glitter to a Diamond Sword, and it was surprisingly epic!
3. Screen-Free Engagement: In an increasingly digital world, these printables offer a fantastic opportunity for kids to step away from screens and engage in tactile, creative play. It’s a wonderful way to encourage fine motor skills, focus, and imaginative storytelling.
4. Instant Gratification: Unlike complex crafting projects, a basic minecraft sword printable can be completed fairly quickly, offering that satisfying "I made this!" feeling in a short amount of time. Perfect for impatient little crafters!
5. Party Power-Up: Planning a Minecraft-themed birthday party? These printables are an absolute lifesaver for decorations, party favors, or even a fun crafting activity during the party itself. I used them for my niece's birthday, and the kids went wild decorating their own swords!
6. Educational Benefits: Following instructions, understanding shapes, measuring, cutting, and gluing all contribute to valuable learning experiences. It’s stealth learning at its finest.
7. Bonding Time: Crafting together is a fantastic way to spend quality time with family or friends. It creates shared memories and fosters collaboration. My favorite memories are often those spent crafting with my little cousins.
8. Versatility: From simple paper cut-outs to sturdy cardboard props, these printables can be adapted to various materials and durability levels depending on your needs.
9. Collector's Delight: Why stop at one? You can collect all the different sword types – wood, stone, iron, gold, diamond, even Netherite – and display them like a true Minecraft connoisseur.
10. Role-Playing Catalyst: A physical sword transforms imaginative play. Suddenly, that backyard becomes a sprawling savanna, and the family dog is a menacing wolf. It’s amazing how a simple prop can ignite an entire world of adventure.
11. Stress Reliever: For adults, crafting can be incredibly therapeutic. The repetitive motions of cutting and gluing can be meditative, offering a peaceful escape from daily stressors.
12. The "Cool Factor": Let's face it, having a real-life Minecraft sword is just undeniably cool. It's a statement piece, a badge of honor for any true fan.
---
Unearthing the Best: Types of Minecraft Sword Printables
Just like in the game, not all swords are created equal! When you're looking for a minecraft sword printable, you'll find a variety that mirrors the progression and aesthetic of the game itself. Understanding these types will help you choose the perfect template for your crafting adventure.
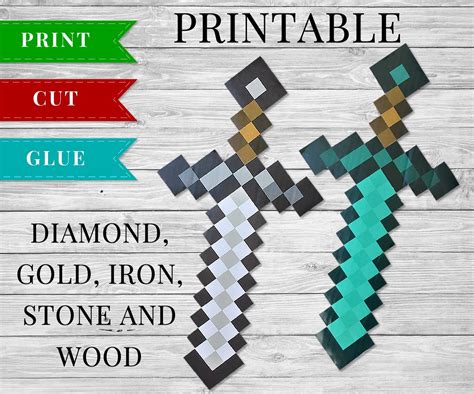
1. Wooden Sword Printable:
- Description: The most basic, often brown and blocky. It’s perfect for beginners due to its simple pixel pattern.
- Crafting Insight: Great for first-timers, as its rougher texture is forgiving with minor cutting imperfections.
- Hypothetical Scenario: My little brother, obsessed with starting his Minecraft journey, insisted on a wooden sword first. We spent an afternoon crafting it, and he proudly declared it his "beginner's blade."
2. Stone Sword Printable:
- Description: A step up from wood, featuring grey and darker grey pixels. Slightly more complex but still very manageable.
- Crafting Insight: Introduces a bit more nuance in color and shading, which can be fun for coloring activities.
3. Iron Sword Printable:
- Description: Characterized by its metallic grey and white pixel patterns, representing a stronger blade.
- Crafting Insight: Looks fantastic when printed on slightly glossy paper or given a metallic finish with paint or markers.
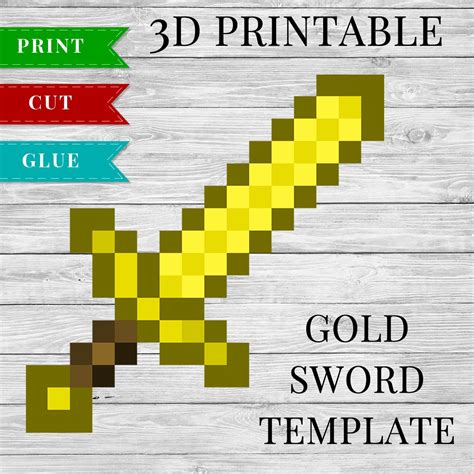
4. Golden Sword Printable:
- Description: Shines with yellow and orange hues, often highly sought after for its iconic look, despite its in-game durability.
- Crafting Insight: A favorite for kids! The vibrant colors make it visually striking. Consider adding a touch of gold glitter for extra sparkle.
- Hypothetical Scenario: For a school play where kids needed props, the Golden Sword was the most popular choice. It just has that undeniable "bling" factor that screams adventure!
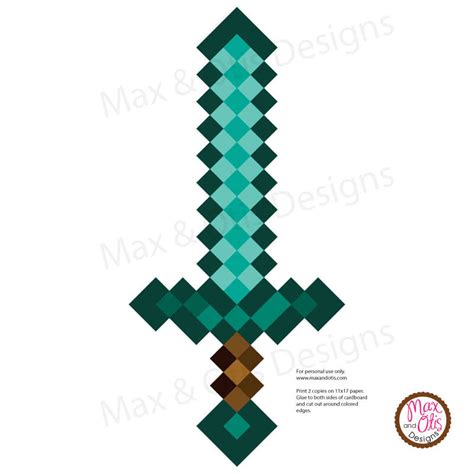
5. Diamond Sword Printable:
- Description: The holy grail! Bright blue and cyan pixels, iconic and instantly recognizable as the most powerful.
- Crafting Insight: This is usually the most requested minecraft sword printable. It looks best with crisp lines and vibrant colors. Consider layering it for a 3D effect.
6. Netherite Sword Printable:
- Description: The newest and most powerful in-game sword, featuring dark, obsidian-like pixels with hints of gold/orange.
- Crafting Insight: A more advanced aesthetic. Requires good color printing to capture the subtle dark tones and fiery accents.
7. Enchanted Sword Printable:
- Description: Often a Diamond or Netherite sword with added purple or glowing pixel effects, representing enchantments.
- Crafting Insight: Can be achieved by printing an enchanted template or by adding your own purple glow-in-the-dark paint or markers to any sword printable.
8. Damaged/Broken Sword Printable:
- Description: Templates showing cracks, chips, or faded colors, perfect for a battle-worn look.
- Crafting Insight: Great for storytelling and adding character. You can even manually "damage" a completed sword with strategic cuts or scuffs.
9. Miniature Sword Printables:
- Description: Smaller versions of any sword type, ideal for party favors, cake toppers, or desk decorations.
- Crafting Insight: Requires more precision cutting due to their small size but are quick to make in batches.
10. Life-Size Sword Printables (Multi-Page):
- Description: Templates broken into multiple pages that, when assembled, create a large, life-sized sword.
- Crafting Insight: More involved, requiring careful alignment and strong adhesive, but the result is incredibly impressive. My personal favorite, though it requires patience!
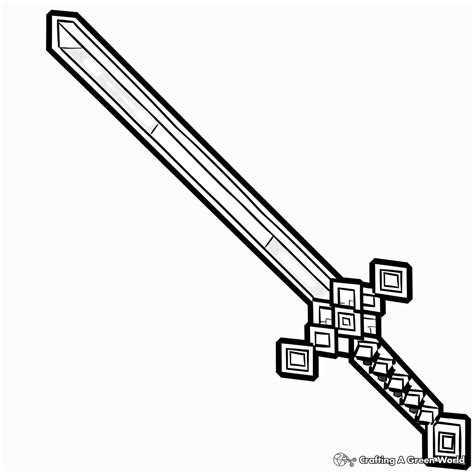
11. Color-Your-Own Sword Printables:
- Description: Black and white outlines of swords, allowing users to color them in themselves.
- Crafting Insight: Fantastic for pure creative expression and less reliant on high-quality color printing.
12. Pixel Art Grid Sword Printables:
- Description: Templates that include a grid, allowing crafters to replicate the pixel art style by coloring in squares.
- Crafting Insight: Excellent for teaching about pixel art and basic geometry.
---
Your Crafting Inventory: Essential Materials for Pixel Perfection
Before you embark on your grand crafting quest for the perfect minecraft sword printable, you'll need to gather your materials. Think of this as stocking your crafting table – having the right ingredients makes all the difference!
1. The Minecraft Sword Printable Template:
- Description: This is your blueprint! Downloaded from a reputable source, ideally in PDF or high-resolution image format.
- Why it's essential: Without it, you're just cutting random shapes. Ensure the template is clear and well-defined.
2. Printer & Ink:
- Description: A working printer with sufficient color ink. For best results, a color inkjet or laser printer.
- Why it's essential: To bring that digital design to life. Ensure your ink levels are good, especially for vibrant Diamond Swords!
3. Paper/Cardstock:
- Description:
- Standard Printer Paper (20-24 lb): Good for quick, light swords.
- Cardstock (65-110 lb): Highly recommended for durability and a more substantial feel.
- Why it's essential: The foundation of your sword. Cardstock makes a significant difference in how sturdy your finished sword will be. I almost always opt for cardstock; it just feels right.
4. Scissors:
- Description: Sharp crafting scissors. If working with kids, safety scissors are a must.
- Why it's essential: For precise cutting around the pixels. A good pair of scissors makes the job much easier and cleaner.
5. Adhesive:
- Description:
- Glue Stick: Clean, easy for kids, but less strong.
- White Craft Glue (PVA glue): Stronger bond, takes longer to dry.
- Hot Glue Gun (with adult supervision): Fast drying, very strong, great for structural reinforcement.
- Spray Adhesive: For large, multi-page templates, offers even coverage.
- Why it's essential: To assemble multiple layers or pages. Choose based on desired strength and drying time.
6. Ruler (Optional but Recommended):
- Description: A standard ruler for straight edges.
- Why it's essential: Helps with scoring fold lines or cutting perfectly straight edges if you're reinforcing with cardboard.
7. Craft Knife/X-Acto Knife (Adult Use Only!):
- Description: A sharp blade for precise cuts, especially for intricate details or cutting through thick cardboard.
- Why it's essential: For clean edges and more advanced crafting. Always use a cutting mat underneath!
8. Cutting Mat (Optional but Recommended):
- Description: A self-healing mat to protect your work surface when using a craft knife.
- Why it's essential: Saves your table! Seriously, don’t skip this if you’re using a craft knife.
9. Cardboard (for Reinforcement – Optional):
- Description: Cereal boxes, shipping boxes, foam board, or poster board.
- Why it's essential: To add significant strength and rigidity to your sword, making it much more durable for play. This is my secret weapon for swords that last!
10. Laminator & Laminating Pouches (for Durability – Optional):
- Description: A laminating machine and plastic pouches.
- Why it's essential: To make your paper sword water-resistant and incredibly durable. Perfect for party props that need to withstand enthusiastic play.
11. Clear Packing Tape or Contact Paper (for Durability – Optional):
- Description: Wide, clear adhesive tape or clear contact paper.
- Why it's essential: A budget-friendly alternative to lamination for adding a protective layer.
12. Coloring Supplies (Optional):
- Description: Crayons, markers, colored pencils if you’re using a black-and-white template.
- Why it's essential: For personalizing "color-your-own" templates.
---
The Artisan's Blueprint: Step-by-Step Guide to Crafting Your Sword
Alright, gather 'round, aspiring pixel artisans! Now that your inventory is stocked, it’s time to follow the blueprint and craft your very own minecraft sword printable. This process is fun, straightforward, and incredibly rewarding.
Step 1: Choose Your Weapon (Template Selection)
- Action: Browse online for your desired minecraft sword printable template. Decide if you want a Wooden, Stone, Iron, Gold, Diamond, or Netherite sword. Consider if you need a single-page print or a multi-page life-size version.
- Expert Tip: Look for templates that are clearly labeled and have good reviews if you're downloading from a crafting site. High-resolution images will give you the crispest results.
Step 2: Print with Precision
- Action: Load your chosen paper (cardstock is highly recommended!) into your printer. Print the template. Ensure your printer settings are on "best quality" or "photo quality" for vibrant colors and sharp lines.
- Hypothetical Scenario: I once printed a Diamond Sword on draft mode to save ink, and it came out looking dull and pixelated in a bad way. Learned my lesson: quality settings matter for these vibrant designs!
- Beginner Tip: If using a multi-page template, print one test page first to ensure scaling and alignment are correct before printing the whole thing.
Step 3: The Art of the Cut
- Action: Carefully cut out the sword shape. Take your time, especially around the pixelated edges. Precision here makes a big difference in the final look.
- Expert Tip: For crisper edges, especially on the "blade" part, use a ruler and a craft knife (adult supervision for kids, please!) on a cutting mat. This gives a much cleaner line than scissors alone.
- Common Mistake to Avoid: Rushing! Jagged edges detract from the pixel art aesthetic.
Step 4: Reinforce Your Blade (Optional but Recommended)
- Action: If you want a sturdy sword, trace the cut-out paper sword onto a piece of cardboard (e.g., cereal box, shipping box, or foam board). Cut out the cardboard shape.
- Expert Tip: Cut the cardboard slightly *smaller* than the paper template, especially around the edges. This prevents the cardboard from showing through if your paper layers aren't perfectly aligned.
- Hypothetical Scenario: My first cardboard-reinforced sword was a flop because the cardboard stuck out everywhere! Now I trim it slightly smaller, and it makes all the difference in the clean finish.
Step 5: Assemble the Layers (If Applicable)
- Action (for single-sided reinforcement): Apply adhesive (glue stick for quick, white glue for strong) to the back of your printed sword and carefully press it onto the cardboard cutout. Smooth out any bubbles.
- Action (for double-sided reinforcement): Print two copies of your minecraft sword printable. Glue one onto each side of the cardboard cutout, aligning them perfectly. This creates a robust, double-sided sword.
- Action (for multi-page life-size swords): Carefully align and glue the individual printed pages together first to form the full sword shape. Then, reinforce with cardboard as above.
- Beginner Tip: For large pieces, start gluing from the center and work your way out to the edges to avoid air bubbles.
Step 6: Secure and Strengthen (Optional Durability Boosts)
- Action (Lamination): If you have a laminator, carefully feed your assembled paper/cardboard sword into a laminating pouch and run it through the machine. Trim the excess laminate.
- Action (Clear Tape/Contact Paper): Cover both sides of your sword with clear packing tape, overlapping slightly. Alternatively, use clear contact paper for a seamless finish. Trim excess.
- Expert Tip: For maximum durability, laminate *after* gluing to cardboard. This encapsulates the entire structure.
- Humorous Warning: Don't be like me and forget to smooth out air bubbles *before* laminating. They'll be trapped forever, mocking your haste!
Step 7: The Finishing Touches
- Action: If you used a black-and-white template, now's the time to color it in! Use markers, crayons, or colored pencils.
- Action (Optional Embellishments): Add glitter, googly eyes (for a silly sword!), or even small pieces of foam for a 3D effect.
- Expert Tip: For a truly authentic pixel look, use square-tipped markers or cut small squares of paper to glue on if you're feeling ambitious!
Step 8: Wield Your Creation!
- Action: Let your adhesive dry completely. Once dry, your minecraft sword printable is ready for action!
- Hypothetical Scenario: The sheer joy on a child's face when they first wield their handmade Diamond Sword is priceless. It makes all the cutting and gluing worth it!
---
Beyond the Basic Blade: Advanced Customization & Durability Hacks
You've mastered the basics of creating a minecraft sword printable. Now, let's level up! These advanced techniques and durability hacks will transform your paper craft into a truly legendary artifact worthy of any seasoned adventurer.
1. 3D Layering for Depth:
- Technique: Print multiple copies of your template. Cut out specific sections (e.g., the hilt, the central blade pixels) from extra prints. Mount these pieces onto your main sword using small foam dots or additional layers of cardboard/foam core.
- Result: Adds incredible depth and a more tangible, blocky feel, mimicking the in-game aesthetic.
- Personal Scenario: I once made a Diamond Sword for a convention, and by layering the central blue pixels, it really popped! People kept asking if it was 3D printed.
2. Foam Core Reinforcement:
- Technique: Instead of thin cardboard, use 5mm or 10mm foam core board as your core. It’s lightweight but incredibly rigid. Trace and cut the sword shape from the foam core, then adhere your printed templates to both sides.
- Result: A much thicker, sturdier, and more robust sword that feels substantial in hand. Perfect for costumes or rough play.
3. Heat Shrink Plastic (Shrinky Dinks):
- Technique: Print (or draw) miniature sword designs on heat shrink plastic sheets. Cut them out and bake them according to package instructions.
- Result: Tiny, durable plastic sword charms, keychains, or zipper pulls. A cool way to make wearable minecraft sword printable items.
4. Resin Coating for Ultimate Durability:
- Technique: After assembling and reinforcing your sword, apply a thin coat of clear epoxy resin (like the kind used for jewelry or tabletops). Follow safety instructions carefully!
- Result: A super durable, glossy, and water-resistant finish. This is for the truly dedicated crafter, as it requires proper ventilation and careful handling.
5. LED Enchantment Effect:
- Technique: For an "enchanted" look, discreetly embed small, battery-operated LED fairy lights or a thin LED strip along the edges or within the hilt of a foam-core reinforced sword.
- Result: A glowing, magical sword that looks fantastic in low light. Imagine a glowing Diamond Sword!
6. Textured Details:
- Technique: Use puffy paint, fabric paint, or even a thin layer of hot glue to add raised textures to specific pixels or parts of the sword, like the hilt grip or battle scars. Once dry, you can paint over them.
- Result: Adds tactile interest and makes the sword feel more "real."
7. Weathering and Battle Damage:
- Technique: After assembly, use sandpaper, markers, or even a light wash of watered-down brown/black paint to create a worn, battle-damaged look. Add strategic "cracks" with a marker or by carefully bending the cardboard.
- Result: A sword with character, telling a story of countless creeper encounters.
8. Magnetic Hilt for Interchangeable Blades:
- Technique: Embed small, strong magnets into the hilt and the base of different sword blades (e.g., wooden, diamond).
- Result: Allows you to swap out blades, letting you change your sword type on the fly for different "missions" or moods.
9. Clear Acrylic Coating:
- Technique: After assembly, spray your sword with a clear acrylic sealant (available at craft stores). Do this in a well-ventilated area.
- Result: Protects against moisture, UV fading, and general wear and tear, giving a subtle protective sheen.
10. Glow-in-the-Dark Pixels:
- Technique: Use glow-in-the-dark paint or markers on specific pixels (especially for enchanted swords) or on the outlines.
- Result: A sword that glows in the dark, perfect for late-night adventures or spooky Halloween costumes.
11. Fabric or Leather Wrapped Hilt:
- Technique: Cut a strip of faux leather or sturdy fabric and wrap it around the hilt of your sword, securing with hot glue.
- Result: A more comfortable and authentic-feeling grip, especially for larger swords.
12. Weighted Core for Realism:
- Technique: For a truly premium feel, embed a thin, flat piece of metal or a few heavy washers within the foam core or cardboard layers of the blade before sealing it.
- Result: Gives the sword a satisfying weight, making it feel more substantial and less like a flimsy prop. This is my go-to tip for making a prop feel like a "real" item.
---
Epic Encounters: Using Minecraft Sword Printables for Parties & Play
Once you've crafted your magnificent minecraft sword printable, the fun doesn't stop there! These versatile creations are perfect for igniting imaginative play, enhancing celebrations, and making memories.
1. Birthday Party Favors:
- Idea: Print out miniature sword templates and have them pre-cut. Set up a "Crafting Table" station at your Minecraft party where kids can glue them onto cardboard, color them, and take them home.
- Impact: A personalized, memorable take-home gift that ties directly into the theme.
2. Costume Accessories:
- Idea: Craft a life-sized Diamond or Netherite sword to complete a Minecraft character costume for Halloween, conventions, or dress-up play.
- Impact: Elevates any costume from good to legendary. My friend once won a costume contest with his perfectly crafted Netherite sword!
3. Imaginative Role-Playing:
- Idea: Encourage kids (or adults!) to use their swords during backyard adventures, living room quests, or even during a playdate.
- Impact: Sparks creativity, physical activity, and storytelling. Watch them defend their "village" from imaginary zombies!
4. DIY Party Decorations:
- Idea: Print multiple swords, axes, and pickaxes. String them together as a garland, tape them to walls, or create a sword-in-the-stone centerpiece.
- Impact: Instantly transforms any space into a blocky wonderland, setting the mood for a Minecraft bash.
5. Photo Booth Props:
- Idea: Create several different sword types, alongside pickaxes and other Minecraft tools. Set up a designated area with a backdrop for fun photos.
- Impact: Provides hilarious and memorable photo opportunities for guests of all ages.
6. Crafting Activity Station:
- Idea: At a party or gathering, provide pre-printed black-and-white sword templates, scissors, glue, and coloring supplies. Let guests craft their own swords.
- Impact: A fantastic, engaging activity that keeps kids entertained and results in a personalized souvenir. This saved my sanity at a particularly rambunctious party!
7. Themed Games:
- Idea: Incorporate the swords into games like "Pin the Sword on the Zombie," a sword-themed scavenger hunt, or even a safe "sword fight" (with rules!).
- Impact: Makes games more interactive and thematic, bringing the Minecraft world to life.
8. Bedroom/Playroom Decor:
- Idea: Display finished swords on a wall, a shelf, or propped in a corner. You can even frame them like pixel art.
- Impact: A constant reminder of their favorite game and their crafting achievements.
9. Gift Toppers:
- Idea: Print and craft a miniature sword to use as a unique gift topper for a Minecraft-themed present.
- Impact: Adds an extra personal touch to the gift, showing thought and effort.
10. School Projects or Dioramas:
- Idea: Use small sword printables as props or elements in school projects about games, history, or even as part of a diorama depicting a Minecraft scene.
- Impact: Adds a creative and relevant visual element to educational presentations.
11. "Sword in the Stone" Challenge:
- Idea: Craft a sturdy sword and embed it (temporarily) into a block of foam or cardboard "stone." Challenge party-goers to "pull the sword from the stone."
- Impact: A fun, engaging activity that adds an element of fantasy and challenge to the party.
12. Storytelling Prompts:
- Idea: Use the swords as physical prompts for creative writing or oral storytelling. "Tell me about the bravest adventure you had with your Diamond Sword."
- Impact: Encourages imaginative narrative development and language skills.
---
Safety First, Adventurer! Important Considerations for Play
While crafting minecraft sword printable items is incredibly fun, it’s crucial to prioritize safety, especially when kids are involved. We want epic adventures, not emergency room visits!
1. Cutting Tools:
- Hazard: Sharp scissors, craft knives, and utility blades.
- Precaution: Always use age-appropriate scissors. For craft knives, insist on adult-only usage and ensure a cutting mat is used. Teach children to pass scissors handle-first.
- Expert Insight: Even safety scissors can cause scrapes. Supervise little ones closely.
2. Adhesives:
- Hazard: Some glues can be toxic if ingested, or hot glue can cause burns.
- Precaution: Use non-toxic, washable glues for children's projects. For hot glue guns, ensure strict adult supervision and teach children about the hot nozzle and glue.
- Humorous Warning: Don't get hot glue on your fingers. Trust me, that fleeting moment of pain is not worth the perfectly sealed edge!
3. Laminators:
- Hazard: Hot surfaces, moving parts.
- Precaution: Keep laminators out of reach of young children. Adults should operate them, explaining to older children the heat involved.
4. Playtime Safety:
- Hazard: Enthusiastic "sword fights" can lead to accidental pokes, trips, or damage to surroundings.
- Precaution: Establish clear rules for play: no hitting faces, no hitting breakable objects, always play in an open, safe area. Emphasize that these are props, not actual weapons.
- Personal Scenario: I learned the hard way that a sturdy cardboard sword can still knock over a vase! Set boundaries for play areas.
5.