Have you ever looked at a photo you thought was perfect, only to zoom in and find it’s just… soft? Not quite in focus, a little blurry, lacking that crispness that truly makes an image sing? Believe me, I’ve been there. For years, I chased that elusive perfect focus, tweaking settings, blaming my lenses, and even wondering if my eyes were playing tricks on me. It was frustrating, to say the least. My hard-earned shots, destined for the wall or a client's portfolio, just weren’t hitting the mark. I remember one particularly important family portrait session where I thought I nailed it, only to discover later that every single shot had a subtle, yet infuriating, front-focus issue. My heart sank. The truth is, achieving consistently sharp focus is one of photography's biggest challenges, often overlooked until it’s too late. But what if I told you there’s a simple, free tool that can transform your focusing accuracy and bring a new level of clarity to your images?
Enter the printable camera focus chart free. This isn’t some magical, expensive gadget, nor is it a complex software suite. It's a remarkably straightforward, yet incredibly powerful, piece of paper that helps you diagnose and correct focus issues with your camera and lenses. Whether you're a seasoned pro dealing with micro-adjustments or a beginner struggling to understand why your subjects aren't tack-sharp, this guide is for you. We’re going to dive deep into what these charts are, why they’re indispensable, how to use them effectively, and where you can get them without spending a dime. Trust me, you don’t want to miss this – it's the secret weapon that saved my photography from endless frustration, and it can do the same for yours. Get ready to reclaim control over your camera's focus and unlock the true potential of your lenses!
---
Table of Contents

- [The Absolute Basics: Why You Need a Focus Chart](#the-absolute-basics-why-you-need-a-focus-chart)
- [Types of Printable Focus Charts: Which One is Right for You?](#types-of-printable-focus-charts-which-one-is-right-for-you)
- [Step-by-Step Guide: How to Use Your Printable Focus Chart](#step-by-step-guide-how-to-use-your-printable-focus-chart)
- [Beyond the Basics: Advanced Calibration Techniques](#beyond-the-basics-advanced-calibration-techniques)
- [Troubleshooting Focus Issues: When Your Chart Isn't Enough](#troubleshooting-focus-issues-when-your-chart-isnt-enough)
- [DIY vs. Professional Charts: Making the Most of Free Resources](#diy-vs-professional-charts-making-the-most-of-free-resources)
- [Integrating Focus Charts into Your Photography Workflow](#integrating-focus-charts-into-your-photography-workflow)
- [The Science Behind Sharpness: Understanding Lens Performance](#the-science-behind-sharpness-understanding-lens-performance)
- [Common Mistakes to Avoid When Using Focus Charts](#common-mistakes-to-avoid-when-using-focus-charts)
- [Future-Proofing Your Focus: Charts for Mirrorless & Beyond](#future-proofing-your-focus-charts-for-mirrorless--beyond)
- [How to Choose the Best Printable Focus Chart for Your Needs](#how-to-choose-the-best-printable-focus-chart-for-your-needs)
- [Common Pitfalls to Avoid When Using Focus Charts](#common-pitfalls-to-avoid-when-using-focus-charts)
- [Advanced Tips for Experts: Pushing Your Focus Further](#advanced-tips-for-experts-pushing-your-focus-further)
- [Conclusion: Your Journey to Pin-Sharp Photography Begins Now](#conclusion-your-journey-to-pin-sharp-photography-begins-now)
---
The Absolute Basics: Why You Need a Focus Chart

Let's start with the fundamental question: why bother with a printable camera focus chart free in the first place? Isn't autofocus supposed to just... work? Well, yes and no. Modern cameras and lenses are incredibly sophisticated, but they're not always perfect out of the box, nor do they stay perfectly calibrated forever. Over time, or even from manufacturing, minor discrepancies can arise between where your camera *thinks* it's focusing and where the lens *actually* focuses. This phenomenon is often referred to as "front focus" (focus is slightly in front of your intended point) or "back focus" (focus is slightly behind).
Imagine you're shooting a portrait. You meticulously focus on the subject's eye, recompose, and fire the shutter. Later, you find the nose or ear is sharp, but the eye, your intended focal point, is just a hair soft. This is a classic symptom of a focus calibration issue. These subtle errors can ruin an otherwise perfect shot, especially when shooting with wide apertures where depth of field is incredibly shallow. A focus chart provides a clear, measurable target that allows you to identify and, crucially, correct these discrepancies.
Here's why a focus chart is your unsung hero:
- Diagnose Front/Back Focus: This is its primary superpower. By shooting a precise target, you can visually see if your camera's autofocus system is consistently focusing either in front of or behind your chosen point.
- Utilize Micro-Adjustment (AFMA/AF Fine Tune): Many DSLRs and some mirrorless cameras offer an in-camera setting (often called Autofocus Micro-Adjustment or AF Fine Tune) that allows you to shift the focus point slightly forward or backward. The focus chart gives you the data you need to set this adjustment precisely.
- Test New Lenses: Every new lens, even from the same manufacturer, can have slight variations. Using a focus chart on purchase helps you ensure your new glass is performing optimally with *your* specific camera body. I always test new lenses immediately after unboxing; it’s a non-negotiable step in my workflow.
- Check Lens Performance Over Time: Lenses can shift slightly due to bumps, drops, or even just age. Periodically testing with a focus chart can help you catch issues before they impact critical shoots.
- Understand Your Camera's Behavior: Different camera bodies, especially across brands or models, can have varying autofocus characteristics. A chart helps you learn how your specific gear behaves.
- Validate Repair Work: If your camera or lens has been serviced for focus issues, a chart provides an objective way to confirm the repair was successful.
- Improve Overall Image Sharpness: By ensuring your camera and lenses are perfectly calibrated, you unlock their full potential, resulting in consistently sharper, more professional-looking images.
- Save Time in Post-Processing: Sharpening in post-production can only do so much. Getting it right in-camera saves you countless hours trying to rescue soft images. I used to spend so much time trying to fix blurry eyes in Photoshop; now, that time is spent on creative edits.
- Gain Confidence in Your Gear: Knowing your equipment is calibrated correctly gives you peace of mind and allows you to focus on the creative aspects of photography, rather than worrying about technical flaws.
- It's Free and Accessible: The best part? You can get a high-quality printable camera focus chart free online, print it at home, and start testing immediately. No expensive tools required!
Types of Printable Focus Charts: Which One is Right for You?
When you search for a printable camera focus chart free, you'll quickly discover there isn't just one type. Each design has its strengths, making certain charts better suited for specific diagnostic needs. Understanding the differences will help you choose the right tool for the job.
Here are the most common types you’ll encounter:
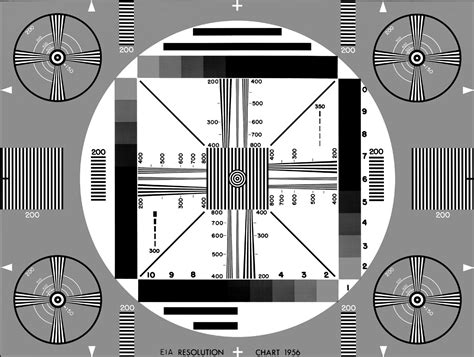
- The Slanted Ruler (or Angled Line) Chart:
- Description: This is perhaps the most widely recognized type. It features a prominent target (often a square or crosshair) for your camera to focus on, and a ruler or series of lines extending at a 45-degree angle away from the target, both forward and backward.
- Purpose: Ideal for precisely identifying front or back focus. When you photograph it, the point of sharpest focus will be clearly visible along the angled ruler, indicating if it's consistently in front of, on, or behind the target.
- Pros: Very visual, easy to interpret, excellent for micro-adjustment.
- Cons: Requires precise setup to ensure the chart is truly at a 45-degree angle to your camera's sensor plane.
- Hypothetical Scenario: I once used a simple slanted ruler chart to diagnose a persistent back-focus issue with my favorite 50mm prime lens. After a few shots, it was clear the sharpness was consistently falling behind the target. This immediate visual feedback allowed me to adjust my AFMA setting in-camera and bring it back into perfect calibration.
- Grid or Chessboard Pattern Charts:
- Description: These charts feature a high-contrast grid or checkerboard pattern.
- Purpose: Primarily used for assessing overall lens sharpness, distortion, and vignetting, but can also help identify gross focus errors if the entire image appears soft or inconsistently sharp across the frame. Less precise for micro-adjustment than slanted rulers.
- Pros: Good for general lens evaluation, easy to print.
- Cons: Not ideal for precise front/back focus calibration.
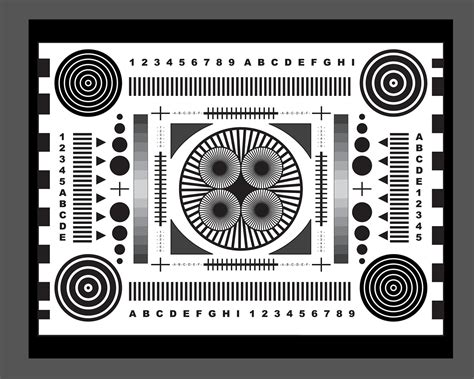
- Siemens Star Chart:
- Description: A circular pattern with converging black and white wedges, resembling a starburst.
- Purpose: Excellent for evaluating resolution, sharpness, and chromatic aberration, particularly in the center and corners of the frame. The point where the wedges merge together indicates the resolution limit.
- Pros: Provides detailed insight into lens performance, good for comparing multiple lenses.
- Cons: More complex to interpret for simple focus calibration.
- Multi-Target Charts (e.g., Focus Calibration Tool from LensAlign/SpyderLensCal clones):
- Description: These often combine a central focus target with multiple parallel and angled rulers or resolution charts. Some emulate the commercial tools.
- Purpose: Offer a more comprehensive test, allowing you to check focus accuracy and resolution simultaneously. They often include alignment aids.
- Pros: Very thorough, can provide a wealth of information.
- Cons: Can be more complex to set up and interpret if you're a beginner.
- Concentric Circle Charts:
- Description: Simple charts with circles expanding from a central point.
- Purpose: Useful for checking for uneven focus or field curvature, where the plane of focus isn't perfectly flat.
- Pros: Simple design.
- Cons: Limited in scope for detailed focus calibration.
- Simple Crosshair or Square Target Charts:
- Description: Just a basic, high-contrast crosshair or square.
- Purpose: Good for quick, informal focus tests, especially if you suspect a major focus issue. You simply focus on the target and examine the sharpness.
- Pros: Easiest to print and use.
- Cons: Lacks the precision for fine-tuning AFMA.
- Customizable Charts:
- Description: Some online tools allow you to generate a custom chart with specific patterns, sizes, or text.
- Purpose: Tailor the chart to your specific needs or the focal length of your lens.
- Pros: Highly flexible.
- Cons: Requires a bit more effort to generate.
My personal preference for diagnosing front/back focus and performing micro-adjustment is always the slanted ruler chart. It provides the clearest, most unambiguous visual feedback for that specific issue. For general sharpness and resolution, I might dabble with a Siemens star, but the angled ruler is my go-to for calibration.
Step-by-Step Guide: How to Use Your Printable Focus Chart

You've got your printable camera focus chart free in hand – fantastic! Now, let's walk through the exact steps to use it effectively. Precision is key here, so take your time with each stage. This isn't a race; it's about getting accurate data.
1. Print Your Chart:
- Quality Paper: Use good quality matte paper (not glossy, as reflections can interfere). Heavier paper (e.g., cardstock) is better as it prevents curling.
- Printer Settings: Print at 100% scale (no "fit to page"). Ensure your printer settings are for the highest quality.
- Flatness: Once printed, ensure the chart is perfectly flat. You can mount it on a sturdy piece of cardboard or foam board. I usually use spray adhesive to ensure it's perfectly smooth.
2. Set Up Your Shooting Environment:
- Stable Surface: Place your chart on a flat, stable surface.
- Lighting: Use even, consistent lighting. Natural daylight (indirect, not direct sun) is ideal. Avoid mixed lighting (e.g., window light mixed with artificial light) as it can affect white balance and contrast. Overcast days are perfect.
- Camera Support: Mount your camera on a sturdy tripod. This is absolutely critical to eliminate camera shake and ensure consistent positioning. My tripod saved me from countless calibration headaches; handheld tests are unreliable.
- Angle: This is the most crucial part for slanted charts. Position your camera so that the central target of the chart is perfectly parallel to your camera's sensor plane. The angled ruler should extend away from the camera at a 45-degree angle. Many charts have alignment marks or a small vertical target to help you get this right. Use a small spirit level on your camera's hot shoe to ensure it's level.
3. Camera and Lens Settings:
- Manual Mode (M): Set your camera to Manual mode.
- Aperture: Shoot wide open (e.g., f/1.4, f/1.8, f/2.8). This makes focus errors most visible due to the shallow depth of field.
- ISO: Keep ISO as low as possible (e.g., ISO 100 or 200) to minimize noise and maximize image quality.
- Shutter Speed: Adjust for proper exposure. Don't worry about it being too slow as you're on a tripod.
- White Balance: Set a custom white balance or use a preset like "Daylight" to ensure consistent color.
- Image Quality: Shoot in RAW format. This gives you the most flexibility for analysis without compression artifacts.
- Autofocus Mode: Use Single Shot AF (AF-S or One-Shot AF). This ensures the camera locks focus once.
- Focus Point: Use a single, central autofocus point. Aim it precisely at the designated focus target on the chart.
- Image Stabilization (VR/IS/OS): Turn off any in-lens or in-body image stabilization. It can sometimes introduce slight shifts during a static test.
- Live View (Optional but Recommended): Use Live View for precise focusing and to check your setup.
4. Determine Shooting Distance:
- Rule of Thumb: Your shooting distance should be approximately 25-50 times your lens's focal length. For example, with a 50mm lens, shoot from 1.25m to 2.5m (approx. 4-8 feet).
- Important: Do not shoot at the minimum focusing distance. This can introduce optical aberrations that skew results.
5. Take Your Shots:
- Focus and Recompose? No! Focus directly on the target without recomposing.
- Multiple Shots: Take at least 3-5 shots for each test. Autofocus systems can have slight variations between shots, and averaging helps ensure accuracy.
- Refocus Between Shots: After each shot, slightly defocus the lens (e.g., by turning the focus ring or focusing on something much closer/further away), then refocus on the chart. This ensures the AF system is re-engaging fully.
6. Analyze Your Results:
- Transfer to Computer: Load your RAW images onto your computer.
- Zoom In: Open the images in your preferred image viewer or editing software (e.g., Lightroom, Capture One, Photoshop). Zoom in to 100% (or even 200%) on the area around the focus target and the angled ruler.
- Identify Sharpest Point: Look for the point on the ruler that exhibits the crispest detail.
- If the sharpest point is *on* the target, your lens is perfectly calibrated. Bravo!
- If the sharpest point is *in front* of the target (closer to the camera), you have a front-focus issue.
- If the sharpest point is *behind* the target (further from the camera), you have a back-focus issue.
- Record Results: Note down the amount of front or back focus for each lens.
7. Apply Micro-Adjustment (AFMA/AF Fine Tune):
- Camera Menu: Go into your camera's menu. Look for settings like "AF Microadjustment," "AF Fine Tune," "AF Adjustment," or similar.
- Adjust Value: Adjust the value based on your findings. A positive value (e.g., +5, +10) generally shifts the focus *backward* (to correct front focus). A negative value (e.g., -5, -10) generally shifts the focus *forward* (to correct back focus). The exact numerical correlation varies by camera model.
- Iterate: Apply a small adjustment (e.g., +5 or -5), then repeat the entire shooting and analysis process. It's an iterative process. Keep fine-tuning until the sharpest point consistently falls on your target. This might take several rounds, so be patient. I remember spending a solid hour calibrating my 85mm lens, but the results were absolutely worth it.
By following these steps meticulously, you'll be well on your way to perfectly calibrated lenses and consistently sharp images!
Beyond the Basics: Advanced Calibration Techniques

Once you've mastered the fundamental use of your printable camera focus chart free for basic front/back focus, you might be ready to explore more advanced calibration techniques. These methods dive deeper into lens performance and help you truly optimize your gear for different shooting scenarios.
- Testing at Multiple Distances:
- Concept: Lens focus calibration can sometimes vary slightly at different subject distances. What's perfect at 2 meters might be subtly off at 5 meters or 1 meter.
- Technique: After calibrating at your standard distance (e.g., 25-50x focal length), repeat the test at both a closer distance (e.g., 10-15x focal length) and a further distance (e.g., 75-100x focal length).
- Analysis: If you notice consistent variations, you might need to find a "sweet spot" AFMA setting that offers the best compromise across your typical shooting range. Some advanced camera models even allow you to save different AFMA settings for different distances, though this is rare.
- Calibration for Zoom Lenses at Different Focal Lengths:
- Challenge: Zoom lenses can sometimes exhibit focus shifts across their focal range. A lens might be perfectly calibrated at 24mm but slightly front-focus at 70mm.
- Technique: For zoom lenses, perform calibration tests at both the wide and telephoto ends of the zoom range (e.g., 24mm and 70mm for a 24-70mm lens).
- Solution: Most cameras only allow one AFMA setting per lens. You'll need to choose an AFMA value that works best for the focal length you use most often, or find a compromise that provides acceptable sharpness across the entire zoom range. For critical work, some pros might use prime lenses or re-calibrate their zoom if they switch to a different primary focal length.
- Considering Focus Shift with Aperture:
- Concept: Some lenses, particularly older designs or those with specific optical characteristics, can exhibit "focus shift" – where the actual point of sharpest focus moves slightly as you change the aperture.
- Technique: Perform focus chart tests at your wide-open aperture (as usual), but then also test at f/4, f/5.6, or f/8.
- Analysis: If you notice a significant shift in focus, it's a characteristic of that specific lens. You'll need to decide which aperture you use most often and calibrate for that, or understand that you might need to manually compensate when shooting at other apertures. This is a common phenomenon with certain high-quality prime lenses designed for maximum sharpness at wide apertures.
- Testing with Different AF Points:
- Concept: While the central AF point is generally the most accurate, peripheral AF points can sometimes be less precise, especially in lower light or with less contrast.
- Technique: After calibrating with the central point, try testing with some of your camera's off-center AF points, focusing on the target.
- Analysis: This can help you understand the consistency of your camera's AF system across the frame. If a particular off-center point is consistently mis-focusing, it might indicate a more serious camera body issue requiring professional service, or simply a limitation to be aware of.
- Environmental Factors:
- Concept: Extreme temperatures or humidity can sometimes affect lens performance, including focus.
- Technique: If you shoot in varied climates, consider periodically checking your calibration in different conditions (within reasonable limits).
- Hypothetical Scenario: I once had a lens that seemed perfectly fine indoors, but when I took it out for a winter shoot in freezing temperatures, my images started appearing slightly soft. A quick re-check with a printable camera focus chart free showed a minor back-focus issue that wasn't present in warmer conditions. It was a subtle shift, but enough to impact critical sharpness.
By incorporating these advanced techniques into your calibration routine, you're not just correcting basic errors; you're gaining a deeper, more nuanced understanding of your camera and lens combination, allowing you to extract every last bit of sharpness from your gear. It’s a journey of continuous improvement!
Troubleshooting Focus Issues: When Your Chart Isn't Enough
Sometimes, even after diligently using your printable camera focus chart free and micro-adjusting your lenses, you might still encounter frustrating focus issues. This is where the real detective work begins. It’s important to remember that a focus chart diagnoses *calibration* problems, but many other factors can lead to soft images.
Here’s a comprehensive look at common issues beyond calibration and how to troubleshoot them:
- User Error (It Happens to the Best of Us!):
- Problem: Mis-focusing on the wrong part of the subject, slight camera movement, or poor technique.
- Troubleshooting:
- Focus Point Placement: Are you consistently placing your AF point on the most critical part of your subject (e.g., the closest eye in a portrait)?
- Recomposing: If you focus and then recompose (move the camera to frame the shot), especially with wide apertures and close subjects, you can inadvertently shift the plane of focus. This is a classic rookie mistake I learned the hard way!
- Shutter Speed: Is your shutter speed fast enough to freeze motion and your own hand shake? (Rule of thumb: 1/focal length or faster for handheld).
- Breathing and Bracing: Are you breathing correctly and bracing yourself for stability?
- Solution: Practice, practice, practice! Consciously think about your focus point, use proper shooting stance, and experiment with faster shutter speeds.
- Low Contrast or Uniform Subjects:
- Problem: Autofocus systems struggle when there isn't enough contrast to lock onto.
- Troubleshooting:
- Find Edges: Try to focus on an area with high contrast or a distinct edge (e.g., an eyelash rather than a smooth cheek).
- AF Assist Lamp: Use your camera's AF assist lamp if available and appropriate for the situation.
- External Light Source: In very dim conditions, a small video light or even a phone flashlight can provide enough contrast for AF to lock.
- Solution: Be strategic about your focus point in challenging lighting.
- Insufficient Light:
- Problem: Autofocus performance degrades significantly in low light.
- Troubleshooting:
- Camera's AF Sensitivity: Check your camera's specifications for its low-light AF capabilities (often measured in EV).
- Brighter Lenses: Use lenses with wider apertures (f/2.8 or wider) as they let in more light for the AF sensor.
- Manual Focus: In extreme low light, sometimes manual focus with Live View magnification is the most reliable option.
- Subject Movement:
- Problem: If your subject is moving, single-shot AF (AF-S) won't track them.
- Troubleshooting:
- Continuous Autofocus (AF-C/AI Servo): Switch to your camera's continuous autofocus mode to track moving subjects.
- Burst Mode: Shoot in burst (continuous shooting) mode to increase your chances of getting a sharp shot.
- Predict Movement: Anticipate your subject's movement and pre-focus where they will be.
- Solution: Master your camera's AF tracking modes and practice with moving subjects.
- Dirty Lens Elements or Sensor:
- Problem: Smudges on the front or rear lens elements, or dust on your camera's sensor, can cause overall softness or hazy images, which might be mistaken for focus issues.
- Troubleshooting:
- Inspect Lens: Hold your lens up to a light source and look for fingerprints, dust, or smudges.
- Sensor Check: Stop down your aperture (e.g., f/16 or f/22), shoot a plain white wall, and examine the image for dark spots.
- Solution: Clean your lens elements carefully with a micro-fiber cloth and lens cleaning solution. Clean your sensor (or have it professionally cleaned).
- Lens Decentering:
- Problem: A severe physical misalignment of the lens elements, usually due to a drop or manufacturing defect. This results in one side or corner of the image being consistently softer than the others, even when the center is sharp.
- Troubleshooting:
- Test Chart at Edges: Use a grid or Siemens star chart and place it squarely in the frame, then examine sharpness across the entire image, especially the corners.
- Solution: This requires professional repair by the manufacturer or a qualified lens technician. A printable camera focus chart free can help you diagnose it, but not fix it.
- Camera Body Issues:
- Problem: Less common, but sometimes the camera body itself can have issues with its autofocus sensor or mirror alignment (in DSLRs).
- Troubleshooting:
- Test with Multiple Lenses: If multiple lenses exhibit similar, uncorrectable focus issues on one body, but perform fine on another body, the camera body is likely the culprit.
- Solution: Professional camera service is required.
- Vibrations:
- Problem: Even on a tripod, ground vibrations (e.g., passing cars, heavy footfalls) can introduce blur.
- Troubleshooting:
- Stable Ground: Ensure your tripod is on solid ground.
- Remote Release/Timer: Use a remote shutter release or the 2-second timer to avoid touching the camera during exposure.
- Mirror Lock-Up: For DSLRs, use mirror lock-up to reduce vibrations from the mirror slapping up.
- Solution: Isolate your camera from vibrations.
By systematically working through these potential issues, you can pinpoint the root cause of your focus problems and get back to capturing truly sharp images. It's a journey of learning and refining your technical skills!
DIY vs. Professional Charts: Making the Most of Free Resources

The beauty of a printable camera focus chart free is, well, its price tag! But how do these free, DIY options stack up against the professional, often expensive, calibration tools on the market? And how can you maximize the effectiveness of your free resources?
Let's break it down:
- DIY Printable Charts (The Free Option):
- Pros:
- Cost-Effective: Absolutely free to download and print. You can print as many as you need.
- Accessibility: Instantly available online. No shipping, no waiting.
- Variety: Many different designs available (slanted ruler, grid, Siemens star), allowing you to choose the best one for your specific test.
- Educational: Forces you to understand the principles of focus calibration.
- Cons:
- Precision Depends on Printing: Quality of your printer, paper, and how flat you mount it directly impacts accuracy. Creases or uneven mounting can skew results.
- Durability: Paper charts are fragile and can easily get damaged, requiring reprinting.
- Setup Can Be Tricky: Getting the exact 45-degree angle and perfect alignment can be fiddly without built-in guides or stands.
- Less Robust: Not designed for heavy, repeated use or transport like professional tools.
- Maximizing Free Charts:
- Use High-Quality Matte Paper: Avoid glossy paper to prevent reflections. Heavy cardstock is ideal.
- Mount Flat: Spray adhesive or tape the chart perfectly flat onto a rigid surface like foam board or thick cardboard. This is crucial for accuracy. I learned this the hard way when a slightly warped chart gave me inconsistent readings.
- Laminate (Carefully): If you want more durability, you can laminate it, but ensure no reflections are introduced. A matte laminate finish is best.
- Create a Stand: Fashion a simple stand from cardboard or wood to hold the chart at the precise 45-degree angle. Some online charts even provide cutout templates for simple stands.
- Consistent Lighting: Always use even, diffused lighting to avoid hot spots or shadows that can interfere with AF.
- Professional Calibration Tools (e.g., LensAlign, SpyderLensCal, Reikan FoCal):
- Pros:
- Precision: Designed for extreme accuracy with built-in alignment guides, sturdy construction, and often specific angles.
- Durability: Made from robust materials, designed for repeated use.
- Ease of Setup: Often come with integrated stands and levels, making setup quicker and more reliable.
- Software Integration (for some): Tools like Reikan FoCal automate the calibration process with software that analyzes multiple shots and suggests optimal AFMA values. This is a huge time-saver for pros with many lenses.
- Cons:
- Expensive: Can range from $50-$300+ for hardware tools, and even more for software solutions.
- Less Flexible: You're