Remember that feeling of opening a brightly wrapped gift, the anticipation bubbling up inside you? That’s exactly how I feel every single time I unwrap a freshly dyed, rinsed, and dried tie-dye creation. It’s a moment of pure magic, a vibrant reveal that never gets old. For years, I chased that feeling, starting with muddy brown mistakes and ending with kaleidoscopic masterpieces. I once spent an entire summer trying to perfect the spiral pattern, convinced I was doing something wrong because my first few attempts looked more like abstract blobs than defined swirls. It turns out, all I needed were clear, concise instructions – the kind you can print out and refer to without fear of missing a crucial step.
You’re here because you crave that same magic, that creative outlet, or perhaps you just want to transform a plain white tee into a wearable work of art. Maybe you’re planning a fun family activity, a summer camp craft, or looking to add some unique flair to your wardrobe without breaking the bank. Whatever your motivation, you’ve landed in the right place. This isn't just a collection of "tie dye instructions printable"; it's your comprehensive, empathetic guide to navigating the wonderful, colorful world of tie-dye. We’re going to cover everything from the absolute basics for first-timers to advanced techniques for seasoned dyers, ensuring you have all the tools, tips, and confidence to create stunning results. I’ve poured years of personal experience, countless hours of experimentation, and a whole lot of colorful passion into this guide, so trust me, you’re in for a treat. Let’s unravel the secrets of vibrant, lasting tie-dye together!
---
Table of Contents

- [The Absolute Beginner's Blueprint: Your First Dip into Tie-Dye](#the-absolute-beginners-blueprint-your-first-dip-into-tie-dye)
- [Unlocking the Rainbow: Essential Supplies & Safety Smarts](#unlocking-the-rainbow-essential-supplies--safety-smarts)
- [Mastering the Folds: Classic Patterns & How-To Guides](#mastering-the-folds-classic-patterns--how-to-guides)
- [Beyond the Basics: Advanced Techniques & Creative Twists](#beyond-the-basics-advanced-techniques--creative-twists)
- [Crafting Color Magic: Dye Mixing & Application Secrets](#crafting-color-magic-dye-mixing--application-secrets)
- [Troubleshooting & Triumphs: Fixing Fades and Flaws](#troubleshooting--triumphs-fixing-fades-and-flaws)
- [Tie-Dyeing for Tiny Hands: Kid-Friendly Projects & Tips](#tie-dyeing-for-tiny-hands-kid-friendly-projects--tips)
- [The Art of Wearable Art: Fabric Choices & Pre-Treatment Prowess](#the-art-of-wearable-art-fabric-choices--pre-treatment-prowess)
- [Making it Last: Post-Dye Care & Longevity Hacks](#making-it-last-post-dye-care--longevity-hacks)
- [Your Printable Tie-Dye Toolkit: Resources & Templates](#your-printable-tie-dye-toolkit-resources--templates)
- [How to Choose the Best Tie-Dye Approach for Your Needs](#how-to-choose-the-best-tie-dye-approach-for-your-needs)
- [Common Pitfalls to Avoid in Tie-Dyeing](#common-pitfalls-to-avoid-in-tie-dyeing)
- [Advanced Tips for Tie-Dye Experts & Innovators](#advanced-tips-for-tie-dye-experts--innovators)
- [Embrace the Swirl: Your Tie-Dye Journey Starts Now!](#embrace-the-swirl-your-tie-dye-journey-starts-now)
---
The Absolute Beginner's Blueprint: Your First Dip into Tie-Dye
Welcome, future tie-dye enthusiast! If you’re reading this, you’re probably itching to start your colorful journey but might feel a little overwhelmed. Trust me, we’ve all been there. My very first tie-dye project was a complete disaster – a murky brown shirt that looked like it had been dragged through a swamp. But don’t worry, with these clear, step-by-step tie dye instructions printable, your first experience will be a triumph, not a tragedy! This section is designed to hold your hand through the very basics, ensuring your inaugural tie-dye endeavor is a joyful success.
1. Understand the "Why": The Magic of Fiber Reactive Dyes: Before we even touch a bottle, it’s helpful to know *why* tie-dye works. Most vibrant tie-dye uses fiber reactive dyes, which chemically bond with natural fibers like cotton. This means the color becomes part of the fabric, not just sitting on top, leading to brilliant, wash-fast results. This is key to achieving those vivid, long-lasting colors we all love.
2. Gather Your Gear (The Starter Pack): You don't need a professional studio to start. For your first project, focus on the essentials:
- A white 100% cotton T-shirt (pre-washed)
- A tie-dye kit (they usually come with dyes, rubber bands, gloves, and soda ash)
- Plastic squeeze bottles (if not in the kit)
- Plastic sheeting or a large garbage bag to protect your workspace
- Rubber gloves (non-negotiable!)
- Old clothes or an apron
- A bucket or tub for rinsing
- Plastic wrap or zip-top bags for curing
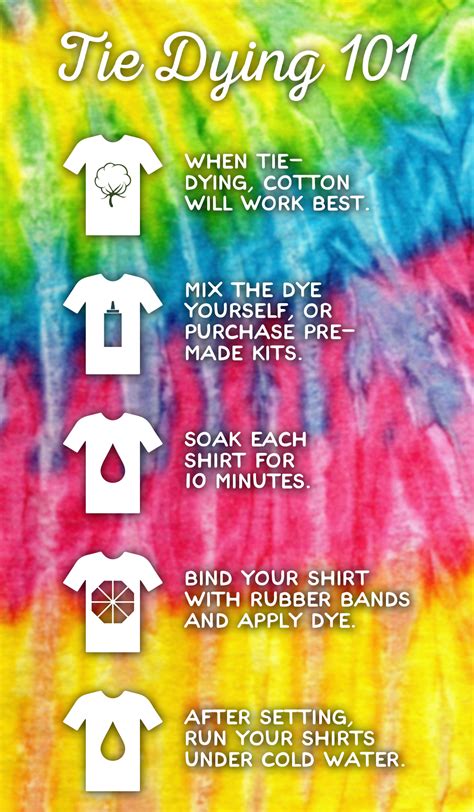
3. Pre-Wash Your Fabric – Don't Skip This! This step is crucial. Wash your cotton item without fabric softener. Fabric softener can create a barrier that prevents the dye from properly bonding. This ensures your fabric is clean and ready to absorb dye. I learned this the hard way when a batch of shirts came out patchy – turns out, I’d used a new fabric softener!
4. Prepare Your Workspace: Protection is Key: Tie-dye is messy – gloriously messy! Lay down plastic sheeting or garbage bags generously over your work surface. If you're working outdoors, this is still important to protect patios or grass from dye spills. This is where those printable tie dye instructions really shine, as you can tick off each setup step.
5. Mix Your Dyes (Carefully!): Follow the instructions on your tie-dye kit for mixing powdered dyes with water. Usually, it involves adding water to the squeeze bottles and shaking well. Make sure the powder is fully dissolved. Wear your gloves!
6. Pre-Soak in Soda Ash (The Secret Sauce): If your kit includes soda ash (sodium carbonate), dissolve it in warm water according to the instructions. Submerge your pre-washed fabric in this solution for 15-20 minutes. This raises the pH of the fabric, allowing the fiber reactive dyes to bond properly. Wring out the excess water so the fabric is damp, not dripping. This is a game-changer for color vibrancy.
7. Choose a Simple Pattern (The Scrunch or Crumple): For your first project, the scrunch or crumple pattern is incredibly forgiving and always looks fantastic. Lay your damp shirt flat, then simply scrunch it up from all directions into a tight, irregular ball. Secure it with 2-4 rubber bands, crisscrossing them over the ball. It’s like creating a colorful abstract cloud!
8. Apply Your Dyes: Less is More (Initially): Place your rubber-banded fabric on a wire rack over a protected surface. Apply your dyes, squeezing them onto different sections of the scrunched fabric. Don't over-saturate to avoid muddying colors, especially on your first try. Aim for distinct areas of color. For example, if you're using three colors, try applying one color to one-third of the scrunched fabric, another to the next third, and so on.
9. Wrap and Wait (The Curing Process): Once dyed, carefully place your fabric in a plastic zip-top bag or wrap it tightly in plastic wrap. This keeps it damp and allows the dye to react with the fibers over time. Let it sit for at least 6-8 hours, or even better, 24 hours for the most vibrant results. Patience is a virtue in tie-dye!
10. The Grand Reveal: Rinse, Rinse, Rinse! Still wearing gloves, take your item out of the plastic. Rinse it under cold running water, keeping the rubber bands on, until the water runs mostly clear. Then, remove the rubber bands and continue rinsing under warm water until no more dye washes out. This is my favorite part – watching the patterns emerge is pure joy!
11. Final Wash and Dry: Wash your tie-dyed item in a washing machine on a cold cycle with a small amount of detergent, *separately* from other laundry for the first few washes. Tumble dry on low or hang to dry.
12. Admire Your Masterpiece! You did it! Your first tie-dye creation. Wear it with pride, knowing you made it yourself. This initial experience is all about building confidence and understanding the basic flow, and these tie dye instructions printable are designed to be your steadfast companion.
Unlocking the Rainbow: Essential Supplies & Safety Smarts

To truly dive into the world of tie-dye, having the right arsenal of supplies and a solid understanding of safety protocols is paramount. Think of it as preparing your artist's studio – you need the right tools and a safe environment to let your creativity flourish. Many beginners underestimate the impact of proper supplies, leading to frustration. I distinctly remember trying to use cheap art gloves that tore instantly, leaving my hands stained for days. Learn from my mistakes! This section details everything you’ll need and how to keep yourself and your workspace safe.
1. High-Quality Fiber Reactive Dyes: This is the heart of your tie-dye. Don't skimp here. Procion MX fiber reactive dyes are the gold standard for cotton, rayon, hemp, and other plant-based fibers. They produce brilliant, permanent colors. Kits are great for beginners, but buying individual colors in bulk is more cost-effective for frequent dyers.
2. Squeeze Bottles with Good Nozzles: These are essential for precise dye application. Look for bottles with fine-tipped nozzles for detailed work and wider tips for broader coverage. Having multiple bottles for different colors is key.
3. Soda Ash (Sodium Carbonate): As mentioned, this is vital for setting fiber reactive dyes. It chemically prepares the fabric to accept and bond with the dye. You can buy it separately in larger quantities once your kit runs out.
4. Urea (Optional, but Recommended for Pros): Urea helps dissolve dye powder and keeps the dye solution moist longer, allowing for better dye absorption and more vibrant colors, especially in drier climates. It’s a game-changer for advanced dyers.
5. Detergent (Synthrapol or Dharma Professional Textile Detergent): This specialized detergent helps wash out loose, unbonded dye particles after dyeing without stripping the bonded dye. It's much more effective than regular laundry detergent for the initial rinses. I started using Synthrapol after noticing my colors were bleeding more than I liked, and it made a huge difference.
6. Rubber Bands, String, or Sinew: For creating your patterns. Rubber bands are easiest for beginners. Sinew (artificial sinew) is great for creating extremely tight resists and intricate patterns, often used in professional tie-dye or shibori. String can also be used for specific folding techniques.
7. Protective Gear: Gloves and Apron/Old Clothes:
- Gloves: Always wear nitrile or heavy-duty rubber gloves. Thin latex gloves often tear. Dye can stain skin for days, and repeated exposure can be irritating.
- Apron/Old Clothes: Wear clothes you don’t mind getting stained. Even tiny splashes can be permanent.
8. Workspace Protection: Plastic Sheeting/Tarps: Cover your entire work area with plastic sheeting, tarps, or large garbage bags. This protects tables, floors, and anything else from dye spills.
9. Rinsing Station: Buckets, Tubs, or an Outdoor Hose: A dedicated rinsing area is crucial. An old utility sink, a large bucket, or an outdoor space with a hose are ideal. Avoid rinsing in your kitchen sink initially, as concentrated dye can stain.
10. Dye Racks/Grids: A wire baking rack placed over a plastic tub or bucket is perfect for keeping your fabric elevated during dyeing, allowing excess dye to drip away and preventing muddy colors.
11. Plastic Wrap or Zip-Top Bags: For wrapping your dyed items during the curing process. This maintains moisture, which is essential for the dye to react properly.
12. Measuring Tools: Measuring spoons and cups are helpful for accurately mixing dye powders and soda ash solutions, ensuring consistent results.
13. Safety Smarts – Your Personal Protection Plan:
- Ventilation: Work in a well-ventilated area, especially when mixing powdered dyes. Consider wearing a dust mask if you're sensitive to powders.
- Eye Protection: Safety goggles are a good idea, especially when pouring or mixing chemicals.
- No Food/Drink: Keep food and beverages away from your workspace to prevent accidental ingestion of dyes.
- Clean Up Spills Immediately: Wipe up any dye spills with paper towels and an all-purpose cleaner. The longer dye sits, the harder it is to remove.
- Keep Away from Pets & Children: Store dyes and chemicals out of reach of curious hands and paws.
- Read Instructions: Always read the specific safety instructions on your dye kit or individual dye packages. Different dyes may have different precautions.
By investing in quality supplies and prioritizing safety, you're setting yourself up for a much more enjoyable and successful tie-dye experience. These tie dye instructions printable will help you check off each item on your list, ensuring you’re ready for the colorful adventure ahead!
Mastering the Folds: Classic Patterns & How-To Guides
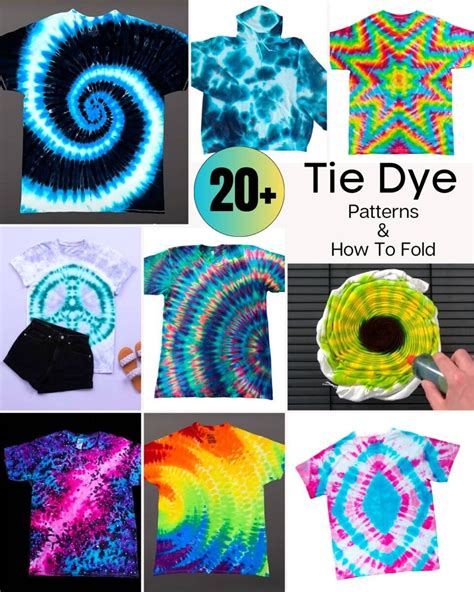
This is where the real artistry begins! The magic of tie-dye isn't just in the colors, but in how you manipulate the fabric to create patterns. By folding, twisting, and binding, you create "resists" that prevent dye from reaching certain areas, forming intricate designs. For beginners, choosing a classic pattern is like learning the fundamental chords on a guitar – once you master them, you can build anything. Here are some staple patterns, complete with easy-to-follow tie dye instructions printable. I remember the thrill of finally getting a perfect spiral; it felt like I'd unlocked a secret code!
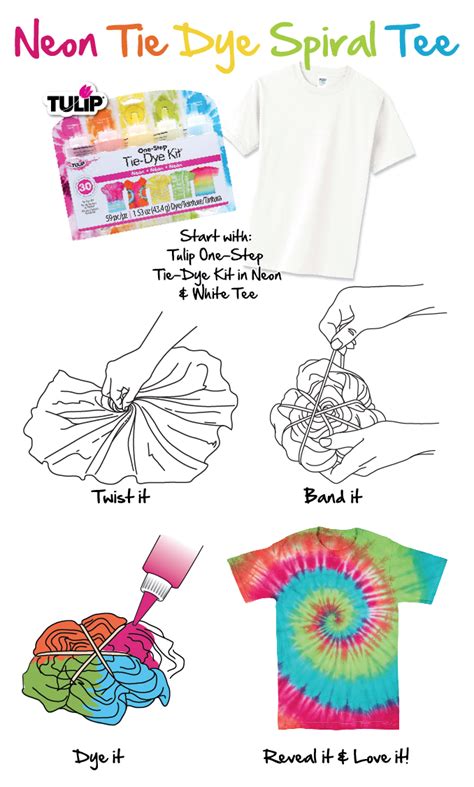
1. The Classic Spiral (The Iconic Swirl):
- How-To: Lay your damp, pre-treated fabric flat. Pinch the fabric at the center (or slightly off-center for a different look). Twist the fabric clockwise (or counter-clockwise) around that pinch point, creating a flat spiral. Keep twisting until the entire fabric is a flat disc.
- Bind: Secure the spiral with 3-4 rubber bands, crisscrossing them over the center to divide the disc into pie-like wedges. The more bands, the more defined the white lines.
- Dye: Apply different colors to each wedge. For example, use red, orange, yellow, and green in alternating sections.
- My Tip: For a super tight spiral, after pinching, use a fork to twist the fabric. It makes it easier to keep the layers flat.
2. The Scrunch/Crumple (Organic & Easy):
- How-To: Lay your damp fabric flat. Simply gather, scrunch, and crumple the fabric from all directions into a tight, irregular ball. Don't overthink it!
- Bind: Secure the crumpled ball with 2-4 rubber bands, wrapping them around in various directions. The looser the scrunch, the more white space.
- Dye: Apply colors randomly over the entire ball, ensuring some dye gets into the folds. This is the most forgiving pattern for beginners.
- My Scenario: This is my go-to when I want a quick, beautiful result without fuss. I once made a batch of scrunch-dyed bandanas for a last-minute outdoor event, and they were a huge hit!
3. The Bullseye (Target Effect):
- How-To: Lay your damp fabric flat. Pinch the fabric where you want the center of your bullseye. Pull it straight up, forming a cone.
- Bind: Starting 1-2 inches below the pinched top, wrap a rubber band tightly around the cone. Continue wrapping rubber bands at even intervals down the cone, creating distinct sections.
- Dye: Apply your darkest color to the very top (the pinched point). Then, apply progressively lighter colors to each subsequent section down the cone.
- My Tip: For a really crisp bullseye, make sure your rubber bands are super tight and evenly spaced.
4. Stripes (Horizontal, Vertical, Diagonal):
- How-To:
- Horizontal: Pleat your damp fabric like an accordion, folding it back and forth horizontally.
- Vertical: Pleat your fabric vertically.
- Diagonal: Lay your fabric diagonally across your workspace and pleat it from one corner to the opposite.
- Bind: Once pleated, secure the fabric tightly with rubber bands at even intervals along the length of the pleats.
- Dye: Apply different colors to the sections between the rubber bands.
- My Scenario: My daughter wanted a rainbow stripe shirt for Pride. We used the horizontal pleat method, and the defined lines were exactly what she envisioned. It was so satisfying to see her wear it!
5. The Accordion Fan (Concentric Circles/Ripples):
- How-To: Lay your damp fabric flat. Fold it like an accordion, either vertically or horizontally. Once pleated, fold the entire pleated strip in half, then in half again, creating a small, square or rectangular packet.
- Bind: Secure the packet tightly with several rubber bands, crisscrossing them.
- Dye: Apply dye to the edges and corners of the packet. The dye will seep into the folds, creating concentric shapes.
6. The Rosette/Flower (Small, Concentrated Circles):
- How-To: Pinch small sections of fabric randomly across your damp item. Pull each pinch up, then wrap a rubber band tightly around the base of the pinch to create a small "bud."
- Bind: Continue creating multiple small buds across the fabric.
- Dye: Apply a different color to the top of each bud, and then a background color to the rest of the fabric.
- My Tip: This is fantastic for adding small pops of color or creating a "polka dot" effect.
7. Heart Shape:
- How-To: Lay your damp shirt flat. Fold it in half vertically. Draw half a heart shape on one side of the folded shirt with a washable marker.
- Bind: Accordion-fold the fabric along the drawn line. Once folded, use string or rubber bands to tightly bind along the heart shape. Bind around the entire shape, pushing the fabric around the heart tightly.
- Dye: Apply dye to the heart shape and a contrasting color to the rest of the shirt.
8. V-Shape:
- How-To: Lay your damp shirt flat. Pinch the center of the shirt near the bottom hem and pull it up. Smooth out the fabric on either side, creating a V-shape.
- Bind: Wrap rubber bands tightly horizontally across the V, starting near the bottom and moving upwards.
- Dye: Apply dye to the V-shaped sections, perhaps different colors for each band, and a background color for the rest.
9. Spider:
- How-To: Lay your damp fabric flat. Pinch the fabric at the center and pull it up to form a peak. Then, smooth out the fabric underneath, creating 4-6 "legs" radiating from the center.
- Bind: Wrap rubber bands tightly around each "leg" at intervals.
- Dye: Apply a dark color to the center peak, and lighter colors along the "legs."
10. Mandala (Complex Symmetrical Design):
- How-To: This is an advanced version of the spiral. Lay your damp fabric flat. Accordion-fold it vertically from bottom to top. Then, starting from the center of this folded strip, accordion-fold it again, creating a square or rectangle.
- Bind: Secure this packet with multiple rubber bands, creating a grid.
- Dye: Apply different colors to each small section of the grid.
- My Tip: This one requires precision and patience, but the results are stunningly intricate.
11. Checkerboard (Grid Pattern):
- How-To: Lay your damp fabric flat. Accordion-fold it horizontally, then accordion-fold it again vertically, creating a perfect square grid.
- Bind: Secure the entire grid with rubber bands, creating a tight checkerboard pattern.
- Dye: Apply alternating colors to the exposed squares of the grid.
12. Clover:
- How-To: Lay your damp fabric flat. Pinch four points that will form the "leaves" of your clover. Gather each point into a small bundle.
- Bind: Secure each bundle with a rubber band close to the base, forming four distinct mini-bullseyes or "leaves."
- Dye: Apply green dye to the bundles and a contrasting background color.
Each of these patterns offers a unique way to approach tie-dye, and having these tie dye instructions printable at hand will make practicing and mastering them a breeze. Don't be afraid to experiment and combine different techniques!
Beyond the Basics: Advanced Techniques & Creative Twists
Once you've mastered the classic folds, the world of advanced tie-dye opens up, offering even more intricate, sophisticated, and surprising results. These techniques often involve different dye application methods or fabric preparation, pushing the boundaries of what you thought was possible. When I first tried ice dyeing, I was skeptical, but the organic, watercolor-like effects blew me away. It's truly a next-level experience for those looking to expand their skills beyond basic tie dye instructions printable.
1. Ice Dyeing (Organic & Ethereal):
- Concept: Instead of liquid dye, powdered dye is sprinkled over ice cubes, which slowly melt, carrying the dye into the fabric in unpredictable, beautiful ways.
- How-To: Pre-treat your fabric with soda ash and wring it out (it can be damp or dry). Scrunch or fold your fabric onto a wire rack placed over a tub. Cover the fabric completely with ice cubes. Sprinkle powdered fiber reactive dye directly onto the ice. Let it melt completely (this can take hours or overnight).
- Results: Produces unique, watercolor-like effects, often with color splitting (where primary colors separate from a mixed dye).
- My Scenario: I once transformed a plain white denim jacket with ice dye, and it looked like a piece of abstract art. People constantly ask where I bought it!
2. Reverse Tie-Dye (Bleach Tie-Dye):
- Concept: Instead of adding color, you remove it from already dyed fabric using a decolorizing agent (typically bleach).
- How-To: Take a dark-colored (100% cotton) item. Fold and bind it as you would for traditional tie-dye. Apply a diluted bleach solution (e.g., 1 part bleach to 1-2 parts water) to the bound areas. Watch carefully as the color lifts. Once desired lightness is achieved, rinse thoroughly to stop the bleaching process, then neutralize with a bleach stop solution (e.g., hydrogen peroxide in water).
- Safety: Always work in a well-ventilated area, wear heavy-duty gloves and eye protection. Bleach is corrosive.
- Results: Creates striking patterns in lighter shades against a darker background.
3. Low Water Immersion (LWI) Dyeing (Subtle & Mottled):
- Concept: Fabric is dyed in a minimal amount of water, often with the addition of urea, allowing the dye to migrate unevenly, creating mottled, painterly effects.
- How-To: Pre-soak fabric in soda ash. Wring out excess water, but leave it quite damp. Place fabric (scrunched, folded, or loose) into a container with just enough water to wet it, but not enough for it to float freely. Sprinkle powdered dye over the fabric, then gently push it into the water. Let it sit for 24 hours.
- Results: Produces soft, blended, and sometimes unpredictable watercolor effects.
4. Ombré or Dip Dyeing (Gradual Color Transitions):
- Concept: Creating a gradual transition of color from light to dark or from one color to another.
- How-To: Prepare a dye bath in a tall container. Dip part of your fabric into the dye, hold for a few minutes. Then, dip a larger section, holding for a shorter time. Continue gradually dipping more of the fabric for progressively shorter times, creating a gradient. Or, you can dip the fabric into one color, let it dry partially, then dip the opposite end into a different color, allowing them to blend in the middle.
- My Tip: This works beautifully on long scarves, dresses, or tapestries. The trick is patience and consistent dipping.
5. Shibori-Inspired Techniques (Japanese Art of Resist Dyeing):
- Concept: A range of Japanese resist-dyeing techniques involving folding, twisting, pleating, and compressing fabric, often with boards, clamps, or stitching, to create geometric or organic patterns.
- How-To: Instead of just rubber bands, explore using clamps, wooden blocks, or stitching techniques to create precise resists. For example, "Itajime" shibori involves folding fabric like an accordion and clamping it between two pieces of wood.
- Results: Elegant, often indigo-dyed patterns that are more structured than typical tie-dye.
- My Scenario: I experimented with Itajime shibori for a set of linen napkins, and the crisp, geometric patterns elevated our dinner table instantly.
6. Stencils and Resist Pastes:
- Concept: Using stencils or a resist paste (like gutta or wax for batik) to block dye from reaching certain areas, creating defined images or patterns.
- How-To: Apply a resist paste or use a stencil to paint a design onto your fabric. Let it dry completely. Then, dye the fabric as usual. The resist will prevent dye penetration. After dyeing and rinsing, remove the resist (e.g., by washing out gutta or melting wax).
7. Geode Tie-Dye:
- Concept: Creates concentric rings resembling a crystal geode.
- How-To: Lay fabric flat. Pinch a small point and pull it up. Wrap string tightly around the base of the pinch, then continue wrapping string in concentric circles outwards, creating ridges.
- Dye: Apply dye to the center and between the string lines.
8. Sinew Resist:
- Concept: Using artificial sinew, a very strong, thin waxed thread, to create extremely tight binds for super crisp, fine lines.
- How-To: After folding and pinching, instead of rubber bands, wrap sinew incredibly tightly around the fabric. Pull it snug!
- Results: Creates very delicate, almost needle-like white lines. This is a favorite among professional dyers.
9. Color Blending & Layering:
- Concept: Applying multiple colors to the same area or dyeing in stages to create complex color mixtures and overlays.
- How-To: For a vibrant blend, apply colors that are adjacent on the color wheel (e.g., blue and yellow to get green in the middle). For layering, dye an item one color, wash it, then re-tie and dye it with another color.
10. Hot Water Bath Dyeing (Solid Colors or Overdyeing):
- Concept: While not strictly "tie-dye," understanding hot water bath dyeing with fiber reactive dyes allows you to create solid base colors or overdye existing items before tie-dyeing, or for dyeing non-cellulose fibers (with different dyes).
- How-To: Use a large pot, hot water, soda ash, salt, and dye. Submerge fabric and stir constantly. This is less about patterns and more about saturating fabric evenly.
11. Discharge Dyeing with Thiox:
- Concept: Similar to bleach tie-dye, but using a non-bleach chemical agent (like sodium hydrosulfite, often sold as "Thiox") to remove color from fabric, creating a lighter pattern without the harshness of bleach.
- How-To: Bind fabric as desired. Apply a paste made from Thiox and water. Let it sit, then rinse and wash.
- Safety: Still requires ventilation and gloves, though less corrosive than bleach.
12. Screen Printing with Dye:
- Concept: Using fiber reactive dyes as a "paint" for screen printing, allowing for graphic designs alongside tie-dye patterns.
- How-To: Mix powdered dye with a print paste thickener. Apply through a screen printing stencil. Cure as usual.
- My Tip: I've seen artists combine screen-printed designs with a subtle ice-dye background, creating truly unique wearable art.
These advanced methods offer endless possibilities for creative expression. Don't be afraid to experiment! The beauty of tie-dye is that even "mistakes" can lead to