Hey there, fellow radio enthusiast! Or maybe you’re just starting out on this incredibly rewarding journey into the world of amateur radio. Either way, you’ve landed in the right place because you're looking for that crucial piece of gear that every ham operator, new or seasoned, absolutely needs: a reliable, easy-to-read printable US amateur radio bands chart.
Trust me, I’ve been there. Fumbling through online charts on a tiny phone screen during a field day, trying to remember which slice of the spectrum I could actually use. It’s like trying to navigate a dense forest without a map – confusing, frustrating, and potentially leading you off-track (or even into a forbidden zone!). That's why having a physical, printable reference sheet is a game-changer. It’s not just a convenience; it’s a vital tool for staying compliant, exploring new modes, and making the most of your radio adventures. Let's make sure you never miss a contact or accidentally stray into forbidden territory again!
The Essential Overview: Why a Printable Band Chart is Your Best Friend
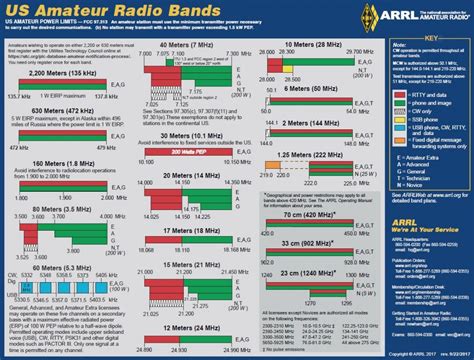
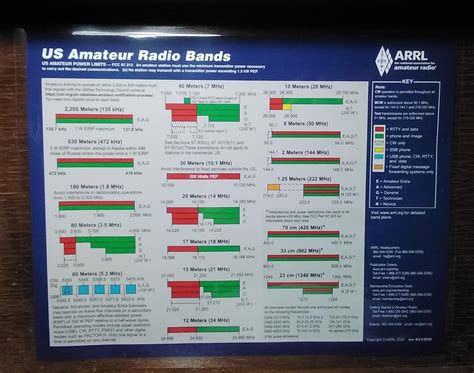
Think of your amateur radio license as a passport to the airwaves. But without a detailed map, that passport won't tell you where you can go! A printable US amateur radio bands chart is that map. It’s your quick-reference guide to what frequencies you can use, what modes are permitted, and which license class has access to which segments. Having it taped to your shack wall, laminated for field operations, or tucked into your go-bag is an absolute must.
- Immediate Access, Zero Distractions: No need to unlock your phone, find a signal, or battle pop-up ads. Just glance and go. I love having mine laminated right next to my rig; it’s the first thing I check.
- Compliance Made Easy: The FCC has specific rules. Knowing your band edges and permitted modes prevents accidental violations. This is crucial for avoiding QRM (interference) and staying within your privileges.
- Exploring New Horizons: See a frequency on your waterfall display and wonder what it is? Your chart tells you if it's voice, digital, or CW, opening up new possibilities.
- Field Operations MVP: When you're out camping or during an emergency activation, internet might be spotty or non-existent. A printed chart is pure gold.
- Learning & Memorization Aid: Regularly seeing the bands helps you internalize them over time, building your expertise organically.
- Troubleshooting Tool: If you're not getting out, checking the chart can quickly confirm you're on a commonly used frequency for your desired mode.
- Teaching & Mentoring: A great visual aid for explaining band privileges to new hams or curious friends. My favorite way to introduce beginners to the hobby is with this chart in hand!
HF Bands: Reaching Around the World (or Just Beyond Your Town)

The High Frequency (HF) bands are where the magic of long-distance communication, or DXing, really happens. These frequencies, from 1.8 MHz to 30 MHz, can carry your signals across continents and oceans, depending on atmospheric conditions and time of day. Having a detailed HF section on your printable US amateur radio bands chart is non-negotiable for chasing far-flung contacts.
- 160 Meters (1.8-2.0 MHz): The Top Band: Often called "Top Band," it's great for local communication at night and sometimes DX during winter nights. *I learned the hard way that this band is a total absorber of static during a summer thunderstorm – not ideal for clear comms!*
- 80 Meters (3.5-4.0 MHz): The Ragchew Band: A fantastic band for local to regional contacts, especially after dark. Known for friendly conversations, or "ragchews."
- 40 Meters (7.0-7.3 MHz): Day & Night Performer: A versatile band that works well for regional contacts during the day and extends to DX at night. It's often busy!
- 30 Meters (10.1-10.15 MHz): Digital & CW Only: A narrow, but reliable band strictly for Morse Code (CW) and digital modes like FT8. No voice allowed here.
- 20 Meters (14.0-14.35 MHz): DXer's Delight: Often considered the workhorse of DX, 20 meters is frequently open for worldwide contacts during daylight hours.
- 17 Meters (18.068-18.168 MHz): The "New" 20: Similar to 20 meters but often quieter, offering excellent DX opportunities when open.
- 15 Meters (21.0-21.45 MHz): Mid-Cycle Performer: Excellent for DX during the peak of the solar cycle, but can be quiet otherwise.
- 12 Meters (24.89-24.99 MHz): Quieter DX: Another fantastic, often less crowded band for DX, especially during solar peaks.
- 10 Meters (28.0-29.7 MHz): Solar Cycle Dependent: Can be a blast for worldwide DX during solar maximums, sometimes acting like a VHF band for local skip. When it's open, it's *wide* open!
VHF/UHF Bands: Your Local Lifeline & Beyond
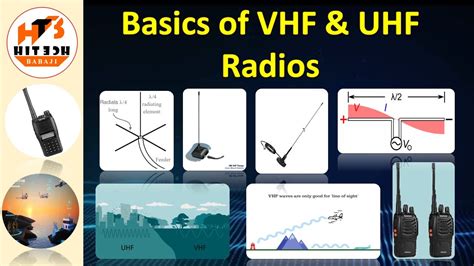
Very High Frequency (VHF) and Ultra High Frequency (UHF) bands (typically 50 MHz and above) are your bread and butter for local communications, emergency networks, and even exciting modes like satellite operations. These frequencies are less affected by atmospheric conditions than HF, making them reliable for shorter distances. Your printable US amateur radio bands chart should clearly delineate these segments.
- 6 Meters (50-54 MHz): The Magic Band: A fascinating band that sometimes acts like HF (with long-distance "skip") and sometimes like VHF. It's truly unpredictable and exciting.
- 2 Meters (144-148 MHz): The Community Hub: The most popular VHF band for local communications, repeaters, and emergency nets. *I've used this band countless times for public service events, from marathons to charity walks – it’s a lifesaver for coordination!*
- 1.25 Meters (222-225 MHz): The Underutilized Gem: Often less congested than 2 meters, this band offers similar capabilities for local communication.
- 70 CM (420-450 MHz): UHF Workhorse: Popular for repeaters, simplex, and even ATV (Amateur Television) and satellite communications. Excellent for shorter range, urban environments.
- Beyond 70 CM (902 MHz, 1.2 GHz, etc.): Microwave & Experimental: These higher bands are used for specialized, short-distance, high-bandwidth applications like digital data links, fast-scan TV, and weak-signal terrestrial work.
- Simplex vs. Repeater: Understand which frequencies are best for direct radio-to-radio (simplex) communication and which are primary repeater inputs/outputs.
- Emergency Communications (EmComm): Many VHF/UHF frequencies are designated for emergency and public service operations. Knowing these cold can save lives.
- Satellite Communications: Specific segments within VHF/UHF are used for amateur radio satellites, letting you talk to people across continents via orbiting relays.
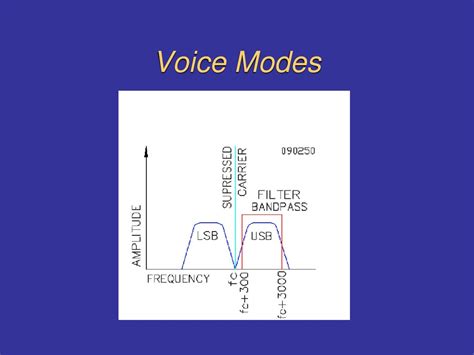
Beyond Voice: Digital Modes, CW, & Specialty Operations
Amateur radio isn't just about talking! A huge and growing part of the hobby involves digital modes, Morse Code (CW), and other fascinating ways to communicate. Your printable US amateur radio bands guide should highlight the segments dedicated to these specialized operations.
- Morse Code (CW): The Original Digital Mode: Still incredibly popular, CW uses dots and dashes. Specific segments on most HF bands are dedicated to CW, usually at the lower end of the band. *I find that knowing CW has saved me in situations of extreme noise where voice simply isn't an option – it's like a secret weapon!*
- FT8 & FT4: Weak-Signal Digital Powerhouses: These incredibly efficient digital modes allow for contacts with incredibly weak signals, often spanning continents with low power. You'll find them on most HF bands.
- PSK31, RTTY, JS8Call: Text-Based Chat: Other popular digital modes allow for keyboard-to-keyboard conversations over the air. Great for casual chats or passing message traffic.
- Slow Scan TV (SSTV) & Fast Scan TV (ATV): Pictures & Video: Yes, hams can send images and even full-motion video over the air, primarily on VHF/UHF and microwave bands.
- Packet Radio & Winlink: Data Transfer & Email: For reliable data transfer, especially useful for emergency communications, providing email-like services without internet.
- Amateur Satellites (OSCARs): Orbiting Repeaters: Specific frequencies (often VHF/UHF) are used to access amateur satellites, allowing for worldwide communication via space.
- Contesting & Special Event Operations: Specific band segments are often used for high-activity events like contests, where operators try to make as many contacts as possible.
Navigating the Rules: Common Sense & FCC Compliance
One of the most critical reasons for having a printable US amateur radio bands chart is to ensure you operate within the bounds of your license privileges and FCC regulations. Ignorance is not an excuse when it comes to radio operations. This section of your chart, or your understanding of it, is vital for maintaining good operating practices and avoiding trouble.
- License Class Privileges: Remember, Technician, General, and Amateur Extra licenses have progressively more band privileges. Your chart should visually represent what you can use. Don't be like me and accidentally transmit on an Extra-only segment (luckily, I quickly realized my mistake!).
- Power Limits: While your chart may not list power limits for every segment, it's crucial to remember that different bands and modes have different maximum power allowances. Always operate with the minimum power necessary.
- Band Edges are Sacred: Stay clear of the absolute edges of the band segments to avoid "splatter" (unwanted signals) outside your allotted frequencies. Give yourself a little buffer.
- Frequency Coordination: For repeaters and certain events, local frequency coordinators ensure efficient use of the spectrum. Check local guidelines.
- No Commercial Use: Amateur radio is strictly for non-commercial purposes. No business, no money, no broadcasting for profit.
- Identification (ID): You *must* identify your station with your call sign at the beginning and end of each contact and at least every 10 minutes during a transmission. This isn't just a rule; it's basic courtesy.
Pro Tips for Optimal Use: When & Where to Tune In
Having a printable US amateur radio bands chart is just the first step. Knowing how to *use* that information effectively is where the real fun begins. Understanding propagation, solar conditions, and local activity will drastically improve your operating experience.
- Solar Cycle Awareness: HF propagation is heavily influenced by the 11-year solar cycle. Higher bands (10m, 12m, 15m) thrive during solar maximums, while lower bands (80m, 160m) are more reliable during minimums.
- Time of Day Matters: HF bands behave differently during day and night. Lower frequencies (80m, 160m) are excellent at night for regional and DX contacts, while higher frequencies (10m, 15m, 20m) are better for daytime DX.
- Propagation Forecasts: Websites and apps like QRZ.com, HamSCI, and dedicated solar flux monitoring sites provide real-time propagation predictions. Use them to pick the best band for your desired contact!
- Listen, Listen, Listen: Before transmitting, listen to the band. Is it active? Are there strong signals? Is there a net going on? This is my favorite strategy because it saves me countless awkward interruptions!
- Antenna Matching: Ensure your antenna is resonant on the band you plan to operate on. A properly tuned antenna makes a world of difference for signal strength and preventing damage to your radio.
- QRM/QRN Management: Learn to identify and mitigate local noise (QRN) and interference from other stations (QRM). Sometimes, a simple frequency shift within the band is all you need.
- Join a Local Club: This is hands down the best way to learn about local repeater activity, band preferences in your area, and get real-world operating tips from experienced hams.
Tips for Maximizing Your Printable Bands Reference

Your printable US amateur radio bands chart isn't just static information; it's a living tool you can personalize and optimize for your operating style.
- Laminate It! Seriously, just do it. It protects against coffee spills, greasy fingers, and general shack wear and tear. A cheap laminator is one of the best investments you can make for your radio setup.
- Highlight Your Favorite Bands: Use a highlighter to mark the bands you use most often or those specific to your license class. This speeds up scanning significantly.
- Add Personal Notes: Write down local repeater frequencies, common net times, or specific frequencies for a club's digital net right on your chart. *I find this approach works best for small teams or specific group activities, like a weekly digital mode net.*
- Multiple Copies: Keep one by your primary rig, one in your go-bag, and maybe even a small, folded version in your wallet for quick reference anywhere.
- Digital Backup: While the point is *printable*, having a digital copy on your phone or tablet is a smart backup for when your paper copy isn't handy.
- Review Regularly: Especially as a new ham, regularly looking at the chart will help you internalize the band plan and build your confidence.
Common Pitfalls: What to AVOID When Using Amateur Radio Bands
Even with the best printable US amateur radio bands chart, there are common mistakes newcomers (and sometimes even seasoned operators!) can make. A little awareness goes a long way.
- Transmitting Outside Your Privileges: This is the big one. Accidentally transmitting on a band segment or with a mode not allowed by your license class can lead to an FCC warning or worse. Always double-check! Don't be like me and almost call CQ on 30 meters with voice (it's CW/digital only!).
- "Broadcasting" to the World: Amateur radio is about two-way communication. You're not a radio station meant for general public consumption. Avoid playing music, making general announcements without specific two-way intent, or conducting business.
- Interfering with Other Services: The band plan is designed to minimize interference. Transmitting on non-amateur frequencies (like public safety or commercial bands) is illegal and dangerous. Your printable chart is your guide away from this!
- Ignoring Band Plans: While the FCC grants broad privileges, "band plans" are voluntary agreements among hams to organize activities within the larger band segments (e.g., specific frequencies for CW, SSB, digital). Ignoring these can lead to QRM and annoyed fellow hams.
- Over-powering: Using too much power for the conditions or your antenna can cause splatter and unnecessary interference. Always use the minimum power needed to make the contact.
- Failing to Identify: Not giving your call sign is a common rookie mistake and a direct violation of FCC rules. It also makes it hard for others to log you or return your calls.
Conclusion

So, there you have it – your comprehensive guide to getting the most out of your printable US amateur radio bands chart. This isn't just a piece of paper; it’s your key to unlocking endless possibilities on the airwaves, from casual chats across town to exciting DX contacts across the globe. By keeping it handy, understanding its nuances, and avoiding common pitfalls, you're setting yourself up for success and enjoyment in the fantastic world of amateur radio.
Now, go print that chart, laminate it, and get on the air! The world is waiting for your signal. 73!