Oh, the magic of beads! If you’ve ever found yourself lost in the shimmering world of tiny glass spheres, dreaming of intricate patterns and dazzling designs, then you know the unique joy – and occasional frustration – that comes with beadwork. We pour our hearts into every stitch, every color choice, every delicate curve. But what happens when your creative vision takes a turn for the geometric, when squares and rectangles just won't cut it? What if your masterpiece demands the elegant angles of a triangle?
That’s where the humble, yet utterly indispensable, printable triangle beading graph paper comes into its own. Trust me, I’ve been there. I remember vividly a late-night session, trying to freehand a complex triangular pendant, only to realize my "straight" lines were more like a drunken spider's walk across the page. My beads were flying, my patience was thin, and my initial excitement was rapidly dimming. It was a moment of pure, unadulterated beading despair. Then, a friend introduced me to the concept of specialized graph paper, and specifically, *triangle* beading graph paper. It was like a spotlight illuminating a previously dark corner of my crafting world. The relief was immense, the possibilities suddenly infinite.
This isn't just any graph paper; it's a specialized tool, a silent partner in your creative journey, designed to transform your wildest geometric beading dreams into tangible, beautiful reality. Whether you're a seasoned beading artisan or just dipping your toes into the dazzling waters of seed beads, understanding and utilizing this powerful resource can elevate your craft in ways you might not have imagined. It’s the secret weapon for precision, consistency, and unleashing your full artistic potential without the headache of wonky angles.
In this comprehensive guide, we’re going to embark on an exciting journey, exploring every facet of printable triangle beading graph paper. We’ll delve into its various forms, uncover its myriad applications, provide practical tips for using it, and even share advanced strategies to help you become a true master of geometric beadwork. Get ready to transform your beading experience, from the initial spark of an idea to the final, breathtaking piece. Let’s unlock the geometric magic together!
---
Table of Contents

- [The Geometry of Gems: Why Triangle Beading Graph Paper is Your Secret Weapon](#the-geometry-of-gems-why-triangle-beading-graph-paper-is-your-secret-weapon)
- [Unraveling the Grids: A Deep Dive into Printable Triangle Graph Paper Formats](#unraveling-the-grids-a-deep-dive-into-printable-triangle-graph-paper-formats)
- [Your Design Canvas: Crafting Original Patterns with Triangle Graph Paper](#your-design-canvas-crafting-original-patterns-with-triangle-graph-paper)
- [Stitch by Stitch Mastery: Adapting Graph Paper to Peyote, Brick, and More](#stitch-by-stitch-mastery-adapting-graph-paper-to-peyote-brick-and-more)
- [The Digital Download Deluge: Finding, Customizing, and Printing Your Perfect Paper](#the-digital-download-deluge-finding-customizing-and-printing-your-perfect-paper)
- [Beyond the Blueprint: Advanced Design Techniques & Creative Expansions](#beyond-the-blueprint-advanced-design-techniques--creative-expansions)
- [Pattern Powerhouse: Organizing, Storing, and Protecting Your Beading Designs](#pattern-powerhouse-organizing-storing-and-protecting-your-beading-designs)
- [Beadwork Blunders & Brilliant Breakthroughs: Troubleshooting Your Graph Paper Journey](#beadwork-blunders--brilliant-breakthroughs-troubleshooting-your-graph-paper-journey)
- [The Community Canvas: Sharing Your Designs & Drawing Inspiration](#the-community-canvas-sharing-your-designs--drawing-inspiration)
- [How to Choose the Best Printable Triangle Beading Graph Paper for Your Needs](#how-to-choose-the-best-printable-triangle-beading-graph-paper-for-your-needs)
- [Common Pitfalls to Avoid in Triangle Beading Design](#common-pitfalls-to-avoid-in-triangle-beading-design)
- [Advanced Tips for Expert Triangle Beaders](#advanced-tips-for-expert-triangle-beaders)
- [Conclusion: Stitch Your Story, One Triangle at a Time](#conclusion-stitch-your-story-one-triangle-at-a-time)
---
The Geometry of Gems: Why Triangle Beading Graph Paper is Your Secret Weapon

Let’s be honest, freehanding intricate geometric patterns with beads is a recipe for headaches. You might start with a vision of a perfectly symmetrical star, only to end up with something that looks like it melted in the sun. That’s where printable triangle beading graph paper swoops in, cape flowing, ready to save the day. It’s not just a piece of paper; it’s a foundational tool that empowers you to design with precision, experiment with confidence, and translate your artistic ideas into reality with stunning accuracy.
Here's why this specialized graph paper is an absolute game-changer for any beader, from novice to seasoned artisan:
1. Precision Perfected: The most obvious, yet most crucial, benefit. Each tiny triangle on the paper represents a bead, ensuring your designs are perfectly symmetrical and accurately scaled. This eliminates the guesswork and frustration of uneven edges or distorted shapes.
2. Visualizing Complexity: Triangle graph paper allows you to visualize complex patterns before you even pick up a needle. You can map out color changes, shape shifts, and intricate details with ease, catching potential issues on paper rather than wasting precious beads and time.
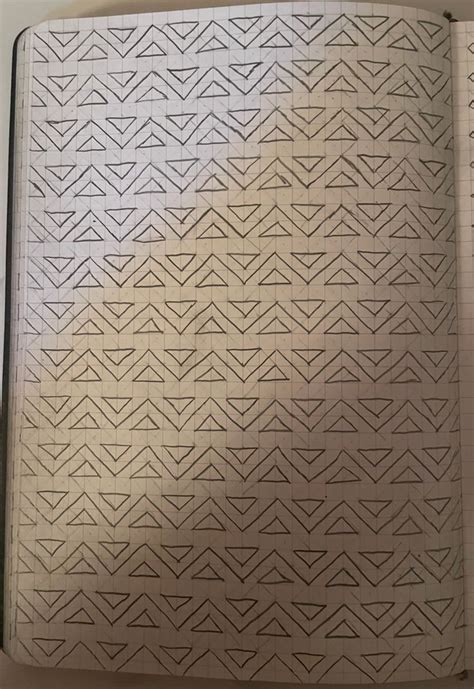
3. Experimentation Station: It creates a safe space for experimentation. Want to see what that color combination looks like? Doodle it on the graph paper. Curious about a new geometric motif? Sketch it out. No commitment, just pure creative exploration. I once spent an entire afternoon just playing with color gradients on a triangular grid, discovering combinations I never would have dared to try directly with beads. It was incredibly liberating!
4. Error Reduction: By meticulously planning your design, you drastically reduce errors in your beadwork. This means less frogging (the dreaded act of undoing stitches) and more joyful, uninterrupted crafting time.
5. Scaling and Adaptation: Need to make a design larger or smaller? The grid provides a clear framework for scaling your patterns up or down while maintaining proportions. This is invaluable for creating matching sets or adapting designs for different projects.
6. Instructional Clarity: If you ever plan to share your designs or write patterns for others, graph paper is indispensable. It provides a clear, universally understood language for conveying bead placement and color sequences.
7. Mental Map Building: For new beaders, using graph paper helps build a mental map of how triangular stitches work. It demystifies the structure of patterns like triangular peyote or brick stitch, making them less intimidating.
8. Creative Freedom: Paradoxically, the structure of graph paper often *increases* creative freedom. By handling the precision, it frees up your mind to focus purely on aesthetics, color, and form, rather than worrying about alignment.
9. Professional Polish: Designs planned on graph paper simply look more professional and polished. The consistency and symmetry speak volumes about the care and skill put into the piece.
10. Resource Conservation: Beads, especially high-quality ones, can be expensive. Planning on paper first saves you from wasting beads on experimental pieces that don't quite work out.
11. Bridging Digital and Physical: For those who use digital design tools, printable triangle beading graph paper acts as a perfect bridge. You can design digitally and then print a tangible reference, or sketch ideas on paper to refine later on a screen.
12. The "Aha!" Moment: There’s nothing quite like that "aha!" moment when a complex design finally clicks into place on the grid, perfectly aligned and ready to be brought to life. It’s a small victory that fuels your beading passion. I remember struggling for days with a specific geometric pendant design, convinced it was impossible. Then, after printing a fresh sheet of triangle graph paper, I sat down with a cup of tea and just started coloring. Within an hour, the solution presented itself, clear as day. It was truly a breakthrough!
Triangle graph paper isn't just a tool; it's an extension of your creative mind, allowing you to build, deconstruct, and refine your ideas with unparalleled clarity. Embrace it, and watch your geometric beadwork reach new heights!
---
Unraveling the Grids: A Deep Dive into Printable Triangle Graph Paper Formats

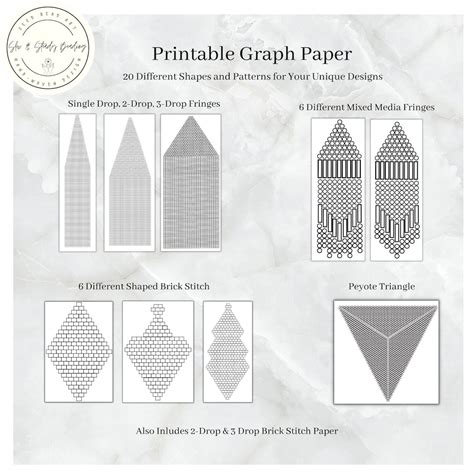
Just like different beads have different shapes and sizes, printable triangle beading graph paper comes in a delightful variety of formats, each tailored to specific bead types and project needs. Understanding these distinctions is key to choosing the right canvas for your next masterpiece. Don's just grab the first one you see; the right grid can make all the difference!
Here's a closer look at the different types you'll encounter and what makes them unique:
1. Equilateral Triangle Grids (Standard):
- Description: This is the most common and versatile type, featuring a grid of perfectly equilateral triangles. Each side of the triangle is equal in length.
- Best For: Ideal for designing patterns for beads that naturally form equilateral shapes when stitched together, such as Delica beads or other cylinder beads in flat or tubular peyote, brick stitch, or right-angle weave.
- Usage: Each small triangle on the grid typically represents a single bead.
- Example Scenario: "I was designing a triangular amulet bag using Delica beads, and the standard equilateral grid was perfect. It ensured all my color changes aligned flawlessly, and the bag kept its crisp, geometric shape."
2. Right-Angle Triangle Grids (Less Common, Specialized):
- Description: Features grids made up of right-angle triangles, often arranged to form squares or larger triangles.
- Best For: Specialized stitches or designs where beads might be arranged on a diagonal or to create specific angular effects that aren't purely equilateral. Less common for general beadwork, but powerful for niche designs.
- Usage: Requires a deeper understanding of how your chosen stitch will translate to this grid.
- Example Scenario: "My friend was experimenting with some very abstract, modern bead art, and she found right-angle triangle grids useful for mapping out sharp, contrasting diagonal lines that traditional grids couldn't quite capture."
3. Isosceles Triangle Grids (Specific Angles):
- Description: Composed of isosceles triangles, meaning two sides are equal in length, but the third is different, resulting in specific, non-60-degree angles.
- Best For: Very specialized beadwork where non-equilateral triangular units are desired, or for mapping patterns that have a distinct 'stretch' or angle in one direction.
- Usage: Can be trickier to work with if you're not familiar with how your beads will sit within these specific angles.
4. Hexagonal Grids (Closely Related):
- Description: While not strictly *triangle* graph paper, hexagonal grids are often used for triangular beadwork because a hexagon is composed of six equilateral triangles. Many triangular motifs naturally fit within a hexagonal framework.
- Best For: Designing motifs that will be part of a larger hexagonal component, or for creating pieces with a strong central point from which triangles radiate.
- Usage: Each small hexagon often represents a bead or a cluster of beads, depending on the stitch.
5. Varying Grid Densities (Bead Size Specific):
- Description: Printable triangle beading graph paper comes in different densities – meaning the size of the individual triangles.
- Best For: Matching your specific bead size. Larger triangles for larger beads (e.g., size 8/0 seed beads), smaller triangles for smaller beads (e.g., size 11/0 or 15/0 Delicas).
- Usage: Crucial for accurate scaling. If your grid is too small for your beads, your design might look cramped when stitched. If it's too large, you might underestimate the final size.
- Hypothetical Scenario: "I was working with chunky size 8/0 seed beads for a statement necklace, and I deliberately chose a graph paper with larger triangles. This helped me visualize the design at a more realistic scale, preventing me from creating something that looked great on paper but was too delicate for the beads."
6. Color-Coded Grids (Enhanced Clarity):
- Description: Some advanced printable triangle beading graph paper templates might include subtle color coding for rows, columns, or specific sections to aid in counting and pattern repetition.
- Best For: Extremely large or complex patterns where losing your place is a real concern.
- Usage: Can significantly reduce eye strain and counting errors, especially for multi-day projects.
7. Grids with Central Markings:
- Description: Templates that include a clearly marked center point, or radial lines emanating from the center.
- Best For: Designing mandalas, medallions, or any piece that expands symmetrically from a central point.
- Usage: Helps maintain symmetry and balance in radial designs.
8. Light vs. Dark Lines:
- Description: The intensity and color of the grid lines themselves can vary. Some prefer very faint grey lines, others prefer bolder black lines.
- Best For: Personal preference and ease of viewing. Faint lines allow your design to pop, while bolder lines provide clearer structure.
- Usage: Consider what kind of pens or pencils you'll be using for your design; a strong contrast is usually best.
9. Grids with Numbered Rows/Columns (Counting Aid):
- Description: Some advanced templates include subtle numbering along the edges to help track rows or bead counts.
- Best For: Beginners or for very large, repetitive patterns where keeping track of your place is paramount.
- Usage: An excellent tool for double-checking your work and ensuring accuracy.
10. Customizable Grids (Digital Tools):
- Description: While not a pre-printed format, many online tools or software allow you to generate printable triangle beading graph paper with custom parameters (e.g., specific triangle size, line thickness, page orientation).
- Best For: When you have very specific requirements that standard templates don't meet.
- Usage: Offers the ultimate flexibility and can be a powerful resource for experienced designers.
11. Blank Templates for Freehand Triangles:
- Description: Less a "grid" and more a "guide," these might have faint dots or very light lines to guide the placement of *your own* freehand triangles, allowing for more organic shapes within a triangular framework.
- Best For: Abstract or highly organic triangular designs where exact grid alignment isn't the primary goal, but some underlying structure is desired.
12. Printable Triangle Beading Graph Paper with Border/Notes Sections:
- Description: Templates that include a dedicated margin or section for jotting down notes about bead colors (e.g., Delica numbers), stitch counts, or project details.
- Best For: Keeping all your design information consolidated in one place, especially for complex projects.
- Usage: Essential for organized beaders who want to recreate or share their patterns easily. "This feature saved my bacon on a complex commission piece! I had all the bead numbers and stitch notes right there on the graph paper, making it incredibly easy to track my progress and ensure I didn't miss a single detail."
Choosing the right type of printable triangle beading graph paper is an important first step. Consider your beads, your stitch, and your design goals, and you’ll find the perfect grid to bring your vision to life.
---
Your Design Canvas: Crafting Original Patterns with Triangle Graph Paper
Now that we understand the 'why' and the 'what' of printable triangle beading graph paper, let's dive into the exciting 'how.' This paper isn't just for following existing patterns; it's your personal design canvas, a launchpad for your unique creative expressions. Think of it as your sketchbook for beads.
Here’s a step-by-step guide to transforming a blank sheet of printable triangle beading graph paper into a vibrant blueprint for your next beading project:
1. Define Your Core Shape & Size:
- Start with the End in Mind: What general shape are you aiming for? A simple triangle? A star? A complex geometric motif?
- Estimate Size: How big do you want the finished piece to be? This will help you select the appropriate grid density (smaller triangles for smaller beads/finer details, larger for chunkier beads).
- Example: "I wanted to create a small, wearable triangular pendant, so I chose a fine-grid printable triangle beading graph paper, knowing my 11/0 Delicas would fit perfectly within those tiny cells."
2. Outline Your Design:
- Light Sketch: Using a pencil, lightly sketch the overall outline of your desired shape onto the graph paper. Don't press too hard; this is just a guide.
- Symmetry Check: If your design is symmetrical, fold the paper or use a ruler to ensure your outline is balanced.
- Reference Point: Mark a central bead or a starting point if your pattern radiates outwards.
3. Choose Your Color Palette:
- Inspiration First: Before you even touch a colored pencil, decide on your bead colors. Gather actual beads, look at color wheels, or browse inspiration online.
- Swatch Section: Use a small corner of your printable triangle beading graph paper to create a color swatch key. Label each colored section with the actual bead number or name (e.g., "DB-001 White," "Opaque Black"). This is a lifesaver for remembering which shade of blue is which!
4. Start Filling in the Blanks (Bead by Bead):
- Central Point: If designing radially, start from the center and work outwards.
- Edge Inwards: For flat patterns, you might prefer to define the outer edges first and then fill in the interior.
- Coloring Tools: Use colored pencils, fine-tipped markers, or gel pens that match your bead colors as closely as possible.
- One Triangle = One Bead: Remember, each tiny triangle on your printable triangle beading graph paper represents a single bead. Fill it in with the chosen color for that bead.
5. Iterate and Refine:
- Step Back: Regularly step back and look at your design from a distance. Do the colors flow well? Is the pattern balanced?
- Erase and Adjust: Don't be afraid to erase and change sections. That's the beauty of designing on paper!
- Shadowing/Highlighting: Consider where you might want to add lighter or darker beads to create depth or a sense of movement.
- Hypothetical Scenario: "I was designing a geometric bracelet and initially used too many bright colors. It looked chaotic. By using my printable triangle beading graph paper, I could easily erase sections and replace them with more harmonious, muted tones, saving me from having to undo hours of actual beading."
6. Add Special Details:
- Fringe/Embellishments: If you plan to add fringe or other embellishments, mark where they will attach to your main beadwork.
- Hardware Placement: Indicate where clasps, jump rings, or bails will be attached.
7. Annotate Generously:
- Stitch Notes: Write down the stitch you plan to use (e.g., "flat triangular peyote," "brick stitch").
- Row/Round Counts: Number your rows or rounds on the graph paper. This is *invaluable* when you start beading.
- Bead Counts: For complex sections, you might even note the bead count for specific rows.
- Personal Touch: Add little reminders to yourself, like "Remember to use strong thread here!"
8. Create a Legend/Key:
- Color Key: Always include a legend for your colors, linking them to specific bead types or numbers. This is especially important if you're using multiple shades of the same color.
- Symbol Key: If you're using any special symbols on your graph paper (e.g., for different bead finishes like matte vs. glossy), explain them.
9. Test a Small Section (Optional but Recommended):
- Before committing to the entire piece, bead a small swatch of your pattern based on your graph paper design. This helps confirm your colors work together as expected and that your chosen stitch translates well.
- Example: "After designing a complex triangular pendant on my printable triangle beading graph paper, I beaded a small corner piece to confirm the color transitions. It saved me from realizing halfway through the main piece that my chosen teal was actually too close to the dark blue!"
10. Save and Store Your Masterpiece:
- Digital Scan: Once complete, scan or take a clear photo of your designed graph paper. This creates a digital backup.
- Physical Storage: Keep your original in a binder or folder. You never know when you'll want to revisit an old design or adapt it for a new project.
Using printable triangle beading graph paper as your design canvas is an incredibly rewarding process. It bridges the gap between your imagination and your hands, allowing you to meticulously plan and execute designs that are truly your own. Embrace the methodical nature of the grid, and watch your creative visions materialize with stunning precision.
---
Stitch by Stitch Mastery: Adapting Graph Paper to Peyote, Brick, and More
The beauty of printable triangle beading graph paper lies in its versatility. While it’s designed for triangular shapes, it's not limited to just one or two stitches. Instead, it serves as a universal blueprint for a variety of popular bead weaving techniques, helping you translate the flat design on paper into a dimensional, textural reality. Let's explore how it adapts to some of our favorite stitches.
Here’s how to effectively use your printable triangle beading graph paper for different beadwork techniques:
1. Flat Triangular Peyote Stitch:
- Concept: This stitch creates a smooth, flat fabric of beads. To form a triangle, you typically increase beads at the beginning and end of rows, or around a central point.
- Graph Paper Use: Each triangle on the graph paper represents one peyote bead. When designing, you'll color in the triangles as if they are sitting next to each other, creating a solid block of color. The grid naturally guides the increases needed to maintain the triangular shape.
- Mapping Increases: Designate a specific color or symbol on your graph paper to mark where increases occur. This visual cue is invaluable when you're actually beading.
- Example: "I was making a series of triangular earrings using flat peyote. My printable triangle beading graph paper allowed me to perfectly map out the color patterns for each increase and decrease, ensuring that the earrings were mirror images of each other."
2. Tubular Triangular Peyote Stitch:
- Concept: This creates a three-dimensional tube with a triangular cross-section, often used for ropes or structural elements.
- Graph Paper Use: You'll design the *flat* pattern that will then be zipped up into a tube. The graph paper helps visualize the repeats and how the colors will align once the tube is formed. Imagine flattening out the tube and designing on that flat surface.
- Visualizing the "Zip": When designing, pay close attention to the edges that will meet. The graph paper helps ensure the pattern flows seamlessly.
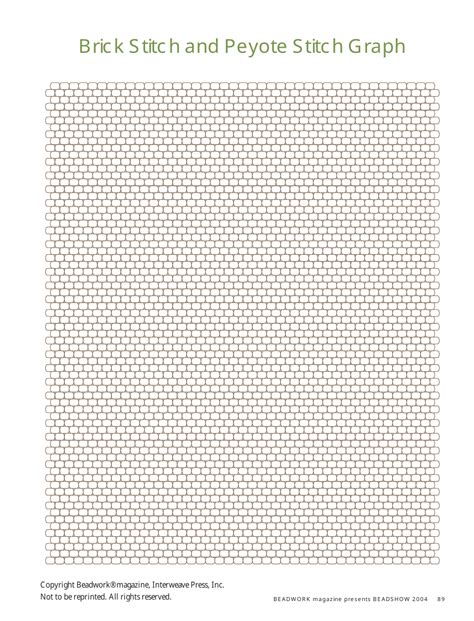
3. Flat Triangular Brick Stitch:
- Concept: Brick stitch beads sit like bricks in a wall, slightly offset from the row below. It's often used for shaped pieces because it's easy to increase and decrease.
- Graph Paper Use: Similar to peyote, each triangle on the paper represents a bead. The grid helps maintain the "brick" alignment and guides increases/decreases for shaping.
- Edge Definition: Brick stitch is excellent for clean edges. Use your graph paper to meticulously plan the outer perimeter of your triangular design.
- Hypothetical Scenario: "I designed a delicate triangular pendant with a scalloped edge using brick stitch. My printable triangle beading graph paper was essential for mapping out the precise decreases needed to form the scallops while maintaining the overall triangular shape. Without it, the scallops would have been uneven, and the whole piece would have looked messy."
4. Right-Angle Weave (RAW) for Triangular Components:
- Concept: RAW creates flexible, interconnected structures. While often square, it can be adapted for triangular components by adjusting the number of beads in each unit.
- Graph Paper Use: This is where the graph paper might represent *units* of beads rather than single beads. You'd use the grid to map out the overall triangular structure, and then mentally (or with a secondary diagram) fill in the RAW units within each triangle.
- Structural Planning: Use the graph paper to plan the *framework* of your RAW triangle, focusing on the points where units connect.
5. Netting Stitch for Triangular Shapes:
- Concept: Netting creates a lacy, open fabric. Triangular netting can be used for light, airy components.
- Graph Paper Use: Given its open nature, the graph paper might be used to map the *overall shape* and the *placement of anchor beads* rather than every single bead. You’d mark the points where the netting structure repeats.
- Visualizing Open Space: Use light pencil to indicate the 'gaps' or 'open areas' created by the netting, contrasting with the beads you color in.
6. Loom Work (Less Common but Possible):
- Concept: Traditional loom work usually creates rectangular pieces. However, you can create triangular *motifs* within a rectangular loom piece, or even shape loom work by adding/subtracting warp threads.
- Graph Paper Use: For a triangular motif, you'd design the pattern on the triangle grid and then translate it onto a square loom graph paper, adjusting for the warp and weft. For shaped loom work, you'd use the triangle grid to plan the overall silhouette.
7. Beads with Specific Shapes (e.g., Tila Beads, Seed Beads, Delicas):
- Delica/Cylinder Beads: These are perfectly suited for triangle graph paper, as their uniform shape creates neat, predictable stitches. Each triangle on the paper directly corresponds to one bead.
- Seed Beads (Rounds): Round seed beads will create a slightly softer, less rigid triangle than cylinder beads. Your printable triangle beading graph paper will still guide placement, but expect the finished piece to have a slightly more organic feel.
- Shaped Beads (e.g., Triangles, Daggers): If you're using actual triangular beads, your graph paper might represent *multiple* tiny triangles for each larger shaped bead, or you might need a specialized grid. This often requires careful experimentation.
- Personal Insight: "I found that when designing with regular round seed beads, I sometimes needed to adjust my graph paper design slightly, as the rounds nestle a bit differently than Delicas. My graph paper was a fantastic starting point, but a small test swatch helped me fine-tune the final look."
8. Understanding Bead Orientation:
- Graph Paper Reminder: Use arrows or small notes on your graph paper to remind yourself of bead orientation, especially for stitches like right-angle weave or when using beads with holes in specific directions.
9. Color Blending and Gradients:
- Smooth Transitions: Graph paper is excellent for planning smooth color gradients within your triangular designs. Color in cells with gradually shifting shades to visualize the effect.
- Sharp Contrasts: Conversely, use the grid to plan sharp, graphic color blocks for high-contrast designs.
10