
Oh, the kitchen! It's more than just a place to cook; it's the heart of the home, a gathering spot, a creative hub, and often, the most expensive room to renovate. Dreaming of a new kitchen is exciting, isn't it? You scroll through Pinterest, save countless Instagram posts, and envision the perfect layout. But then reality hits: how do you translate those grand ideas into a functional, beautiful space that fits *your* home and *your* life? That's where the magic of printable kitchen design graph paper comes in.
Trust me, I've been there. I remember staring at a blank wall, armed with a measuring tape and a head full of ideas, feeling completely overwhelmed. My first attempt at kitchen planning involved scribbling on a regular notebook, and let's just say, the results were less "dream kitchen" and more "abstract art." It was only when a seasoned contractor friend gently nudged me towards the simplicity and precision of graph paper that everything clicked. Suddenly, my jumbled thoughts had a framework, and my vague concepts began to take shape, one little square at a time. It saved me from making costly mistakes and helped me visualize a space that truly worked for my family.
This isn't just about drawing lines; it's about empowering you to be the architect of your own culinary sanctuary. Whether you're a seasoned DIY enthusiast or a complete beginner taking your first step into home design, this comprehensive guide will walk you through everything you need to know about harnessing the power of printable kitchen design graph paper. We'll delve into why it's an indispensable tool, how to use it effectively, and how to transform those initial pencil marks into a kitchen you'll adore for years to come. Get ready to turn your kitchen dreams into a tangible plan, because by the end of this, you’ll be sketching like a pro!
---
Table of Contents

- [The Foundation: Understanding Your Kitchen's Design Canvas (Graph Paper Basics)](#the-foundation-understanding-your-kitchens-design-canvas-graph-paper-basics)
- [Scaling Up (and Down!): Choosing the Right Scale for Your Vision](#scaling-up-and-down-choosing-the-right-scale-for-your-vision)
- [Measurement Mastery: Bringing Your Kitchen's Reality to Paper](#measurement-mastery-bringing-your-kitchens-reality-to-paper)
- [The Art of Layout: Crafting Functional Kitchen Zones](#the-art-of-layout-crafting-functional-kitchen-zones)
- [Cabinetry & Appliance Placement: Making Every Inch Count](#cabinetry--appliance-placement-making-every-inch-count)
- [Materializing Your Dream: Incorporating Finishes & Details](#materializing-your-dream-incorporating-finishes--details)
- [Beyond the Blueprint: Advanced Design Techniques & 3D Visualization](#beyond-the-blueprint-advanced-design-techniques--3d-visualization)
- [The Digital Edge: Bridging Printable Paper with Online Tools](#the-digital-edge-bridging-printable-paper-with-online-tools)
- [Troubleshooting & Refinement: Avoiding Common Design Blunders](#troubleshooting--refinement-avoiding-common-design-blunders)
- [Your Personal Design Journey: From Paper to Practicality](#your-personal-design-journey-from-paper-to-practicality)
- [How to Choose the Best Printable Kitchen Design Graph Paper for Your Needs](#how-to-choose-the-best-printable-kitchen-design-graph-paper-for-your-needs)
- [Common Pitfalls to Avoid in Kitchen Design with Graph Paper](#common-pitfalls-to-avoid-in-kitchen-design-with-graph-paper)
- [Advanced Tips for Experts: Elevating Your Graph Paper Designs](#advanced-tips-for-experts-elevating-your-graph-paper-designs)
- [Conclusion: Your Kitchen, Designed Your Way](#conclusion-your-kitchen-designed-your-way)
---
The Foundation: Understanding Your Kitchen's Design Canvas (Graph Paper Basics)
Before we dive headfirst into sketching out islands and pantry units, let's establish a solid understanding of what printable kitchen design graph paper is and why it’s your best friend in this journey. At its core, graph paper provides a grid, a visual framework that helps you represent real-world dimensions in a scaled-down format. This simple tool becomes incredibly powerful when planning a space as complex as a kitchen.
Here’s why it’s non-negotiable for anyone serious about kitchen design, from the casual renovator to the aspiring interior decorator:
1. Precision is Power: Unlike freehand sketching, graph paper ensures accuracy. Each square represents a specific unit of measurement (e.g., 6 inches, 1 foot), allowing you to draw walls, cabinets, and appliances to scale. This precision is vital for avoiding costly errors down the line.
2. Visualization Made Easy: It transforms abstract ideas into concrete visual plans. You can literally *see* how much space a refrigerator takes up, how wide a walkway will be, or if that dream island actually fits.
3. Experimentation Without Commitment: Want to try a U-shape layout versus an L-shape? Or maybe shift the sink to a different wall? With graph paper, you can sketch out multiple options quickly and easily, without moving a single piece of furniture or knocking down a wall. This is where you can be truly creative without fear of expensive mistakes.
4. Communication Tool: Your detailed graph paper drawing becomes a universal language. When you talk to contractors, cabinet makers, or appliance salespeople, you'll have a clear, scaled diagram that conveys your vision far better than words alone. Trust me, they'll appreciate it!
5. Budgeting Aid: By clearly seeing the dimensions and placement of every element, you can more accurately estimate material needs, cabinet counts, and appliance sizes, which directly impacts your budget.
6. Identifying Obstacles: Drawing to scale helps you spot potential issues like doors clashing, inadequate clearance for appliance doors, or insufficient space around an island *before* construction begins. It’s much cheaper to erase a line than to redo a wall!
7. Ergonomics Check: Graph paper allows you to test the "workflow" of your kitchen. Can you easily move between the sink, stove, and refrigerator? Is there enough counter space where you need it most? This is crucial for a kitchen that feels good to work in.
8. Personal Scenario Example 1: I once had a client who insisted on a massive island in their relatively small kitchen. After drawing it out on graph paper, we quickly saw that it would completely block the natural flow, making the kitchen feel cramped and dysfunctional. The visual proof on paper allowed them to adjust their vision to a more practical, albeit slightly smaller, island that worked beautifully.
9. Personal Scenario Example 2: For my own kitchen, I used graph paper to meticulously plan the lighting. By drawing in light fixture locations and noting their spread, I could ensure even illumination without dark spots or glare, especially over critical work zones like the sink and prep areas. It was a game-changer for daily cooking.
10. The "Why" Behind the Grid: The grid isn't just lines; it's a system. Each square is a measurable unit, a consistent reference point that allows you to translate complex shapes and volumes into a simple, two-dimensional representation. This consistency is what makes graph paper superior to blank paper for design work.
11. Cost-Effective Solution: It's essentially free! You can find countless templates for printable kitchen design graph paper online, print them at home, and get started without any specialized software or expensive tools. It's the ultimate low-barrier-to-entry design solution.
12. Empowerment Through Understanding: By taking the time to understand these basics, you're not just preparing to draw; you're preparing to *design* with confidence and a deeper understanding of spatial relationships. This foundational knowledge is what separates a haphazard sketch from a thoughtful, functional blueprint.
Scaling Up (and Down!): Choosing the Right Scale for Your Vision
One of the most critical decisions you'll make when using printable kitchen design graph paper is selecting the right scale. The scale determines how many real-world inches or feet each square on your paper represents. Get this wrong, and your entire plan will be inaccurate, leading to frustration and potential errors. But get it right, and you unlock a world of precision!
Here’s how to navigate the world of kitchen design scales:
1. Understanding Scale Ratios: Scale is typically expressed as a ratio, like 1:24 or 1/4" = 1'. This means either 1 unit on paper equals 24 units in real life, or 1/4 inch on paper equals 1 foot in real life. For kitchen design, the latter (1/4" = 1') is the most common and generally recommended.
2. The Gold Standard: 1/4" = 1': This scale means every 1/4 inch on your graph paper represents 1 foot (12 inches) in your actual kitchen. It's fantastic because it allows you to fit a decent-sized kitchen onto an 8.5" x 11" or 11" x 17" sheet of paper while maintaining enough detail to be useful. It's the perfect balance for most DIY kitchen planners.
3. For Smaller Spaces or More Detail: 1/2" = 1': If you have a very small kitchen, or if you want to capture more intricate details like appliance handles or specific trim, a 1/2" = 1' scale might be suitable. With this scale, every 1/2 inch on paper represents 1 foot in reality. Just be aware that larger kitchens might not fit on standard paper sizes with this scale.
4. For Broad Strokes (Less Common): 1/8" = 1': This scale is typically used for very large spaces or for initial, high-level layouts where extreme detail isn't immediately necessary. It's less common for detailed kitchen planning because individual cabinet units can become very small and hard to distinguish.
5. Metric Scales (for non-US users): If you're working with metric measurements, common scales might be 1:50 (1 cm on paper = 50 cm in reality) or 1:100 (1 cm on paper = 100 cm in reality, or 1 meter). Choose the scale that best suits your local measurement system and level of detail required.
6. Why Consistency Matters: Once you choose a scale, stick with it! Mixing scales on the same drawing will lead to chaos and inaccuracies. Every single element you draw, from walls to a coffee maker, must adhere to the same scale.
7. Personal Scenario Example 1: I once started a design using 1/2" = 1' for a large kitchen, only to realize halfway through that my entire layout wouldn't fit on a single sheet of paper. I had to restart, switching to the more appropriate 1/4" = 1' scale. It was a valuable lesson in planning ahead – always consider the overall size of your space before committing to a scale.
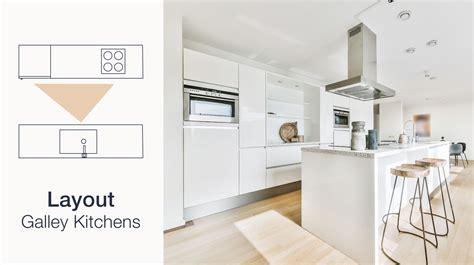
8. Personal Scenario Example 2: A friend was designing a compact galley kitchen. She opted for the 1/2" = 1' scale, and it was brilliant. It allowed her to clearly see how a pull-out pantry would interact with the refrigerator door and ensure proper clearance, details that might have been too small to discern at a smaller scale.
9. The "Sweet Spot" for Most: For the vast majority of kitchen projects, especially for those utilizing printable kitchen design graph paper for DIY planning, the 1/4" = 1' scale is your best bet. It offers a clear, manageable representation without requiring oversized paper.
10. Test Your Scale: Before you draw your entire kitchen, draw a single, known object (like a 30-inch wide oven) to scale. This will help you visualize how the scale translates and confirm you're comfortable with it.
11. Label Your Scale: Always, *always* label the scale clearly on your graph paper drawing (e.g., "Scale: 1/4" = 1'"). This is crucial for anyone else reading your plan, and even for yourself if you come back to it later.
12. Graph Paper Square Size: When printing your printable kitchen design graph paper, ensure the squares are uniform and accurately printed. A standard 1/4 inch grid is ideal for the 1/4" = 1' scale, meaning four squares make up a full inch. If your squares are different sizes, you'll need to adjust your interpretation of the scale accordingly.
Measurement Mastery: Bringing Your Kitchen's Reality to Paper
Alright, designer, tape measure in hand! Before you can even think about sketching cabinets or appliances, you need accurate measurements of your existing kitchen space. This is the foundation upon which your entire design rests. Skimp on this step, and your beautiful graph paper plan will be nothing more than a pretty fantasy. Let's get precise.
Here’s a step-by-step guide to mastering your kitchen measurements:
1. Gather Your Tools:
- Steel Tape Measure: Essential for accuracy. A 25-foot tape is usually sufficient.
- Pencil and Eraser: For initial sketches and corrections.
- Notebook or Scrap Paper: To jot down raw measurements before transferring to graph paper.
- Clip Board: Keeps your paper steady while measuring.
- A Friend (Optional but Recommended): An extra set of hands makes measuring long walls much easier.
2. Sketch a Rough Outline: On a piece of scrap paper, draw a simple, rough sketch of your kitchen's perimeter. Don't worry about scale yet, just get the basic shape. Mark where doors, windows, and any fixed elements (like radiators, bulkheads, or columns) are located.
3. Measure Wall-to-Wall: Start by measuring the total length of each wall, from corner to corner. Measure at least twice, preferably at different heights (e.g., floor, waist, ceiling) to account for any irregularities or walls that aren't perfectly straight. Note the largest measurement.
4. Locate Doors and Windows:
- Measure the width of each door and window opening.
- Measure the distance from the corner of the wall to the outside edge of the door/window trim.
- Measure the distance from the floor to the bottom of the window sill.
- Measure the distance from the top of the window/door frame to the ceiling.
- Note which way doors swing open (into or out of the kitchen).
5. Identify Fixed Obstacles:
- Utilities: Mark the exact location of water lines (sink, dishwasher), gas lines (stove), electrical outlets, light switches, and vents. Measure their distance from the nearest corner and from the floor.
- Architectural Features: Measure any columns, soffits, chimney breasts, or recesses.
- Radiators/Heating Vents: Measure their dimensions and distance from walls.
6. Measure Heights:
- Measure the ceiling height from the floor in several places to check for consistency.
- Measure the distance from the floor to the bottom of any existing upper cabinets (if applicable).
- Measure the height of your existing countertops.
7. Account for Appliances: If you're keeping existing appliances, measure their width, depth, and height. If you're buying new ones, look up their precise dimensions online. Don't forget to include clearance for doors to open fully.
8. Draw on Graph Paper: Now, grab your printable kitchen design graph paper and your chosen scale (1/4" = 1' is usually best).
- Start by drawing the perimeter walls.
- Carefully plot the locations and dimensions of doors, windows, and fixed obstacles.
- Mark all utility hookups.
- Double-check every measurement as you draw it on the grid.
9. Create a Legend: On your drawing, create a small legend for any symbols you use (e.g., "X" for outlets, "W" for water line).
10. Personal Scenario Example 1: I once neglected to measure the exact height of a low window sill. When I designed the new countertop on paper, it looked fine. In reality, the countertop would have been higher than the sill, creating an awkward visual break and practical issue. A quick re-measure on paper saved me from a serious construction headache!
11. Personal Scenario Example 2: My friend, an avid baker, was designing her dream kitchen. She meticulously measured her stand mixer's height, depth, and the required clearance for its head to tilt. This allowed her to ensure the perfect spot for it under an upper cabinet, with enough counter space around it for comfortable use. It's the small details that make a big difference!
12. The "Check and Recheck" Rule: This isn't just a suggestion; it's a mantra. Measure everything at least twice. If possible, have someone else verify critical measurements. Small errors here can cascade into significant problems during installation. Don't be like me and forget to charge your tape measure (just kidding, but seriously, check it!).
The Art of Layout: Crafting Functional Kitchen Zones
With your kitchen's dimensions accurately plotted on your printable kitchen design graph paper, it's time for the fun part: designing the layout! This is where you transform a mere floor plan into a dynamic, functional space. The key is to think in terms of "zones" and "workflow" – how you move and operate within your kitchen.
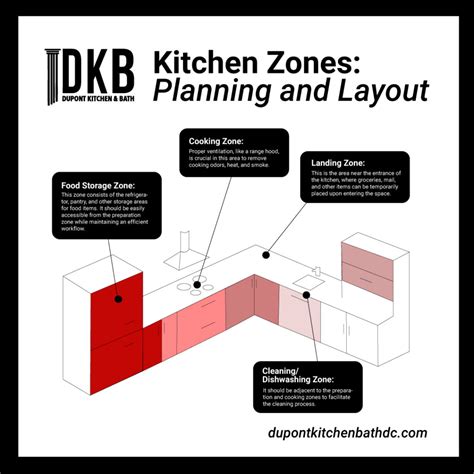
Here are the essential zones and principles to consider for an ergonomic and efficient kitchen:
1. The Work Triangle (or Work Flow): This classic concept connects the three primary work areas: the refrigerator (food storage), the sink (food prep/cleanup), and the stove/cooktop (cooking).
- Principle: The sum of the three legs of the triangle should ideally be between 12 and 26 feet. No single leg should be less than 4 feet or more than 9 feet.
- Goal: Minimize steps between these critical areas for maximum efficiency.
- Application: Sketch these three appliances first on your graph paper, then draw lines connecting them. Adjust their positions until the triangle feels balanced and efficient.
2. Food Storage Zone:
- Elements: Refrigerator, pantry, food storage cabinets.
- Placement: Ideally near the kitchen entrance for easy grocery unloading. Also, consider proximity to the prep zone.
- Considerations: Ensure refrigerator doors have ample clearance to open fully. Plan for freezer drawers if applicable.
3. Food Prep Zone:
- Elements: Counter space, sink, cutting boards, small appliances (mixer, toaster).
- Placement: The largest continuous stretch of counter space, usually between the sink and the cooktop.
- Considerations: Aim for at least 36 inches of uninterrupted counter space. Consider a secondary prep sink if your kitchen is large enough.
4. Cooking Zone:
- Elements: Stove/cooktop, oven, microwave, range hood, pots and pans storage, spice rack.
- Placement: Near the prep zone, but also accessible from the dining area for serving.
- Considerations: Ensure proper ventilation. Leave at least 15 inches of counter space on either side of the cooktop for safety and landing hot dishes.
5. Cleanup Zone:
- Elements: Sink, dishwasher, trash/recycling bins, dish storage.
- Placement: Usually centered under a window or in an island. Dishwasher should be immediately adjacent to the sink for easy loading.
- Considerations: Ensure enough counter space around the sink for drying and stacking.
6. Serving Zone (Optional but Recommended):
- Elements: Counter space, perhaps a bar area, serving dishes.
- Placement: Often an extension of the island or a dedicated buffet area, easily accessible from the dining room.
7. Traffic Flow & Walkways:
- Principle: Ensure clear pathways through the kitchen, especially around the work triangle.
- Measurements: Main walkways should be at least 36-42 inches wide. Pathways between an island and a counter should be at least 42-48 inches wide, especially if two cooks will be present.
- Application: Use your graph paper to draw lines representing traffic paths. If they cross through your work triangle, try to adjust the layout.
8. Personal Scenario Example 1: While sketching my sister's kitchen, we initially placed the refrigerator right next to a wall. On paper, it looked fine. But then we remembered its wide French doors. Drawing the *open* doors on the printable kitchen design graph paper revealed they would crash into the wall, preventing the left door from opening fully. A simple shift of 6 inches made all the difference!
9. Personal Scenario Example 2: I helped a friend design a kitchen for her elderly parents. We prioritized wide, clear walkways (48 inches minimum) and ensured the microwave was at an accessible height, not too high or too low. We also placed the dishwasher to the right of the sink, as her mother was right-handed, making loading easier. These small, empathetic considerations make a huge impact on daily living.
10. Considering Accessibility: If anyone in your household has mobility challenges, factor in wider clearances, lower counter heights, accessible storage, and pull-out shelves. Graph paper is excellent for testing these specific needs.
11. The "Bubble Diagram" Trick: Before placing specific appliances, try drawing "bubbles" for each zone on your graph paper. This helps you visualize the flow and relationships between areas without getting bogged down in exact dimensions initially.
12. Don't Forget the Details: As you refine your layout, remember things like where outlets will go, if there’s enough room for a trash pull-out, and if cabinet doors will open without hitting each other or an appliance. This is where your printable kitchen design graph paper truly shines in preventing future headaches.
Cabinetry & Appliance Placement: Making Every Inch Count
Once your zones and workflow are established on your printable kitchen design graph paper, it's time to populate your layout with the specific elements that bring it to life: cabinetry and appliances. This is where precision and foresight become paramount, as every inch truly counts in a functional kitchen.
Here’s how to strategically place your cabinets and appliances for maximum efficiency and aesthetic appeal:
1. Start with the "Big Three": Place your refrigerator, sink, and range/cooktop first. These are the fixed points of your work triangle. Ensure they adhere to the clearances you planned in the layout phase.
- Refrigerator: Allow 18-24 inches of landing space on the handle side (or both sides for French door models) for unloading groceries.
- Sink: Typically requires at least 24-36 inches of counter space on one side and 18-24 inches on the other for prep and drying.
- Range/Cooktop: Ensure 12-15 inches of counter space on either side for landing hot pots and safe cooking.
2. Cabinetry Basics:
- Base Cabinets: Standard depth is 24 inches. Widths vary, typically in 3-inch increments (e.g., 12", 15", 18", 21", 24", 30", 36").
- Wall Cabinets: Standard depth is 12-15 inches. Heights vary (30", 36", 42"). They are usually installed 18 inches above countertops.
- Tall Cabinets: Pantry units or utility cabinets (e.g., for built-in ovens/microwaves) are typically 24 inches deep and 84-96 inches tall.
3. Fill in the Gaps with Cabinets: Once the major appliances are placed, use your printable kitchen design graph paper to fill in the remaining wall space with cabinets.
- Prioritize Function: Think about what you'll store in each area. Draw pull-out shelves, drawer banks, and specialty cabinets (e.g., spice pull-outs, trash/recycling centers) to scale.
- Corner Solutions: Corners can be tricky. Consider lazy susans, blind corner cabinets, or diagonal corner cabinets. Draw their full swing radius to ensure clearance.
- Symmetry & Balance: While not always achievable, aim for some visual balance, especially with upper cabinets. Consider aligning upper cabinets with lower cabinets where possible.
4. Dishwasher Placement: Always place the dishwasher immediately next to the sink (left or right, based on your dominant hand) to minimize dripping and make loading/unloading efficient. Ensure there's enough space to open the dishwasher door fully without blocking a main walkway or hitting an adjacent cabinet handle.
5. Microwave Options:
- Over-the-Range: Saves counter space, but can be too high for some users.
- Built-in: Creates a seamless look, often in a tall cabinet or island.
- Countertop: Most flexible, but takes up valuable counter space.
- Drawer Microwave: Excellent for accessibility and maintaining clear counters.
Draw your chosen option to scale and assess its impact.
6. Ventilation: Don't forget the range hood! Measure its width and depth. Ensure it's adequately sized for your cooktop and that you've accounted for ducting if it's external.
7. Islands and Peninsulas:
- Size: Draw the exact footprint on your printable kitchen design graph paper. Remember to leave adequate clearance (42-48 inches) around all working sides.
- Function: Will it house a sink, cooktop, storage, seating, or all of the above? Draw these elements to scale.
- Overhangs: If planning for seating, draw the required countertop overhang (typically 12-15 inches for comfortable knee space).
8. Personal Scenario Example 1: During my own kitchen renovation, I used graph paper to meticulously plan a custom spice pull-out next to the range. By drawing it to scale and adding the individual spice jar dimensions, I knew exactly how wide it needed to be to hold all my spices efficiently. It was a small detail that made a huge difference in my cooking flow.
9. Personal Scenario Example 2: A client wanted a double oven but had limited wall space. By drawing various tall cabinet configurations on the printable kitchen design graph paper, we discovered that by shifting the refrigerator slightly, we could create enough continuous tall cabinet space for the double oven and a small pantry pull-out. It was like solving a puzzle, and the graph paper was our guide!
10. Electrical Outlets: Mark the precise locations for all outlets, especially above counters (required every 2 feet in many codes) and for specific appliances. Don't underestimate how many you'll need!
11. Door and Drawer Swings: Use your pencil to lightly sketch the arc of cabinet doors and appliance doors when they open. This helps identify potential collisions *before* installation. It's a critical, often overlooked, step.
12. Thinking Vertically: Remember, a kitchen has height too! Plan for upper cabinets, open shelving, and decorative elements. Use graph paper to sketch elevations (side views) of walls to ensure upper cabinets don't visually overwhelm the space and provide adequate storage.
Materializing Your Dream: Incorporating Finishes & Details
Your printable kitchen design graph paper isn't just for floor plans and elevations; it's also a powerful tool for visualizing the aesthetic elements that will define your kitchen's style. While you can't glue swatches to the paper, you can use it to map out how colors, textures, and finishes will interact within your scaled design. This step helps bridge the gap between function and form, ensuring your kitchen isn't just practical, but also beautiful.
Here’s how to bring your material and finish choices to life on paper:
1. Countertop Contours: Lightly shade in your countertop areas on the graph paper. This helps you visualize their flow and how they connect different zones. If you have unique shapes (e.g., a curved island), sketch them accurately.
- Considerations: Note where seams might fall for larger countertops, especially with materials like quartz or granite.
2. Flooring Flow: Draw the boundaries of your kitchen flooring. If you're extending it into an adjacent room, sketch that connection too. This helps you visualize transitions and overall flow.
- Pattern Play: If you're considering a patterned tile or wood floor, you can use the grid on your printable kitchen design graph paper to sketch out a small section of the pattern to see how it might lay out.
3. Cabinet Fronts & Hardware: While you can't draw every detail, you can denote cabinet styles. For example, if you're planning shaker-style doors, you can draw simple rectangles. If you're thinking about different upper and lower cabinet colors, use different shading or labels.
- Hardware Placement: Lightly mark where handles or pulls will go. This helps assess symmetry and ergonomics.
4. Backsplash Design: Sketch the backsplash area on your elevation drawings. If you have a specific tile size or pattern in mind, you can use the graph paper to map out a small section of the tiling.
- Feature Walls: If you're planning a unique backsplash behind the range, use your graph paper to detail its dimensions and how it integrates with the surrounding cabinets.
5. Lighting Layout: This is where graph paper truly shines for aesthetics and functionality.
- Ambient: Mark the location of recessed lights, pendant lights, or flush mounts.
- Task: Indicate under-cabinet lighting, or task-specific pendants over an island.
- Accent: If you have special display cabinets, mark where internal lighting might go.
- Personal Scenario Example 1: For my very first kitchen design, I forgot to account for lighting placement on the graph paper. The result? A beautiful kitchen