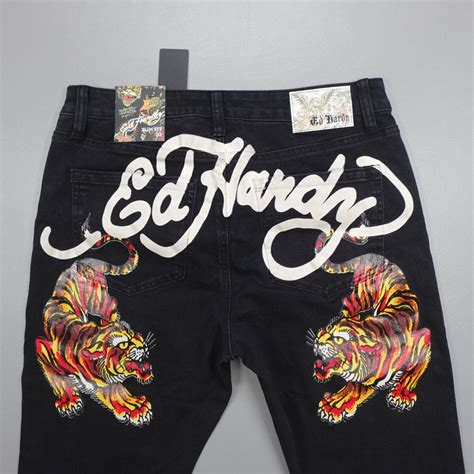
The moment you see that iconic skull-and-rose, the bold, flowing script, or the vibrant tiger, you know it's Ed Hardy. It’s more than just a style; it's a statement, a nostalgic trip to an era of maximalist cool and tattoo flash art. If you've landed here, chances are you're dreaming of infusing that same rebellious, eye-catching energy into your own print projects – from custom t-shirts to unique posters, or even just digital art. Trust me, I get it. I once spent an entire weekend trying to get a vintage tattoo script to look *just right* on a custom denim jacket, only to realize my font wasn't actually "printable" in the way I thought. It was a headache I don't wish on anyone!
But don't worry, you’re in the right place. As a fellow creative who's navigated the wild world of typography and print, I’m here to guide you through finding, preparing, and successfully using printable Ed Hardy fonts for your projects. We'll dive deep into what makes a font truly "printable," how to find those iconic styles (or close approximations), and how to avoid common pitfalls that can turn your creative vision into a pixelated nightmare. Let’s get that ink-inspired magic onto your canvas!
Discovering Your Perfect Ed Hardy-Style Fonts
Finding fonts that truly capture the essence of Ed Hardy's iconic designs isn't just about typing "tattoo script" into a search bar. It's about understanding the nuances of his style and finding fonts that embody that bold, often ornate, and undeniably rebellious spirit.
- The Direct Match Dilemma: While some fonts are directly inspired by Don Ed Hardy's actual tattoo lettering, many are "interpretations." Real Ed Hardy *fonts* per se (licensed for general use in a typeface format) are rare. Focus on fonts that evoke the *spirit* of his work: ornate scripts, bold serifs, and classic tattoo flash lettering.
- "Sailor Jerry" & Classic Tattoo Styles: Don Ed Hardy's work is deeply rooted in traditional American tattooing. Look for fonts categorized as "Sailor Jerry," "Chicano," "Traditional Tattoo," or "Flash Art" scripts. These are often the closest you'll get to the authentic hand-drawn feel.
- Beyond Script: Incorporating Display Fonts: Remember, Ed Hardy designs aren't *just* script. They often incorporate bold, blocky display fonts, sometimes with decorative elements like banners, swirls, or flourishes. Think about pairing a strong script with a complementary robust display font for headings.
- Exploring Font Marketplaces: Sites like DaFont, Font Squirrel, Google Fonts (though less "Ed Hardy-specific"), Creative Market, and MyFonts are treasure troves. Use keywords like "tattoo script," "vintage tattoo," "flash art," "ornate font," "hand-drawn script," or "Chicano font."
- Free vs. Premium: The Quality Question: While free fonts are tempting, premium fonts often offer better kerning (spacing between letters), more character variations (ligatures, alternates), and robust file formats (like OTF or TTF) that are better suited for professional printing. I've learned the hard way that a free font might look great on screen but fall apart when scaled for print.
Navigating Licensing & Copyright: Don't Get Burned!

This is where the rubber meets the road, especially when you're thinking "printable Ed Hardy fonts" for commercial use. Getting this wrong can lead to serious headaches, or worse, legal issues.
- Personal Use vs. Commercial Use: This is the golden rule. Most free fonts are for "personal use only." This means you can use them for your personal projects (e.g., a birthday card for a friend), but *not* for anything you sell or profit from (e.g., t-shirts you sell online, client work). Always check the license!
- Understanding Font Licenses: Licenses vary wildly. Some are "desktop licenses," allowing you to use the font on your computer for print. Others might have specific clauses for web use, app use, or even embroidery. Don't assume.
- The Ed Hardy Brand Itself: It's crucial to understand that "Ed Hardy" is a protected brand. While you can use *fonts that mimic his style*, you cannot use the "Ed Hardy" name, logo, or direct reproductions of his copyrighted artwork (like specific skull designs) without permission. Your goal is "Ed Hardy *inspired*," not "Ed Hardy *knock-off*."
- When in Doubt, Buy a Commercial License: If you're planning on selling anything with your design, invest in a commercial license for the font. It's usually a one-time fee and provides peace of mind. It’s a small price to pay to avoid a cease-and-desist letter.
- Reading the Readme: Many font downloads come with a "Read Me" file or a separate license agreement. Open it, read it, understand it. This is your bible for how you can legally use the font.
Preparing Your Fonts for Flawless Printing
So you've found the perfect Ed Hardy-esque font and cleared the licensing hurdles. Now, let's talk about making sure it looks stunning when it leaves your screen and hits the paper (or fabric!). This is where the "printable" part truly comes alive.
- Vectors are Your Best Friend (Always!): For anything being printed professionally (screen printing, direct-to-garment, large format posters), your text needs to be converted to vectors. This means turning your editable text into shapes. Why? Because vector graphics can be scaled infinitely without losing quality, unlike pixel-based images.
- "Outline Text" or "Create Outlines": In design software like Adobe Illustrator or Inkscape, this is often called "Create Outlines" or "Convert to Paths." Once you do this, your text is no longer editable as text, but as shapes that a printer can interpret perfectly. Pro Tip: Always save a version of your file *before* outlining in case you need to edit the text later!
- Resolution for Rasterized Elements: If you're mixing your Ed Hardy-style text with rasterized images (like a scanned drawing or a high-res photo), ensure these images are at least 300 DPI (dots per inch) at the final print size. Lower resolutions will look blurry or pixelated.
- Color Modes: CMYK for Print: For most commercial printing, use CMYK (Cyan, Magenta, Yellow, Black) color mode. Your screen displays RGB (Red, Green, Blue), which has a wider color gamut. Converting to CMYK can sometimes shift colors slightly, so be aware of this.
- Proofing is Paramount: Before sending anything to print, get a proof. This could be a digital proof from your printer or even a small print on your home printer (if possible). This is your last chance to catch typos, alignment issues, or resolution problems. Don't be like me, sending a design with a subtle typo to the screen printer – that was an expensive lesson!
Creative Applications: Beyond the T-Shirt

While Ed Hardy's style is synonymous with apparel, these bold, expressive fonts open up a world of creative possibilities for all sorts of print projects.
- Custom Apparel & Accessories: T-shirts, hoodies, caps, tote bags – this is the obvious choice. Imagine a personalized denim jacket with a custom back patch designed with that iconic script.
- Event Invitations & Flyers: Think rock concert posters, tattoo convention flyers, or even a themed birthday party invitation. The fonts instantly convey a rebellious, energetic vibe.
- Personalized Stationery & Gifts: Custom notepads, unique greeting cards, or even framed art prints for a friend who loves the aesthetic. A friend of mine created custom beer labels for his homebrew using a flash-art font, and they were a huge hit!
- Brand Identity for the Bold: If you're designing a logo or branding for a tattoo parlor, a custom motorcycle shop, a vintage clothing store, or a punk rock band, these fonts can be a cornerstone of the visual identity.
- Digital Art & Social Media Graphics: While not "printable," mastering these fonts for print makes them even more versatile for striking social media banners, YouTube channel art, or digital wallpapers.
Common Pitfalls: What to AVOID When Using Ed Hardy Fonts for Print

Just like a bad tattoo, some font choices and printing mistakes are hard to undo. Learn from my missteps so your projects shine!
- Don't Use JPEGs for Print! Never send a JPEG or other raster image of your text to a professional printer. It will pixelate. Always use vector files (AI, EPS, PDF with outlined text) or high-resolution PNGs with transparent backgrounds *if* the text is already part of a raster image at 300 DPI.
- Avoid Excessive Font Usage: While Ed Hardy's style is maximalist, using too many different fonts can make your design look cluttered and unprofessional. Stick to 1-3 complementary fonts – perhaps one strong script, one bold display, and one simple sans-serif for supporting text.
- Ignoring Legibility: Some ornate scripts are beautiful but hard to read, especially at small sizes. Test your chosen font at various sizes to ensure it's still legible for your intended purpose. A cool font that no one can read isn't cool; it's frustrating.
- Disregarding Contrast: Ensure your font color stands out against its background. A black script on a dark grey background might look edgy on screen, but it can disappear in print.
- Forgetting to Outline Fonts (Again!): This is the number one rookie mistake. I've seen countless design files where the designer forgot to outline the fonts, and the printer's system substituted them with a generic Arial. Don’t be like me and learn this lesson the hard way in a panic call from the print shop! Double-check, then triple-check.
Tips for Personalizing Your Ed Hardy-Inspired Designs
The beauty of the Ed Hardy aesthetic is its unique, hand-crafted feel. Here’s how you can infuse that personal touch into your own projects.
- Mix & Match Styles Thoughtfully: Don't be afraid to combine a bold script with a more rugged, distressed font for emphasis. The juxtaposition can create visual interest.
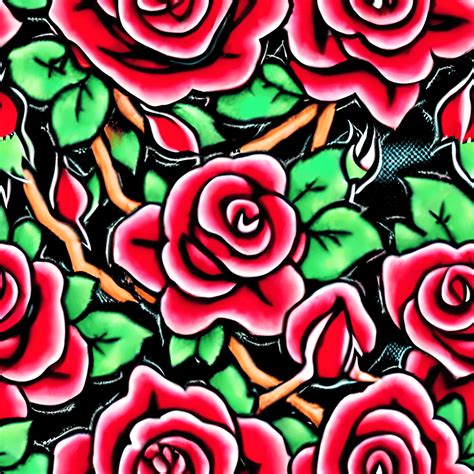
- Incorporate Classic Tattoo Elements: Beyond just fonts, add vector elements like roses, skulls, daggers, anchors, or eagles. These complement the typography and amplify the Ed Hardy vibe.
- Distress and Texture: To give your fonts that worn, vintage feel, apply textures or distress effects in your design software. This can make a crisp digital font look like it's been worn for years.
- Hand-Drawn Flourishes: Even if you're using a digital font, consider hand-drawing small flourishes, banners, or swirls to wrap around your text. Scan them in, vectorize them, and integrate them for a truly unique touch. I find this approach works best for making a design truly *yours* and less generic.
- Color Palette is Key: Ed Hardy is known for vibrant, often contrasting colors. Don't be afraid of bold reds, rich blues, deep greens, and stark blacks and whites.
Conclusion
Diving into the world of printable Ed Hardy fonts is a fantastic way to inject bold personality and timeless rebellion into your creative projects. From understanding where to find the perfect tattoo-inspired script to mastering the nuances of licensing and preparing your files for print, you now have the insights to bring your vision to life. Remember, attention to detail in the pre-press stage is what separates a good design from a great, print-ready masterpiece. Now go forth, get creative, and let those designs roar – without any printing nightmares!