Hey there, fellow anomaly enthusiast and crafting wizard! Are you ready to dive headfirst into the mysterious, whimsical, and utterly delightful world of *Gravity Falls*? Specifically, are you itching to bring everyone's favorite twins, Dipper and Mabel Pines, into your physical reality, in glorious 3D, right from your printer? Trust me, you're in for a treat! As someone who once spent an entire weekend trying to perfectly fold a miniature Mystery Shack (with questionable success, but immense joy!), I know the thrill of seeing these characters take shape in your hands. This isn't just about printing; it's about crafting, connecting with a beloved story, and adding a touch of the supernatural to your space.
Whether you're a seasoned papercraft pro with a utility knife collection that rivals a surgeon's, or a complete beginner who just learned what "cardstock" means, this comprehensive guide is your Journal 3 for everything printable Dipper and Mabel 3D. We’re going to unlock the secrets to finding the best templates, mastering the art of assembly, and even customizing your creations to make them truly unique. Get ready to transform flat sheets of paper into dimensional masterpieces, because by the end of this, you’ll be crafting like a resident of Gravity Falls itself. Let's make some magic happen!
---
Table of Contents

- [Unlocking the Mystery: Understanding Printable Dipper and Mabel 3D Models](#unlocking-the-mystery-understanding-printable-dipper-and-mabel-3d-models)
- [The Hunt for Treasures: Where to Find the Best Printable Dipper and Mabel 3D Files](#the-hunt-for-treasures-where-to-find-the-best-printable-dipper-and-mabel-3d-files)
- [Your Crafting Arsenal: Essential Tools and Materials for Bringing Dipper & Mabel to Life](#your-crafting-arsenal-essential-tools-and-materials-for-bringing-dipper--mabel-to-life)
- [The Art of Assembly: Step-by-Step Guides for Your 3D Dipper and Mabel Papercraft](#the-art-of-assembly-step-by-step-guides-for-your-3d-dipper-and-mabel-papercraft)
- [Beyond the Blueprint: Creative Customization and Personalizing Your Gravity Falls Creations](#beyond-the-blueprint-creative-customization-and-personalizing-your-gravity-falls-creations)
- [Expanding Your Crafting Universe: Exploring Other 3D Options Beyond Basic Papercraft](#expanding-your-crafting-universe-exploring-other-3d-options-beyond-basic-papercraft)
- [Showcasing Your Masterpieces: Display and Decor Ideas for Your Dipper & Mabel 3D Figures](#showcasing-your-masterpieces-display-and-decor-ideas-for-your-dipper--mabel-3d-figures)
- [Connecting with Fellow Fans: The Gravity Falls Crafting Community and Sharing Your Creations](#connecting-with-fellow-fans-the-gravity-falls-crafting-community-and-sharing-your-creations)
- [How to Choose the Best Printable Dipper and Mabel 3D Model for Your Needs](#how-to-choose-the-best-printable-dipper-and-mabel-3d-model-for-your-needs)
- [Common Pitfalls to Avoid on Your Gravity Falls Crafting Journey](#common-pitfalls-to-avoid-on-your-gravity-falls-crafting-journey)
- [Advanced Tips for Experts: Elevating Your Dipper and Mabel 3D Crafting](#advanced-tips-for-experts-elevating-your-dipper-and-mabel-3d-crafting)
- [Conclusion: Your Adventure Awaits!](#conclusion-your-adventure-awaits)
---
Unlocking the Mystery: Understanding Printable Dipper and Mabel 3D Models
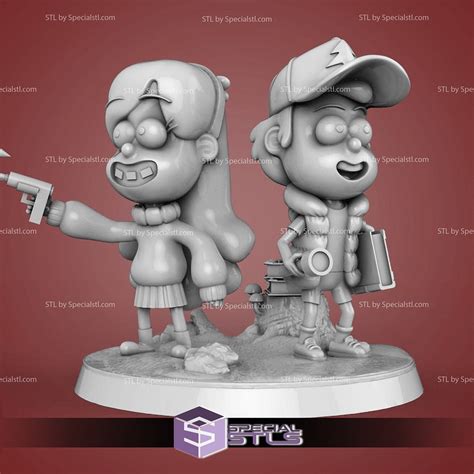
Before we grab our scissors and glue, let's establish what we mean by printable Dipper and Mabel 3D models. This isn't just a flat picture; it's a template designed to be cut, folded, and glued into a three-dimensional representation of your favorite *Gravity Falls* characters. Think of it like a puzzle where you get to build the pieces yourself! These models range from simple, blocky designs perfect for beginners, to intricate, highly detailed figures that challenge even the most experienced crafters.
The beauty of these printable Dipper and Mabel 3D projects lies in their accessibility and versatility. All you really need is a printer, some paper, and a few basic tools, and you're ready to start building your own miniature *Gravity Falls* universe. It's a fantastic way to engage with the show beyond just watching it, transforming passive enjoyment into an active, creative endeavor.
Here’s a deeper look into the types and nuances of these fantastic fan creations:
1. Papercraft/Pepakura Models: This is the most common form of printable Dipper and Mabel 3D. These templates typically come as PDF files that you print out. Each piece is marked with lines for cutting, folding, and gluing tabs. The result is a hollow, geometric 3D figure that captures the essence of the characters.
- *Personal Scenario:* My first attempt at a papercraft Dipper was a blocky, slightly lopsided affair, but the sheer satisfaction of seeing his hat come together from a flat piece of paper was enough to hook me!
2. Low-Poly Figures: Often a subset of papercraft, low-poly models use fewer polygons (flat surfaces) to create a distinct, angular aesthetic. This style can be surprisingly effective for characters like Dipper and Mabel, giving them a modern, stylized look while simplifying the assembly process.
3. Pop-Up Card Elements: While not full 3D models, some printables offer elements that pop up from a card or diorama, creating a sense of depth. Imagine opening a birthday card to reveal a miniature Dipper peeking out from behind a tree!
4. Diorama Components: Beyond just the characters, you can find printable Dipper and Mabel 3D elements that allow you to build miniature scenes – think tiny Mystery Shacks, gnome armies, or even the portal itself! These often involve multiple layers of paper or foam to create depth.
5. Simplified Kids' Crafts: Many templates are designed with younger fans in mind, featuring larger pieces, fewer folds, and simpler assembly. These are fantastic for family crafting sessions.
6. Advanced Articulated Models: For the truly ambitious, some creators design models with movable parts, allowing you to pose Dipper or Mabel in various action stances. These often require more precise cutting and assembly, and sometimes additional materials like wire or small fasteners.
7. Textured vs. Flat Designs: Some templates come with pre-printed textures and details, meaning your Dipper will already have his vest pattern and Mabel her iconic sweaters. Others are minimalist, offering a blank canvas for you to color, paint, or add your own details.
8. Varying Scales: You can find models ranging from tiny, desk-sized figures to larger, display-worthy pieces. The scale often dictates the complexity and the amount of paper required.
9. Online Tutorials and Communities: Many templates come with video tutorials or step-by-step photo guides, making the process much less intimidating. There are also vibrant online communities where crafters share tips, tricks, and their finished projects.
10. Fan-Created vs. Officially Licensed: The vast majority of printable Dipper and Mabel 3D models you'll find online are fan-created. While Disney doesn't typically release official papercraft templates, the fan community more than makes up for it with incredible creativity and dedication.
- *Hypothetical Scenario:* I once stumbled upon a fan-made replica of Mabel's grappling hook that was so detailed, I spent an entire afternoon just admiring the clever engineering before even attempting to print and build it. The creator clearly poured their heart into it!
11. Educational Value: Beyond fandom, these projects are fantastic for developing fine motor skills, spatial reasoning, and patience – for kids and adults alike! It’s a hands-on way to understand geometry and construction.
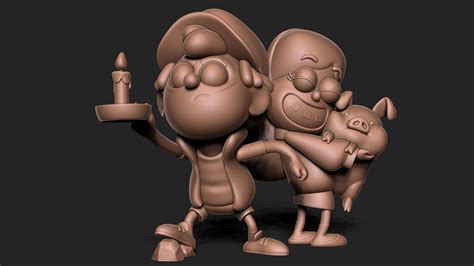
12. The "Why": Connecting with Fandom: Ultimately, these projects are a tangible way to express love for *Gravity Falls*. Building a Dipper or Mabel figure is like bringing a piece of that magical, mysterious world right into your home, letting you relive your favorite moments and characters.
The Hunt for Treasures: Where to Find the Best Printable Dipper and Mabel 3D Files

Alright, adventurer, grab your trusty Journal (or, you know, your web browser)! The first step in bringing your printable Dipper and Mabel 3D dreams to life is finding the perfect templates. The internet is a vast and wondrous place, filled with incredible fan-created resources. But like any good treasure hunt, you need to know where to look. I’ve spent countless hours sifting through sites, and here's what I've learned about navigating the digital wilderness for the best *Gravity Falls* papercraft.
Here are some of the prime locations and strategies for your search:
1. DeviantArt & ArtStation: These platforms are goldmines for fan art of all kinds, including printable Dipper and Mabel 3D templates. Many talented artists share their papercraft designs here, often for free or as part of a small, affordable package.
- *Tip:* Use specific search terms like "Gravity Falls papercraft," "Dipper Pines 3D model printable," or "Mabel Pines pepakura."
2. Pinterest & Instagram: Visual platforms like these are fantastic for discovery. Search for hashtags like #GravityFallsPapercraft, #DipperMabelDIY, or #PrintableGravityFalls. You'll often find direct links to templates or inspiration that leads you to the original creators.
3. Dedicated Papercraft Websites/Forums: There are entire communities built around papercraft. Websites like Pepakura.eu or specific fan forums often host large collections of templates. While not always *Gravity Falls*-specific, you can often find talented designers who have tackled these characters.
4. Etsy & Creative Market: For those willing to invest a small amount, these marketplaces offer high-quality, professionally designed printable Dipper and Mabel 3D files. Purchasing a template often ensures clearer instructions, better design, and direct support from the creator.
- *Personal Scenario:* I once bought a super detailed Mabel model from Etsy, and the instructions were so clear, it felt like the creator was right there guiding me. It was definitely worth the few dollars!
5. YouTube Tutorials: Many papercraft enthusiasts create video tutorials that not only show you how to assemble a model but also link directly to where you can download the templates. Watching someone build it step-by-step is an invaluable resource, especially for beginners.
6. Fan Blogs & *Gravity Falls* Wiki Forums: Deep within the fandom, you might find dedicated blogs or forum threads where fans share their own creations or curate lists of excellent templates they’ve discovered. These are often hidden gems.
7. 3D Model Repositories (for 3D Printing, then adapting): While primarily for 3D printing, sites like Thingiverse or MyMiniFactory sometimes host low-poly 3D models of Dipper and Mabel. With some advanced software (like Pepakura Designer), you can sometimes "unfold" these 3D models into printable papercraft templates. This is a more advanced technique but opens up a world of possibilities.
8. University/Hobbyist Project Archives: Occasionally, students or hobbyists doing projects related to 3D modeling or character design might release their work as free printables. These can be harder to find but offer unique interpretations.
9. Reverse Image Search: If you see a finished printable Dipper and Mabel 3D model online that you love, try a reverse image search (e.g., Google Images). This can often lead you back to the original source or creator's page where the template is available.
10. Terms of Use & Licensing: Always, always check the creator's terms of use. Most fan-created templates are for personal use only. Respect the artist's work and intellectual property. Don't redistribute or sell their designs without permission.
- *Hypothetical Scenario:* I once found a fantastic Dipper model, only to realize the creator explicitly asked for credit if shared online. It's a small detail, but respecting those wishes builds a better community for everyone.
11. Quality Check: Before printing an entire model, do a quick check of the template. Are the lines clear? Are the instructions legible? Does it look like a high-resolution file? A blurry template is a recipe for frustration.
12. Start Simple, Then Advance: If you're new to this, begin with a simpler, blockier Dipper or Mabel. Don't jump straight into an articulated model with 50 tiny pieces. Build confidence, then tackle the more complex designs.
Your Crafting Arsenal: Essential Tools and Materials for Bringing Dipper & Mabel to Life
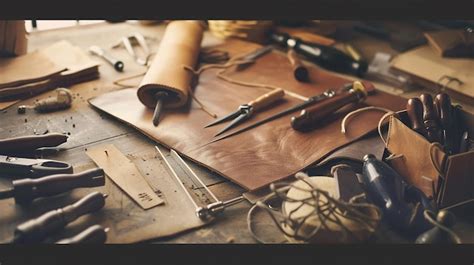
Alright, recruits! Every good adventurer needs their gear, and crafting your printable Dipper and Mabel 3D models is no different. You don't need a full-blown workshop, but having the right tools will make your experience infinitely more enjoyable and your finished products much more polished. Think of this as your essential supply list for a successful *Gravity Falls* papercraft expedition.
Here’s a detailed breakdown of what you'll need, from the absolute basics to some optional upgrades:
1. A Reliable Printer: This is your portal to the 3D world! An inkjet or laser printer will work. Ensure it's capable of printing in color (unless you're going for a monochrome look) and at a decent resolution. Check your ink levels before you start!
- *Expert Tip:* If your printer allows, select a "best quality" or "photo quality" print setting for crisper lines and more vibrant colors.
2. Quality Paper/Cardstock: This is where your Dipper and Mabel will truly come to life.
- Cardstock (65-110 lb / 176-300 gsm): This is the gold standard. It's sturdy enough to hold its shape but still pliable enough for folding. My personal preference is matte cardstock around 80-100lb; it just feels right and takes glue well without getting too soggy.
- Printer Paper (Regular 20 lb): Only use this for the simplest, smallest models or for practice. It's too flimsy for most 3D structures.
- Photo Paper (Matte or Glossy): Can produce vibrant colors, but glossy can be tricky with glue. Matte photo paper can work well for a premium finish, but test it first.
- *Personal Scenario:* I once tried using regular printer paper for a detailed Waddles model, and it ended up looking like a sad, crumpled marshmallow. Never again! Cardstock is your friend!
3. Sharp Scissors: A good pair of craft scissors is essential for clean cuts. Keep them dedicated to paper to maintain their sharpness.
4. Precision Craft Knife/X-Acto Knife: For intricate details, tight corners, and straight lines, a craft knife is indispensable.
- Cutting Mat: Absolutely crucial if you're using a craft knife. It protects your work surface and provides a non-slip base. Don't be like me and accidentally carve a cryptic symbol into your dining table!
- Ruler (Metal Preferred): For guiding your craft knife to make perfectly straight cuts and for precise scoring. A metal ruler prevents accidental nicks into the ruler itself.
5. Adhesive: Your bonding agent for Dipper and Mabel's structural integrity.
- Craft Glue (PVA Glue): My go-to. It dries clear, holds strong, and gives you a little working time. Look for one with a fine applicator tip.
- Glue Stick: Good for larger, less critical tabs or for beginners, but often doesn't provide the same strong, lasting hold as liquid glue.
- Super Glue/Cyanoacrylate: Use with extreme caution and only for very small, fiddly parts that need an instant, strong bond. It dries quickly and can bond skin!
- Double-Sided Tape (Thin): Great for quick, clean bonds, especially on larger flat areas. Not ideal for tabs that need to curve.
6. Scoring Tool: This is a game-changer for clean, crisp folds.
- Bone Folder: A classic tool for scoring and creasing paper. It compresses the paper fibers, making for super sharp folds.
- Empty Ballpoint Pen/Dull Knife: You can use the back of a dull craft knife or an empty ballpoint pen to score lines by gently running it along a ruler.
7. Tweezers: For handling tiny tabs, placing small pieces, and getting into tight spots. A lifesaver for intricate models!
8. Toothpicks/Cotton Swabs: Useful for applying tiny amounts of glue or for cleaning up excess.
9. Small Clips or Clamps (Optional but Recommended): Mini binder clips or clothes pins can hold glued tabs in place while they dry, ensuring a strong bond.
10. Work Surface: A clean, well-lit, and comfortable area. A dedicated space helps keep things organized.
11. Storage Solutions: Small containers or Ziploc bags for storing cut pieces before assembly, especially if you're working on a multi-part model. Nothing worse than losing Mabel's tiny grappling hook!
12. Gloves (Optional): If you're sensitive to glue or want to keep your prints pristine, thin cotton gloves can be useful.
Equip yourself with these tools, and you'll be well on your way to crafting a printable Dipper and Mabel 3D collection that would make Grunkle Stan proud (or at least, make him try to sell them in the gift shop).
The Art of Assembly: Step-by-Step Guides for Your 3D Dipper and Mabel Papercraft
You’ve found your perfect printable Dipper and Mabel 3D templates, gathered your tools, and now it’s time for the main event: bringing them to life! This is where the magic happens, but also where patience and precision become your best friends. Don't worry, even if you feel like you have the crafting skills of a gnome, I'm here to guide you through the process, step by step.
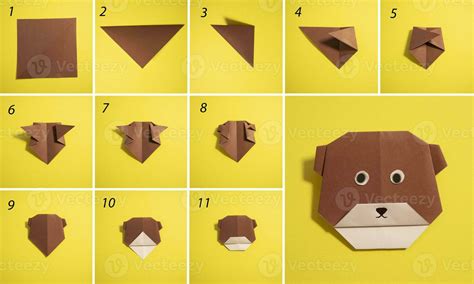
Here's a detailed breakdown of the assembly process, designed for both beginners and those looking to refine their technique:
1. Print Your Template with Precision:
- Check Printer Settings: Ensure you're printing at 100% scale (no "fit to page") to maintain accurate dimensions. Select the highest quality print setting and choose the correct paper type.
- Use Quality Paper: As discussed, cardstock is king. It prevents warping and gives your model structural integrity.
- Print in Batches (If Applicable): For multi-page models, print one page at a time to check for issues, or print everything at once and keep pages organized.
- *Personal Scenario:* I once printed a template at 90% scale by accident, and my Dipper ended up looking like he'd been hit by a shrinking ray! Always double-check those print settings!
2. Understanding the Template Markings:
- Cut Lines: Usually solid lines. These are where your scissors or craft knife will go.
- Fold Lines (Mountain Fold): Often indicated by a dashed line or a line with outward-pointing arrows. These folds create an "A" shape (like a mountain peak).
- Fold Lines (Valley Fold): Typically a dotted line or a line with inward-pointing arrows. These folds create a "V" shape (like a valley).
- Glue Tabs/Flaps: These are the shaded or numbered areas that you will apply glue to, attaching them to other parts of the model. They often have specific numbers or letters corresponding to where they attach.
3. The Cutting Phase: Precision is Key:
- Use a Craft Knife for Straight Lines: For long, straight edges, place your metal ruler along the cut line and carefully run your craft knife along it. Always cut away from yourself!
- Scissors for Curves and Intricacies: For curved lines or smaller details (like Mabel's headband or Dipper's hat emblem), use sharp craft scissors. Take your time, making small, controlled cuts.
- Cut Out All Pieces First: It's often easier to cut out all the individual components before you start folding. Keep them organized in piles or small containers.
- *Expert Tip:* Don't try to cut perfectly on the line; aim to cut just *inside* the line for a cleaner, seamless edge once assembled.
4. Scoring for Perfect Folds:
- Identify All Fold Lines: Before folding, gently score *all* designated fold lines. This weakens the paper fibers, allowing for crisp, straight folds.
- Use a Ruler and Scoring Tool: Place your metal ruler precisely on the fold line. Run your bone folder or empty ballpoint pen along the line with firm but not excessive pressure.
- Score on the "Inside": For a mountain fold, score on the side that will become the *outside* of the fold. For a valley fold, score on the side that will become the *inside* of the fold.
5. The Folding Frenzy: Bringing Dimension:
- Fold Along Scored Lines: Carefully fold each piece along its scored lines, creasing firmly with your fingers or a bone folder. The cleaner the fold, the better your model will look.
- Practice Folds: For complex pieces, do a "dry run" of the folds to see how the piece will come together before applying glue.
6. Gluing and Assembly: The Grand Finale:
- Work in Sections: Don't try to glue everything at once. Most templates are designed to be assembled piece by piece, or in small, manageable sections. Follow the numbered or lettered instructions on your template.
- Apply Glue Sparingly: A little goes a long way! Apply a thin, even layer of craft glue to the glue tabs. Too much glue will make the paper soggy and can cause bubbling or visible residue.
- Align and Press: Carefully align the glue tab with its corresponding edge. Press firmly and hold in place for a few seconds (or use clips) until the glue sets.
- Use Tweezers for Small Tabs: For tiny, fiddly tabs, tweezers are your best friend for precise placement and holding.
- Allow Drying Time: Be patient! Let glue dry completely before moving on to the next section, especially for structural components. Rushing can lead to pieces coming apart or deforming.
- *Hypothetical Scenario:* I was once so excited to finish a Mabel model that I rushed the glue on her iconic sweater. It sagged and pulled apart, and I had to re-glue the whole section. Lesson learned: patience is key, even when Waddles is calling!
7. Troubleshooting Common Issues:
- Mismatched Edges: Re-check your folds and cuts. Sometimes a slight miscut can throw off alignment.
- Glue Bleed: Use less glue, or try a different adhesive (like thin double-sided tape for certain areas).
- Warped Paper: Ensure you're using cardstock and not over-saturating with glue.
- Loose Joints: Apply a little more glue, hold firmly, or use a clip while it dries.
8. Finishing Touches:
- Clean Up Excess Glue: Use a cotton swab or a slightly damp cloth to gently wipe away any visible glue residue before it dries completely.
- Burnish Edges: For a super clean look, you can use a bone folder to burnish (rub firmly) along the edges of your folds.
- Add Details: If your template is plain, this is the time to add your own coloring, glitter (Mabel would approve!), or other embellishments.
Congratulations, you've just built your very own printable Dipper and Mabel 3D figure! Now stand back and admire your handiwork. You've earned it!
Beyond the Blueprint: Creative Customization and Personalizing Your Gravity Falls Masterpiece
So, you've mastered the art of assembling your printable Dipper and Mabel 3D figures. But why stop there? The true magic of crafting lies in making something uniquely your own. *Gravity Falls* is a show bursting with personality, charm, and endless oddities, and your papercraft creations should reflect that! This section is all about taking your Dipper and Mabel models from "just printed" to "personalized masterpiece."
Get ready to unleash your inner artist and give your Dipper and Mabel figures that extra spark of *Gravity Falls* flair:
1. Coloring and Shading:
- If Your Template is Grayscale: This is your chance to bring the characters to life with colored pencils, markers, or even watercolors. Experiment with shading to add depth.
- Adding Detail to Pre-Colored Models: Even if your template is colored, you can use fine-tip markers or colored pencils to enhance existing lines, add subtle shading to creases, or even draw in tiny details like freckles on Mabel.
- *Expert Tip:* Use alcohol-based markers (like Copic or Ohuhu) for smooth, blendable color without saturating the paper too much.
2. Texture and Embellishments:
- Glitter (Mabel's Favorite!): A touch of glitter glue on Mabel's sweater, a shooting star, or Waddles' blanket can add that signature sparkle.
- Fabric Scraps: Tiny pieces of felt or fabric can be glued onto clothing for a more tactile, realistic texture. Imagine a fuzzy sweater for Mabel!
- Puffy Paint: Use puffy paint to add raised details like seams on Dipper's vest or the outline of a specific symbol.
- Rhinestones/Sequins: For Mabel's accessories or a touch of extra bling.
- Faux Fur/Yarn: A tiny bit of faux fur could be used for Waddles, or yarn for Mabel's hair or a miniature grappling hook.
3. Accessories and Props:
- Miniature Journals: Print out tiny versions of Journal 3 or create your own with brown paper and a gold marker. Dipper needs his notes!
- Waddles!: No Mabel is complete without her beloved pig. Search for a printable Dipper and Mabel 3D companion model for Waddles, or craft a simple one from felt or clay.
- Grappling Hook: A tiny paper or wire grappling hook for Mabel.
- Pine Tree Hat/Shooting Star Sweater: If your template is basic, you can craft and glue on these iconic elements.
- Mystery Shack Souvenirs: Tiny replicas of the "Sasquatch" or "Gnome" signs, or even a miniature jar of "Stan's Nuts."
- *Personal Scenario:* I once crafted a tiny, intricate Journal 3 to go with my Dipper model. It took forever, but seeing him "holding" it made the whole display feel so much more alive!
4. Creating Dioramas and Scenes:
- Background Elements: Print out a backdrop of the Gravity Falls forest, the Mystery Shack exterior, or the inside of the Shack.
- Miniature Furniture: Craft tiny paper chairs, tables, or even a tiny TV for Dipper and Mabel to interact with.
- Natural Elements: Use small twigs, faux moss, or pebbles to create a natural forest floor around your characters.
- Lighting: Small LED fairy lights can add an atmospheric glow to a diorama, especially for mysterious scenes.
5. Pose and Expression Adjustments:
- Slight Bends: Carefully bending limbs or heads slightly before gluing can add a sense of movement or expression.
- Printed Expressions: If your template allows, you can print out different facial expressions (e.g., surprised Dipper, excited Mabel) and swap them out.
6.