There's a foundational truth in the world of shooting: accuracy begins with a proper zero. It doesn't matter if you have the fanciest rifle, the most expensive scope, or the steadiest hands – if your firearm isn't zeroed correctly, you're just sending rounds downrange with an educated guess. And for many of us, especially those starting out or looking for a reliable, accessible way to dial in our firearms, the "printable 25 yard zero target" is an absolute game-changer.
I remember my first time trying to zero a new rifle. I had bought a fancy scope, watched a few YouTube videos, and thought I was ready. I went to the range with generic paper targets, spent what felt like hours chasing my shots all over the paper, and left feeling more frustrated than confident. It wasn't until a seasoned shooter at the range saw my struggle and handed me a specific "printable 25 yard zero target" that things finally clicked. He explained the logic, the simple adjustments, and how this specific target made all the difference. That day, I learned that the right tools, combined with the right knowledge, transform frustration into precision. This guide is built on that very principle: to empower you with the knowledge and the *tools* (specifically, the best printable 25 yard zero target options) to confidently achieve pinpoint accuracy.
Whether you're a seasoned marksman looking to refine your process, a new gun owner eager to learn the ropes, or someone simply curious about optimizing their shooting experience, you've come to the right place. We're going to dive deep into why 25 yards is such a critical distance, explore the different types of targets available, walk you through the zeroing process step-by-step, and equip you with the insights to avoid common pitfalls. Get ready to transform your shooting game, because by the end of this comprehensive guide, you’ll not only understand the "printable 25 yard zero target" inside out, but you’ll also be ready to put that knowledge into practice. Trust me, you don’t want to miss this!
---
Table of Contents

- [The Foundational Twenty-Five: Why 25 Yards is Your Zeroing Sweet Spot](#the-foundational-twenty-five-why-25-yards-is-your-zeroing-sweet-spot)
- [Your Arsenal of Accuracy: Exploring Different Printable 25 Yard Zero Targets](#your-arsenal-of-accuracy-exploring-different-printable-25-yard-zero-targets)
- [From Screen to Range: Printing, Prepping, and Perfecting Your Target Setup](#from-screen-to-range-printing-prepping-and-perfecting-your-target-setup)
- [The Zeroing Ritual: A Step-by-Step Guide to Achieving Pinpoint Precision](#the-zeroing-ritual-a-step-by-step-guide-to-achieving-pinpoint-precision)
- [Troubleshooting Your Target Time: Common Zeroing Challenges and Solutions](#troubleshooting-your-target-time-common-zeroing-challenges-and-solutions)
- [Beyond the Basics: Advanced Techniques for Optimizing Your 25-Yard Zero](#beyond-the-basics-advanced-techniques-for-optimizing-your-25-yard-zero)
- [The Long Game: Translating Your 25-Yard Zero to Longer Distances](#the-long-game-translating-your-25-yard-zero-to-longer-distances)
- [The Unsung Heroes: Essential Gear and Practices for Your Zeroing Session](#the-unsung-heroes-essential-gear-and-practices-for-your-zeroing-session)
- [Safety First, Always: Ensuring a Secure and Productive Zeroing Experience](#safety-first-always-ensuring-a-secure-and-productive-zeroing-experience)
- [How to Choose the Best Printable 25 Yard Zero Target for Your Needs](#how-to-choose-the-best-printable-25-yard-zero-target-for-your-needs)
- [Common Pitfalls to Avoid When Using Printable 25 Yard Zero Targets](#common-pitfalls-to-avoid-when-using-printable-25-yard-zero-targets)
- [Advanced Tips for Experts: Squeezing Every Ounce of Precision from Your 25-Yard Zero](#advanced-tips-for-experts-squeezing-every-ounce-of-precision-from-your-25-yard-zero)
- [Conclusion: Your Journey to Pinpoint Accuracy Starts Now](#conclusion-your-journey-to-pinpoint-accuracy-starts-now)
---
The Foundational Twenty-Five: Why 25 Yards is Your Zeroing Sweet Spot
If you’re new to the world of firearms, the concept of "zeroing" might seem a bit mysterious. Simply put, zeroing is the process of adjusting your firearm's sights (whether iron sights, a red dot, or a magnified scope) so that the point of aim matches the point of impact at a specific distance. And for many, especially for rifles chambered in common calibers like .223/5.56mm or .308, 25 yards is the absolute sweet spot for initially zeroing your firearm.
### 1. The Ballistic Arc and the "Near Zero"
Modern rifle cartridges don't travel in a straight line; they follow a ballistic arc. They start by rising slightly above the line of sight, reach an apex, and then begin to drop. A 25 yard zero target is incredibly effective because for many popular rifle calibers, a zero at 25 yards often correlates with a second zero (or "near zero") at a much longer distance, typically around 200-300 yards. This means you can establish a very effective combat or hunting zero without needing access to a long-distance range. It’s like setting a baseline that unlocks performance at longer ranges.
### 2. Accessibility and Convenience
Not everyone has access to a 100-yard, 200-yard, or even longer range. Many indoor ranges are limited to 25 yards, and even outdoor ranges often have 25-yard pistol bays that can accommodate rifles for initial zeroing. Using a printable 25 yard zero target allows you to get your firearm "on paper" quickly and efficiently, even in confined spaces. It saves time, ammo, and frustration.
### 3. Ease of Adjustment and Immediate Feedback
At 25 yards, even significant adjustments to your sights result in noticeable changes on the target. This immediate feedback is invaluable, especially for beginners. If your shots are wildly off at 100 yards, it can be hard to tell if it's shooter error, a massive zeroing problem, or both. At 25 yards, your groups are tighter, and you can clearly see the impact of each click of your scope’s turrets. This makes the learning process much more manageable and less intimidating.
### 4. Setting the Stage for Longer Distances
Think of your 25-yard zero as the robust foundation for your marksmanship journey. Once you have a solid zero at 25 yards, translating that to 100, 200, or even 500 yards becomes a much simpler task of understanding your specific cartridge's ballistic trajectory and making calculated adjustments. It’s significantly easier to fine-tune a zero that's already close than to start from scratch at a longer, more challenging distance.
### 5. Specific Firearm Considerations
- Rifles (AR-15s, AK-47s, Hunting Rifles): For many tactical rifles, a 25-yard zero is a standard practice, often providing a "battle zero" that keeps shots within a vital zone out to significant distances. For hunting rifles, it's a great initial step before confirming at longer ethical hunting ranges.
- Pistols: While 25 yards might be a bit far for a primary pistol zero for many, some advanced pistol shooters and those using optics on their handguns might find a 25-yard zero beneficial for precise long-range pistol work. Most will zero pistols at 7-15 yards, but the principle of using a specific, detailed printable 25 yard zero target remains the same for initial setup.
- Rimfire (.22 LR): For .22 LR rifles, 25 yards is often a primary zeroing distance, as the flatter trajectory at this range makes it ideal for plinking or small game hunting. The lower recoil also makes it perfect for practicing zeroing fundamentals.
I remember my own "aha!" moment realizing the importance of a solid 25-yard zero. I was preparing for a precision rifle class, and I’d always just zeroed at 100 yards. My instructor insisted we start at 25. He showed us how a precise 25-yard zero simplified the process of mapping out our ballistic data for longer ranges. It was like unlocking a cheat code for understanding trajectory. It removed so much guesswork and made the 100-yard and beyond confirmation shots so much faster and more accurate. It’s a truly fundamental step that saves you headaches down the line.
---
Your Arsenal of Accuracy: Exploring Different Printable 25 Yard Zero Targets
The beauty of a printable 25 yard zero target is its versatility and accessibility. You don't need fancy equipment; just a printer and the right file. But not all targets are created equal, and understanding the different types can significantly impact your zeroing success.
### 1. MOA (Minute of Angle) Grid Targets
- Description: These targets feature a central aiming point surrounded by a grid, where each line on the grid represents a specific MOA value at 25 yards. MOA is an angular measurement often used in shooting, roughly 1.047 inches at 100 yards.
- Benefits: Ideal for shooters who understand MOA adjustments on their scopes. If your scope adjusts in 1/4 MOA or 1/2 MOA clicks, these targets make it incredibly easy to count how many clicks you need to move your point of impact.
- Example Scenario: My friend, a long-range shooter, swears by MOA grid targets. He was trying to zero a new precision rifle scope, and the MOA grid allowed him to quickly calculate his adjustments. He could see his group was, say, 4 MOA left and 2 MOA high, and immediately knew how many clicks to dial without any guesswork. This saved him a ton of ammo and time on the range.
- Key Feature: Clearly marked grid lines (e.g., 1 MOA per square).
- Best For: Shooters familiar with MOA, those with MOA-based optics, and anyone serious about precise adjustments.
### 2. Mil-Dot (Milliradian) Grid Targets
- Description: Similar to MOA targets, but the grid lines represent milliradian (Mil) values. A milliradian is another angular measurement, roughly 3.6 inches at 100 yards.
- Benefits: Essential for shooters whose scopes use Mil-based adjustments. Provides the same precise, calculable feedback as MOA targets, just in a different unit.
- Example Scenario: I once helped a former military sniper zero his new civilian rifle. He was accustomed to Mil-Dot reticles and adjustments, so a Mil-grid printable 25 yard zero target was crucial for him. He could quickly use his reticle to measure the deviation from his point of aim and dial in the exact number of mils needed.
- Key Feature: Grid lines marked in Mils (e.g., 0.5 Mil or 1 Mil per square).
- Best For: Shooters familiar with Mils, those with Mil-based optics (often FFP scopes), and military/law enforcement personnel.
### 3. Universal Grid Targets (Inch/CM)
- Description: These targets feature a simple grid where each square represents a specific linear measurement (e.g., 1 inch or 1 cm) at 25 yards.
- Benefits: Extremely straightforward and intuitive, especially for beginners. You can directly measure how far off your shots are in inches or centimeters and then use a simple formula (or a scope adjustment calculator) to determine your clicks.
- Key Feature: Clear, consistent grid spacing in common units of measurement.
- Best For: Beginners, those using iron sights, and shooters who prefer linear measurements over angular ones.
### 4. Specific Firearm Targets (e.g., AR-15, AK-47)
- Description: These targets are often designed with specific zeroing procedures or ballistics in mind for popular firearms. An AR-15 target, for instance, might have multiple aiming points to facilitate a 25/300-yard zero, or specific holdovers marked.
- Benefits: Tailored for optimal zeroing with a particular platform, often providing guidance on specific offsets or sight picture considerations.
- Example Scenario: When I first got my AR-15, I found a specific printable 25 yard zero target designed for the M4 carbine. It had clear instructions on where to aim for a 25-yard zero that translated to a 300-yard battle zero. It removed all the guesswork and made my first AR zeroing experience surprisingly easy.
- Key Feature: Markings, instructions, or multiple aiming points specific to a firearm model.
- Best For: Owners of popular firearms with established zeroing procedures (e.g., AR-15, AK-47, certain pistol models).
### 5. Red Dot / Holographic Sight Targets
- Description: These targets often feature a larger, simpler aiming point (sometimes a large circle or square) that makes it easy to see your red dot or holographic reticle against it. They might also include smaller, precise aiming points within the larger one.
- Benefits: Designed to make the often-larger reticle of a red dot sight easier to use for precise zeroing, preventing the reticle from obscuring the target entirely.
- Key Feature: High contrast, often simpler designs that don't get lost behind a red dot.
- Best For: Firearms equipped with non-magnified red dot or holographic sights.
### 6. Iron Sight Targets
- Description: These targets emphasize a clear, bold aiming point that contrasts well with iron sights. They often have a distinct silhouette or a "lollipop" style aiming point that allows for a clear sight picture.
- Benefits: Optimizes the sight picture for traditional iron sights, which can be challenging to use precisely on complex targets.
- Key Feature: Simple, high-contrast aiming points.
- Best For: Firearms with fixed or adjustable iron sights.
### 7. Combination Targets
- Description: These targets attempt to combine features from several types, perhaps offering an MOA grid around a large central aiming point, or multiple aiming points for different zeroing distances.
- Benefits: Offers flexibility for shooters who might be trying different optics or want a multi-purpose target.
- Key Feature: Blends elements from other target types.
- Best For: Experienced shooters who understand their needs and want a single versatile target.
My personal preference when selecting a printable 25 yard zero target is often a combination target that features a clear central aiming point with a surrounding MOA grid. This allows me to quickly get on paper with a larger reticle, then precisely dial in my adjustments using the MOA scale. It’s a game-changer for efficiency at the range.
---
From Screen to Range: Printing, Prepping, and Perfecting Your Target Setup
You've picked out the perfect printable 25 yard zero target file. Now, how do you turn that digital blueprint into a robust, reliable tool for the range? The seemingly simple act of printing and setting up your target can significantly impact your zeroing experience. Don't underestimate the power of proper preparation!
### 1. Choosing the Right Paper: More Than Just White
- Standard Printer Paper (20-24 lb): This is the most common and accessible option. It works for most situations, especially indoors or on calm days.
- Cardstock (65-110 lb): My go-to for outdoor shooting. Cardstock is significantly thicker and more durable, resisting wind flap and holding up better to multiple shots without tearing. It also provides a cleaner, more defined hole, which is crucial for precise grouping.
- Weatherproof Paper: If you're shooting in humid, rainy, or dusty conditions, consider specialized weatherproof paper. It's more expensive but can be a lifesaver, preventing your target from disintegrating mid-session.
- Color: While most targets are designed for white paper, ensure your printer ink allows for high contrast. Black ink on white paper is usually ideal for clarity.
### 2. Printer Settings: Precision Starts Here
- Scale: 100% or "Actual Size": This is CRITICAL. Do NOT select "Fit to Page" or "Scale to Fit." Many printable 25 yard zero target designs rely on precise measurements (like 1 MOA per square). If you scale the target, those measurements become inaccurate, rendering the target useless for precise adjustments. Always ensure your printer is set to print at 100% or "Actual Size."
- Print Quality: Best/High: Choose the highest print quality setting your printer offers. This ensures crisp lines, clear grids, and a sharp aiming point, all of which contribute to better visibility and more accurate zeroing.
- Color vs. Black & White: While color targets can be visually appealing, for a zero target, high-contrast black and white is often preferred. It reduces glare and makes bullet holes easier to spot.
### 3. Laminating or Weatherproofing (Optional, but Recommended)
- Lamination: If you plan on reusing targets or shooting in damp conditions, laminating your printable 25 yard zero target is a fantastic option. It makes them tear-resistant and waterproof. You can even use small adhesive labels to cover holes and reuse them multiple times.
- Clear Packing Tape: A budget-friendly alternative to laminating. Cover the target face with clear packing tape. It offers decent weather resistance and prevents tearing.
- Spray Sealant: A quick spray with a clear acrylic sealant can add a layer of moisture resistance.
### 4. Mounting Your Target: Stability is Key
- Sturdy Backer: Never just tape a target to a flimsy stick. Use a sturdy backer like corrugated plastic, thick cardboard, plywood, or a dedicated target stand. This prevents the target from flapping in the wind and ensures a consistent point of impact.
- Secure Attachment: Use a heavy-duty stapler, strong tape (like duct tape), or target clips to firmly attach the printable 25 yard zero target to its backer. Even a slight wobble can introduce errors.
- Height and Visibility: Position the target so it’s clearly visible and at a comfortable height for your shooting position. Ideally, the center of the target should be roughly level with your shooting position to minimize vertical holdover calculations.
### 5. Environmental Factors: Don't Let Nature Disrupt Your Zero
- Wind: Even at 25 yards, strong, gusty winds can push lightweight targets around, affecting your point of aim. A sturdy backer is crucial here. Also, consider wind flags or observe the foliage around the target to gauge wind direction and speed, as it *will* affect your bullet's trajectory, even at short distances.
- Lighting: Ensure the target is well-lit but not in direct glare that washes out the aiming point. Early morning or late afternoon sun can cast long shadows or create reflections that make it hard to see. If using an indoor range, consistent lighting is usually less of an issue.
- Temperature and Humidity: While less impactful at 25 yards than at long range, extreme temperature and humidity changes can subtly affect ballistics. Be aware of drastic shifts if you're zeroing and then shooting in vastly different conditions.
My personal routine for an important zeroing session always includes printing my chosen printable 25 yard zero target on cardstock and bringing a sturdy stapler and a solid piece of corrugated plastic as a backer. I once tried to zero on a windy day with flimsy paper targets, and it was an absolute nightmare. The targets were flapping and tearing, and I couldn't get a consistent group to save my life. That day, I learned that a few extra minutes of preparation can save hours of frustration (and wasted ammo!) at the range.
---
The Zeroing Ritual: A Step-by-Step Guide to Achieving Pinpoint Precision
Now that you understand the importance of 25 yards and have your ideal printable 25 yard zero target ready, it's time for the actual zeroing process. This isn't just about sending rounds downrange; it's a methodical ritual that builds confidence and precision.
### 1. Range Safety Brief: Your First Priority
Before anything else, ensure you understand and adhere to all range rules. This includes:
- Eye and Ear Protection: Non-negotiable. Always wear adequate eye and ear protection.
- Know Your Target and Beyond: Be aware of your backstop and what's behind it.
- Firearms Safety Rules: Always follow the four fundamental rules of firearm safety:
1. Treat every firearm as if it were loaded.
2. Never point the muzzle at anything you are not willing to destroy.
3. Keep your finger off the trigger until your sights are on the target.
4. Be sure of your target and what is beyond it.
- Ceasefires: Understand ceasefire procedures and never handle your firearm during a ceasefire.
### 2. Setting Up Your Bench/Shooting Position: Stability is Key
- Stable Platform: Use a sturdy shooting bench, a solid rest, or sandbags to eliminate as much human error as possible. The goal is to isolate the firearm's accuracy from your own inconsistencies.
- Comfortable Position: Ensure you are comfortable and stable. Proper body mechanics reduce fatigue and improve consistency. A good shooting mat or comfortable chair can make a world of difference.
- Target Distance: Confirm your target is precisely 25 yards (or 75 feet) away using a tape measure or rangefinder. Don't eyeball it; precision matters here.
### 3. Bore Sighting (Optional, but Highly Recommended)
- What it is: Bore sighting aligns your scope's reticle with the bore of your firearm. It gets you "on paper" quickly, often with the first shot, saving you significant ammo.
- Methods:
- Laser Bore Sighter: A small laser device inserted into the bore or chamber.
- Optical Bore Sighter: A device that clamps to the muzzle.
- Manual Bore Sighting (for bolt actions): Remove the bolt, look through the bore at the target, then align your scope's reticle to the same point.
- Benefit: Prevents the frustration of missing the entire paper on your first shots.
### 4. The First Shots: Getting on Paper
- Initial Group: Take 3-5 slow, deliberate shots aimed at the center of your printable 25 yard zero target. Focus on consistent fundamentals: breathing, trigger control, and sight picture.
- Analyze the Group: Observe where your shots are consistently landing. Don't worry about individual flyers right now; look for the center of your group.
- My first time zeroing a rifle without bore sighting was a disaster. My shots were nowhere near the paper. I wasted an entire box of ammo just trying to find where I was hitting. Once I learned about bore sighting, it became an essential first step. It truly saves you ammo and massive frustration.
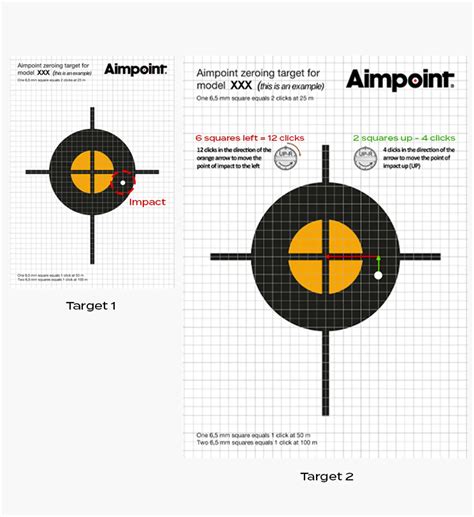
### 5. Understanding MOA/Mil Clicks and Adjustments
- Scope Turrets: Your scope has adjustment turrets (knobs) for windage (left/right) and elevation (up/down). They are usually marked with the value of each click (e.g., 1/4 MOA, 0.1 Mil).
- The Rule: To move your point of impact, you adjust your scope *in the direction you want the bullet to go*. If your shots are hitting low, adjust elevation "UP." If they're hitting left, adjust windage "RIGHT."
- Calculating Clicks:
- For MOA: If your scope is 1/4 MOA per click, and your group is 2 MOA low, you need 8 clicks UP (2 MOA / 0.25 MOA per click = 8 clicks).
- For Inches (using a 1/4 MOA scope at 25 yards): At 25 yards, 1 MOA is approximately 0.26 inches. So, 1 click of a 1/4 MOA scope moves your impact by roughly 0.065 inches (0.26 / 4). If your group is 1 inch low, you need 1