Oh, Mr. Potato Head! Just hearing his name brings a smile to my face, conjuring up images of silly faces, mismatched parts, and pure, unadulterated joy. For many of us, he’s more than just a toy; he’s a cherished piece of childhood, a symbol of creative freedom, and perhaps even a gentle reminder that it’s okay to be a little bit kooky. I still remember the sheer delight of digging through that classic red box, trying to find just the right nose or the perfect pair of eyes to complete my spud’s latest persona. It was an exercise in imagination, a tactile exploration of expressions, and honestly, a fantastic way to pass an afternoon.
But what if you don’t have the physical toy? Or what if you’re looking for a more versatile, budget-friendly, or even eco-conscious way to enjoy the magic of this iconic character? That’s where the wonderful world of Mr. Potato Head printables comes in! These digital treasures open up a universe of possibilities, transforming simple paper into a canvas for endless creativity. Whether you're a parent seeking engaging activities for your little ones, a teacher looking for a fun educational tool, a party planner needing a unique theme, or simply someone yearning for a nostalgic craft session, Mr. Potato Head printables are your secret weapon.
Trust me, you don't want to miss out on the incredible potential these printables hold. I’ve spent countless hours diving deep into the realm of printable crafts, and I can tell you, the sheer variety and utility of Mr. Potato Head templates are truly astounding. From classic designs that evoke pure nostalgia to imaginative themed sets that push the boundaries of what a potato can be, there’s something here for everyone. This comprehensive guide is designed to be your ultimate resource, packed with ideas, tips, and inspiration to help you unlock the full power of Mr. Potato Head printables. So, grab your scissors, fire up your printer, and let’s dive into a world where creativity knows no bounds – all centered around our favorite plastic spud!
Table of Contents

- [The Classic Collection: Timeless Mr. Potato Head Printables](#the-classic-collection-timeless-mr-potato-head-printables)
- [Beyond the Spud: Themed & Seasonal Printables](#beyond-the-spud-themed--seasonal-printables)
- [Learning Through Play: Educational Printables](#learning-through-play-educational-printables)
- [Party Perfect: Mr. Potato Head Printables for Celebrations](#party-perfect-mr-potato-head-printables-for-celebrations)
- [Crafty Creations: DIY Projects & Mixed Media](#crafty-creations-diy-projects--mixed-media)
- [Personalizing Your Spud: Customization & Creativity](#personalizing-your-spud-customization--creativity)
- [Digital Adventures: Interactive & Online Mr. Potato Head](#digital-adventures-interactive--online-mr-potato-head)
- [The Practical Side: Printing & Assembly Tips](#the-practical-side-printing--assembly-tips)
- [The Spud's Story: Nostalgia & The Legacy of Mr. Potato Head](#the-spuds-story-nostalgia--the-legacy-of-mr-potato-head)
- [Troubleshooting and FAQs for Your Printable Projects](#troubleshooting-and-faqs-for-your-printable-projects)
- [How to Choose the Best Mr. Potato Head Printable for Your Needs](#how-to-choose-the-best-mr-potato-head-printable-for-your-needs)
- [Common Pitfalls to Avoid When Using Printables](#common-pitfalls-to-avoid-when-using-printables)
- [Advanced Tips for Printable Experts](#advanced-tips-for-printable-experts)
- [Conclusion: Your Spud-tacular Adventure Awaits!](#conclusion-your-spud-tacular-adventure-awaits)
---
The Classic Collection: Timeless Mr. Potato Head Printables

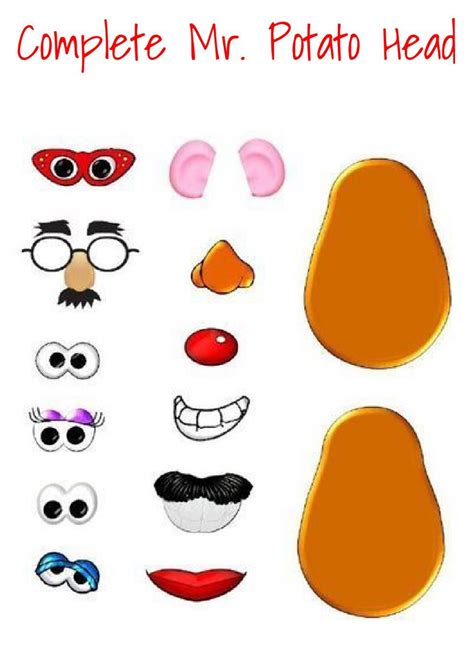
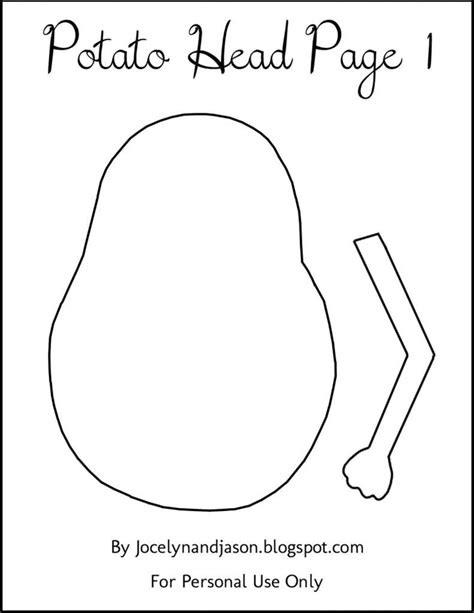
Let's start with the heart of it all: the classic Mr. Potato Head experience, transformed into a printable format. These are the templates that capture the essence of the original toy, providing all the familiar parts – the big eyes, the goofy mustache, the red shoes – ready to be cut out and arranged on a potato-shaped canvas. This category is perfect for those seeking a pure, nostalgic, and immediately recognizable Mr. Potato Head experience.
1. The Basic Body Template: This is your foundation. A simple, outlined potato shape, often with a subtle suggestion of where the eyes might go. It's the blank canvas awaiting its transformation. My kids love drawing their own potato body variations on this before adding the pre-made parts.
2. Standard Facial Features: Think round eyes, a triangular nose, a simple smile. These are the quintessential elements that make a Mr. Potato Head, well, Mr. Potato Head! Look for sets that offer a variety of expressions for these basic features.
3. Iconic Accessories: The bowler hat, the oversized glasses, the pipe (though less common now, reflecting changing times), and the classic red shoes. These accessories are what truly bring the character to life and add that touch of whimsy.
4. Expressive Mouths: From wide-open grins to puckered lips or even a surprised "O" shape, different mouth options allow for a vast range of emotions to be conveyed. It's amazing how much personality a simple line or curve can convey!
5. A Medley of Noses: Long noses, button noses, even a silly pig nose! The nose is often the most comical feature and can instantly change the entire look of your spud.
6. Ears, Eyebrows, and More: Don't forget the smaller details! Ears, bushy eyebrows, and even a few stray hairs can add layers of character and make your Mr. Potato Head truly unique.
7. Printable Storage Box: Some generous creators even provide templates for a small printable box or envelope to store all your cut-out parts. This is a brilliant addition for keeping everything organized, especially when taking your potato parts on the go.
8. Black and White for Coloring: Many classic printables come in black and white outlines, perfect for coloring before cutting. This adds an extra layer of engagement and allows kids to personalize their parts even further. My daughter once spent an entire afternoon meticulously coloring each accessory before we put them on our paper potato.
9. Pre-Colored Versions: For instant gratification, look for printables that are already colored. Just print, cut, and play! These are great for busy parents or when you need a quick activity ready in minutes.
10. Large Format Printables: Some classic sets are designed to be printed on larger paper (like tabloid or A3) or multiple sheets to create an oversized Mr. Potato Head. This is fantastic for group activities or a fun wall decoration.
11. "Build Your Own" Scene Templates: Beyond just the potato, some classic printables include a background scene (like a garden or a living room) where your Mr. Potato Head can "live." This encourages imaginative play and storytelling around the character.
12. The "Toy Story" Collection: Of course, no classic Mr. Potato Head printable discussion would be complete without mentioning the *Toy Story* versions. These often include specific features like Mrs. Potato Head's purse, extra hats, or even alien eyes, bringing the beloved movie characters to life. This is my go-to printable when my nephew comes over, as he's a huge *Toy Story* fan, and it's a game-changer for keeping him entertained.
Beyond the Spud: Themed & Seasonal Printables
While the classic Mr. Potato Head is undeniably charming, the world of printables allows us to take our spud on incredible thematic journeys! Imagine your Mr. Potato Head dressed as a vampire for Halloween, or sporting a Santa hat for Christmas. These themed sets add a fresh layer of excitement and relevance, making them perfect for holidays, special events, or just sparking new imaginative scenarios.
1. Halloween Spud: Think spooky eyes, vampire fangs, a witch's hat, a ghost sheet, or even a pumpkin body. These are fantastic for pre-trick-or-treat activities or classroom Halloween parties.
2. Christmas Cheer Potato: Santa hats, reindeer antlers, elf ears, candy cane arms, or even a snowman body. These festive printables are wonderful for getting into the holiday spirit. My kids absolutely adored making their "Santa Spuds" last Christmas.
3. Springtime Sprout: Floral hats, butterfly wings, ladybug spots, or parts that make your potato look like a blooming flower or a buzzing bee. Perfect for celebrating warmer weather and nature.
4. Summer Vacation Spud: Sunglasses, swim trunks, a surfboard, a snorkel, or even a tiny beach ball. These bring the laid-back vibes of summer right to your tabletop.
5. Winter Wonderland Potato: Scarves, mittens, earmuffs, ice skates, or even a cozy winter coat. Great for indoor activities on snowy days.
6. Career Day Potato: Dress your spud as a doctor, firefighter, chef, astronaut, artist, or a builder. This category is not only fun but also subtly introduces children to different professions.
7. Fantasy & Fairy Tale Characters: Imagine a potato knight with a shield and sword, a princess with a crown and gown, or even a silly dragon potato. These printables encourage storytelling and imaginative play.
8. Animal Kingdom Spud: Give your potato ears, whiskers, tails, and paws to transform him into a cat, dog, rabbit, or even a fantastical creature like a unicorn.
9. Sports Enthusiast Spud: Outfits for a football player, basketball player, soccer star, or gymnast, complete with tiny equipment. Encourage active play and sportsmanship!
10. Historical Figures Potato: A slightly more advanced concept, but you can find (or create!) parts to turn your Mr. Potato Head into a famous historical figure, like a pharaoh, a knight, or even a space explorer. This can be a fun supplement to history lessons.
11. Around the World Spud: Hats, outfits, and accessories representing different cultures and countries. This is a wonderful way to introduce children to global diversity in a playful manner. I once used a set like this for a "cultural fair" day in my classroom, and it sparked so many interesting conversations.
12. Monster Mash Spud: For those who love a bit of quirky fright, printables that include multiple eyes, wild hair, sharp teeth, and unusual limbs to create friendly (or not-so-friendly) monsters. These are great for encouraging unique creative combinations.
Learning Through Play: Educational Printables
Mr. Potato Head isn't just about fun; he's a fantastic educational tool! Mr. Potato Head printables lend themselves beautifully to teaching a wide range of skills, from fine motor development to emotional intelligence. They offer a hands-on, engaging way for children to learn without even realizing it.
1. Fine Motor Skill Development: The act of cutting out the small parts and then carefully positioning them on the potato body is excellent for honing scissor skills and hand-eye coordination. It's a precise task that requires focus.
2. Facial Recognition & Emotion Identification: Printables featuring different facial expressions (happy, sad, angry, surprised, silly) are perfect for teaching children about emotions. You can ask them to create a "happy potato" or discuss what makes the potato "sad."
3. Body Part Identification: Simple printables with labels for "eyes," "nose," "mouth," "ears" help young children learn and recognize basic body parts in a playful context. My youngest learned his body parts much faster with this method!
4. Storytelling & Narrative Development: Encourage children to create a Mr. Potato Head with a specific character (e.g., a "brave potato" or a "sleepy potato") and then tell a story about him. The changing expressions can guide the narrative.
5. Vocabulary Building: Introduce new words as you discuss the different parts and accessories. "Let's find the 'dapper' hat!" or "Can you put on his 'gigantic' shoes?"
6. Matching & Sorting Games: Print multiple sets of parts and have children match identical eyes, noses, or hats. You can also sort parts by color, size, or type (e.g., all the hats in one pile, all the eyes in another).
7. Following Instructions: Provide verbal instructions like, "First, put on his blue eyes, then his big red nose." This helps children practice listening comprehension and sequential thinking.
8. Symmetry & Asymmetry Exploration: Discuss how most faces are symmetrical, but then encourage them to experiment with asymmetrical designs (e.g., one big eye, one small eye) to see the humorous effect.
9. Color Recognition & Pairing: Use colored printables to teach color names. Ask children to find all the red parts or to put the blue hat on the potato.
10. Creative Problem Solving: When a child can't find the "right" part, encourage them to improvise. "What else could we use for a mustache?" This fosters flexible thinking.
11. Counting & Basic Math: Count the number of eyes, noses, or accessories they've used. "If we add two more hats, how many hats will he have?"
12. Therapeutic Use: For children struggling with communication or emotional expression, creating a Mr. Potato Head can be a non-threatening way to explore feelings or practice social interactions. As a former educator, I've seen firsthand how effective this can be in helping kids open up.
Party Perfect: Mr. Potato Head Printables for Celebrations
If you're planning a birthday party, a baby shower, or any family gathering, Mr. Potato Head printables can be an absolute game-changer for adding a unique, fun, and memorable touch. They can transform a simple event into a spud-tacular celebration!
1. "Build-A-Spud" Party Station: Set up a table with printed potato bodies (perhaps laminated or on cardstock), a variety of cut-out features, glue sticks, and crayons. Let guests create their own Mr. Potato Head as a party activity. This keeps kids engaged for ages!
2. Themed Invitations: Design your party invitations to look like a Mr. Potato Head, with removable parts or a "build your own invitation" element. This instantly sets a playful tone for your event.
3. Party Decorations: Print large Mr. Potato Head faces or individual parts to create banners, wall decor, or table centerpieces. You can even print multiple parts and have them "scattered" across the party area.
4. Photo Booth Props: Print oversized Mr. Potato Head eyes, noses, mustaches, and hats on cardstock, attach them to sticks, and create a hilarious photo booth. Guests of all ages will love posing with these silly props. This always gets a lot of laughs at family gatherings.
5. Party Games: "Pin the Nose on the Potato": A classic party game gets a Mr. Potato Head twist! Print a large potato body, blindfold players, and have them try to pin the nose in the right spot.
6. Favor Bag Toppers: Design small Mr. Potato Head-themed labels or bag toppers for your party favor bags. You could even include a mini printable set inside each bag as a take-home activity.
7. Cupcake Toppers & Food Labels: Print tiny Mr. Potato Head faces or accessories, glue them onto toothpicks, and use them as adorable cupcake toppers or labels for your party snacks.
8. Thank You Notes: Create personalized thank you notes with a Mr. Potato Head theme. You can have a space for kids to draw their favorite potato creation from the party.
9. Birthday Banners: Spell out "Happy Birthday" using letters integrated into Mr. Potato Head parts or use the spud's face as a decorative element between words.
10. Tablecloth Decor: Use basic potato outlines as stencils on a plain paper tablecloth, then let kids decorate them with crayons or markers during the party.
11. "Guess the Potato" Game: Print several Mr. Potato Heads with different, distinct expressions or themes. Have guests try to guess the emotion or character each potato represents.
12. Mr. & Mrs. Potato Head Couple's Party: For an adult-themed party or even a baby shower, focus on classic Mr. and Mrs. Potato Head designs, perhaps with a touch of sophistication or humor for the older crowd. I used this for a friend's gender reveal party, and it was a massive hit!
Crafty Creations: DIY Projects & Mixed Media
Mr. Potato Head printables are not just for cutting and gluing; they are fantastic starting points for more elaborate crafting projects. They invite you to go beyond the paper and incorporate other materials, textures, and techniques to create truly unique, tactile works of art.
1. Laminated & Reusable: Print your parts on cardstock, laminate them, and add Velcro dots or small magnets to the back. This transforms them into durable, reusable pieces that can be played with on a whiteboard, fridge, or felt board. This is a personal favorite strategy of mine for making activities last.
2. Felt Board Fun: Instead of laminating, print on regular paper, cut out, and then glue the parts onto felt. These felt pieces will stick to a felt board, allowing for easy repositioning and play.
3. Cardboard Stand-Ups: Print large Mr. Potato Head bodies and features, glue them onto sturdy cardboard (like cereal boxes), cut them out, and create stand-up figures. You can even add a small cardboard easel stand to the back.
4. Collage Art: Use Mr. Potato Head parts as the central theme for a mixed-media collage. Combine them with fabric scraps, buttons, yarn, glitter, and other craft supplies to create a textured and vibrant piece.
5. 3D Spud Models: Print parts, cut them out, and then affix them to actual potatoes (real or foam ones) using toothpicks or glue. This brings the printable concept full circle back to the original toy, but with your custom paper parts.
6. Greeting Card Embellishments: Use smaller versions of Mr. Potato Head parts to decorate homemade greeting cards for birthdays, thank yous, or just "thinking of you" notes. A tiny potato with a silly face on a card is always a mood booster!
7. Puppet Show Characters: Glue printed Mr. Potato Head bodies onto craft sticks or paper bags to create simple puppets. Use different parts to change their expressions and tell stories.
8. "Spud Story Jar": Print and cut out a wide variety of parts. Place them in a jar. Kids can randomly pull out parts and then assemble a Mr. Potato Head based on the random selection, creating a unique character to inspire a story.
9. Fabric Transfers: For the truly ambitious crafter, some printable designs might be adaptable for fabric transfer paper, allowing you to create custom Mr. Potato Head t-shirts, tote bags, or small pillows.
10. Clay & Play-Doh Integration: Print out Mr. Potato Head bodies, then use play-doh or modeling clay to create the facial features and accessories directly onto the paper body, giving it a 3D, tactile element.
11. Shrinky Dinks (Shrink Plastic): If you find Mr. Potato Head line art printables, you can trace them onto shrink plastic, color them, bake them, and create miniature plastic charms, keychains, or jewelry. This is an advanced but very rewarding craft.
12. Custom Magnets: Print, cut, laminate (optional), and then attach magnetic sheets or small round magnets to the back of the parts to create fridge magnets. This is a fun and functional craft that transforms your printable into a reusable toy.
Personalizing Your Spud: Customization & Creativity
One of the most exciting aspects of Mr. Potato Head printables is the opportunity for boundless customization. This isn't just about sticking pre-made pieces; it's about making Mr. Potato Head truly *yours* (or your child's!), adding unique touches, and even designing your own parts from scratch.
1. Drawing Your Own Parts: Start with a blank potato body template and encourage freehand drawing of eyes, noses, mouths, and accessories. This is pure creative expression and boosts artistic confidence.
2. Mixing and Matching Styles: Combine parts from different printable sets. Maybe a classic body with themed holiday accessories, or a realistic eye with a cartoonish nose. The possibilities for hilarious combinations are endless!
3. Adding Personal Touches: Beyond the provided parts, encourage children to add their own embellishments directly onto the paper potato. Think glitter, googly eyes, yarn hair, or even small fabric scraps.
4. "Self-Portrait" Potato: Encourage kids (or adults!) to create a Mr. Potato Head that resembles themselves, complete with their hair color, eye shape, and even their favorite outfit accessories.
5. Family Member Potatoes: Create a whole "potato family" by designing each spud to represent a different family member, capturing their unique characteristics and quirks.
6. Character Mash-ups: What if Mr. Potato Head was also a superhero? Or a robot? Use elements from other character printables or draw your own to create unique mash-ups.
7. Digital Customization (Basic): For those comfortable with simple image editing software, you can download blank templates and digitally draw/color your own parts before printing. This opens up a whole new level of precision and experimentation.
8. Coloring Outside the Lines (Literally): Use the black and white printable outlines as a base, but encourage unconventional coloring. A purple potato? A rainbow nose? Why not! There are no rules in the world of creative spuds.
9. Themed Backgrounds: Create or print a custom background scene for your Mr. Potato Head to "live" in. Is he in space? Under the sea? At a fancy ball? The background can inspire the potato's accessories.
10. Story-Driven Customization: Before creating, come up with a story for your Mr. Potato Head. Is he an explorer who got lost in a jungle? A rock star performing on stage? Let the narrative guide the choice and design of his features.
11. "Emotion of the Day" Spud: Each day, create a Mr. Potato Head that reflects how you (or your child) are feeling. This is a wonderful way to visually represent and process emotions.
12. Collaborative Spud Design: Have multiple people contribute to one Mr. Potato Head. One person draws the eyes, another the nose, and so on. This fosters teamwork and results in a truly unique, often hilarious, creation. I've done this with my creative writing group, and the results are always surprisingly profound.
Digital Adventures: Interactive & Online Mr. Potato Head
While the tactile experience of cutting and gluing is wonderful, the digital realm offers a different, equally engaging way to interact with Mr. Potato Head. Online tools and apps provide instant gratification, endless part combinations, and a mess-free creative outlet, often serving as a gateway to exploring Mr. Potato Head printables later.
1. Official Hasbro Online Builder: Hasbro has, at various times, offered official online Mr. Potato Head builders. These allow users to drag and drop digital parts onto a potato body, change colors, and sometimes even save or print their creations.
2. Educational Apps: Many educational apps for kids feature a "build a face" or "mix and match" activity inspired by Mr. Potato Head. These often include sound effects and animations.
3. Simple Drag-and-Drop Websites: Numerous free websites offer basic Mr. Potato Head builders where you can click and drag parts. These are excellent for quick, mess-free fun or for generating ideas for your physical printables.
4. Digital Coloring Pages: Instead of printing a black and white outline and coloring it by hand, use a digital art program or an online coloring tool to color Mr. Potato Head printables on a screen.
5. Interactive Whiteboard Activities: For educators, digital Mr. Potato Head activities can be projected onto an interactive whiteboard, allowing multiple students to participate in building a collaborative spud.
6. "Create Your Own Character" Games: Some online games allow children to design a character from scratch, and the principles are very similar to building a Mr. Potato Head. This helps develop digital literacy and design thinking.
7. Virtual Playdates: Kids can share their screen and build Mr. Potato Heads together virtually, describing their choices and collaborating on a shared digital spud.
8. Animation Integration: Some advanced digital tools might allow users to animate their Mr. Potato Head creations, making the eyes blink or the mouth move, adding another layer of engagement.
9. Social Media Sharing: Once a digital Mr. Potato Head is created, it can often be easily shared on social media platforms, allowing friends and family to see the creation without needing physical prints.
10. Concepting for Physical Printables: Use digital builders to experiment with different part combinations and color schemes before committing to printing. This saves ink and paper and helps visualize the final product.
11. Digital Storytelling: Create a series of digital Mr. Potato Heads, each representing a different emotion or character in a story, and then use them as visual aids for a digital narrative.
12. Learning Basic Software Skills: Using digital Mr. Potato Head tools can be a fun, low-pressure way for children to learn basic computer skills like clicking, dragging, dropping, and saving files.
The Practical Side: Printing & Assembly Tips
You've found the perfect Mr. Potato Head printable! Now comes the crucial step of bringing it to life. The quality of your final spud-tastic creation often depends on a few practical considerations during the printing and assembly process. Don't worry, it's easier than you think!
1. Choose the Right Paper:
- Standard Printer Paper (20lb/75gsm): Good for quick, disposable activities or for kids who love to color and cut. It’s lightweight and easy to manage.
- Cardstock (65lb/176gsm or higher): Highly recommended for durability, especially if you want to reuse the parts. It holds up much better to cutting, gluing, and repeated handling.
- Glossy Photo Paper: For vibrant colors and a more polished look, especially if you're making party decorations or gifts. Be careful, though, as some inks can smudge.
2. Printer Settings Matter:
- High Quality/Best Print: Always select the highest print quality setting in your printer dialogue box for crisp lines and vibrant colors.
- Correct Paper Type: Make sure your printer settings match the paper you're using (e.g., "cardstock" or "photo paper") for optimal ink distribution.
- Scaling: Double-check that the printable is set to print at "actual size" or "100%" to avoid distorted proportions unless you intentionally want to scale it up or down.
3. Cutting Tools:
- Kid-Friendly Scissors: For younger children, provide safety scissors.
- Sharp Craft Scissors: For adults, a good pair of sharp craft scissors will give you clean, precise cuts, especially around intricate details.
- X-Acto Knife/Craft Knife: For very detailed work or if you're cutting out internal shapes (like the inside of glasses), an X-Acto knife with a cutting mat is invaluable, but only for adult use.
4. Adhesive Choices:
- Glue Sticks: Best for kids. They're clean, easy to use, and dry quickly.
- Liquid Glue (PVA/School Glue): Stronger bond, but can wrinkle paper if applied too thickly. Use sparingly.
- Double-Sided Tape: Excellent for a mess-free, instant bond, especially for laminates or thicker paper.
- Velcro Dots/Magnets: As mentioned in the craft section, these are fantastic for creating reusable, repositionable Mr. Potato Head sets.
5. Laminating for Longevity: If you want your Mr. Potato Head printables to last through countless play sessions, laminating them after printing and cutting is a must. A simple home laminator works wonders.
6. Storage Solutions: Once cut, those little parts can easily get lost. Consider a small plastic container, a Ziploc bag, or even a repurposed classic Mr. Potato Head storage box (if you have one!) to keep everything together.
7. Batch Printing: If you're planning a party or a classroom activity, print multiple copies of the same sheet at once to save time and ensure consistency.
8. Test Print: If you're unsure about colors or sizing, do a single test print on plain paper before committing to your final, more expensive cardstock or photo paper.
9. Drying Time: If using liquid glue, allow ample drying time before handling or storing the finished Mr. Potato Head to prevent smudging or parts falling off.
10. Consider the Background: If you're sticking your Mr. Potato Head onto a background, make sure the colors of the printable parts stand out against it.
11. Safety First: Always supervise young children when they are using scissors or any sharp tools.
12. Embrace Imperfection: Especially with kids, the joy is in the process and the creation, not necessarily a perfectly cut or aligned Mr. Potato Head. A slightly wobbly eye just adds character!
The Spud's Story: Nostalgia & The Legacy of Mr. Potato Head
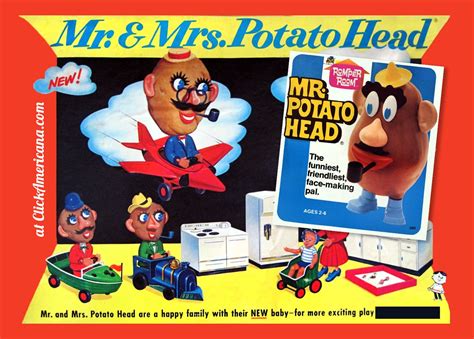
Before the digital age brought us Mr. Potato Head printables, there was the iconic toy. Understanding the history and enduring appeal of Mr. Potato Head helps us appreciate why these printables resonate so deeply and why they continue to be a source of joy and creativity across generations.
1. The Original Concept (1940s-1950s): Mr. Potato Head wasn't always plastic! He was invented by George Lerner in the late 1940s as individual plastic parts with sharp points that children could stick into real fruits and vegetables. The original toy was sold by Hasbro in 1952.
2. First Toy to Be Advertised on TV: In 1952, Mr. Potato Head made history as the very first toy to be advertised on television.