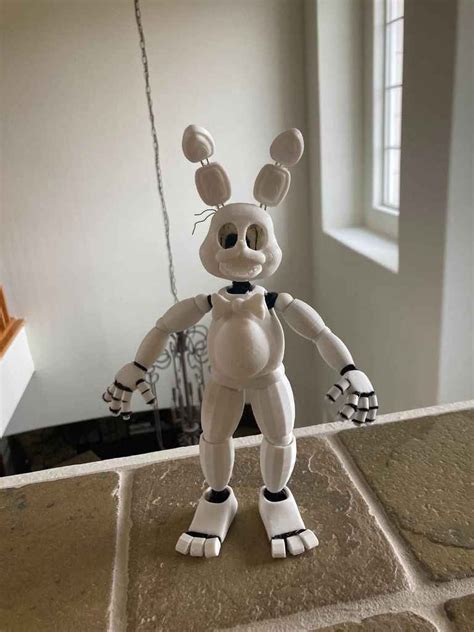
Have you ever looked at a static toy and wished it could strike a dynamic pose? Or perhaps you’re a 3D printing enthusiast eager to bring your creations to life in a way that truly engages? If the idea of a 3D printable posable bunny robot figure sparks joy and curiosity, you’re in the right place! I remember the thrill of printing my first articulated figure; the anticipation was real, and seeing those tiny joints click perfectly into place felt like pure magic. But trust me, my initial foray into a *posable* bunny robot wasn’t quite flawless – I learned a thing or two the hard way about getting those limbs just right.
This isn't just about printing a cute bunny; it’s about crafting an interactive companion that brings a unique blend of robotics charm and playful articulation to your desk, shelf, or even your next photography project. From choosing the perfect file to post-processing tricks, this guide will walk you through everything you need to know. We’ll dive deep into making sure your bunny isn't just printed, but *perfectly posable* and ready for adventure.
The Articulation Advantage: Why Posable?

The magic of a 3D printable posable bunny robot figure isn't just in its cuteness; it's in its ability to interact with the world around it through dynamic poses. A static figure is cool, but one that can wave, sit, or even strike a heroic stance? That's next level!
- Engaging Display Pieces: Your bunny isn't just an object; it's a character. You can pose it according to your mood or the season, making it a lively addition to any space. I once posed a tiny bunny robot as a desk guardian, complete with a miniature sword – it sparked so many fun conversations!
- Photography & Stop-Motion: For creatives, a posable figure is a dream. Use it for unique photo shoots or even venture into stop-motion animation.
- Play & Interaction: Especially for younger audiences (or the young at heart!), a figure that moves and can be posed encourages imaginative play far more than a rigid toy.
- Testing Your Skills: Successfully printing and assembling an articulated figure is a testament to your 3D printing prowess. It requires precision and understanding of your machine’s capabilities.
- Gifts with Personality: Imagine gifting a friend a bunny robot that can be posed in an inside joke position. That’s personalization at its best!
Choosing Your Bunny: Finding the Right File for You
Before you even think about hitting 'print', the most crucial step is finding the right STL file for your 3D printable posable bunny robot figure. The market for 3D models is vast, offering everything from super-articulated designs to simpler, more stylized versions.
- Free vs. Paid Models: Sites like Thingiverse and Printables.com offer a treasure trove of free designs, often shared by hobbyists. For more intricate, professionally designed models with better articulation or unique aesthetics, check out platforms like Cults3D, MyMiniFactory, or Patreon creators specializing in articulated figures.
- Joint Types & Articulation Points: Pay close attention to the design's joints. Ball joints offer maximum flexibility, while pin joints might be sturdier but limit movement. Some designs feature click-together joints, while others require small pins or even elastic string.
- Print-in-Place vs. Assembly Required: Some highly advanced designs print with all joints integrated, ready to move right off the print bed (though these can be challenging). Most posable figures will require some assembly. Understand what you’re signing up for!
- Reviews & Community Feedback: Always check comments and makes from other users. Did they have trouble with specific joints? Are the tolerances too tight or too loose? This insight can save you a lot of headache.
- Designer's Reputation: Opt for designers with a good track record of well-designed, print-tested models. My favorite strategy, which saved me countless times, is to look for designers who also provide clear assembly instructions or even video guides.
Design & Aesthetics: Crafting Your Bunny's Look
While many 3D printable posable bunny robot figure designs are readily available, understanding the underlying design principles can help you choose the best file and even inspire future customizations.
- Scale Matters: Do you want a tiny desk buddy or a larger, more detailed display piece? The scale will affect print time, filament usage, and the level of detail achievable, especially in the joints.
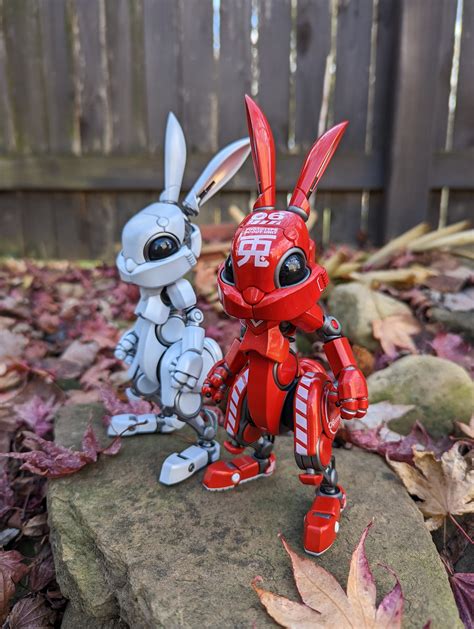
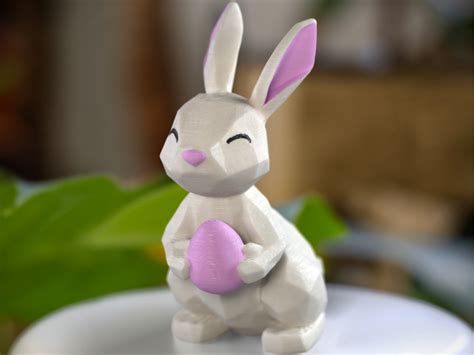
- Stylization vs. Realism: Some designs lean into a more robotic, angular look, while others are adorably cartoony. Consider what aesthetic appeals most to you.
- Expressive Features: Look beyond just posability. Does the bunny have expressive eyes? Can you add custom accessories like little hats or bows? These small details can drastically enhance its personality.
- Tolerance for Articulation: A good designer factors in "tolerance" – the tiny gap between moving parts – so they don't fuse during printing. If a model seems overly complex or doesn't mention tested tolerances, proceed with caution.
- Customization Potential: Is the design easy to paint? Can you swap out parts? Some designers even release modules for different ears, tails, or body parts, opening up endless customization possibilities.
Printing Success: Slicing Your Way to a Perfect Bunny
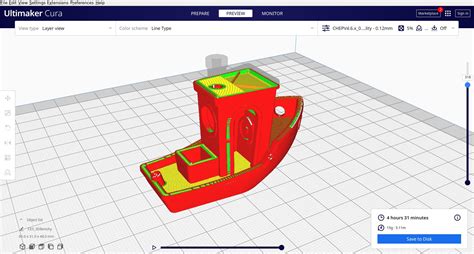
This is where the rubber meets the road! Getting your 3D printable posable bunny robot figure to print perfectly often boils down to careful slicing and understanding your printer.
- Filament Choice: PLA is generally recommended for articulated figures due to its ease of printing and rigidity, which helps maintain joint integrity. PETG can offer more durability but might be trickier to dial in for small tolerances.
- Layer Height & Infill: For articulated parts, a finer layer height (e.g., 0.12mm to 0.16mm) can result in smoother joints and better detail. Infill around 10-20% is usually sufficient for strength, unless specified otherwise by the designer.
- Supports – Less is More (Carefully Applied): Over-supporting can lead to joint fusion. Use tree supports where possible, and only in areas that absolutely require it (e.g., complex overhangs). Orient parts to minimize support needs as much as possible. Trust me, you don’t want to mess this up by having supports fuse your joints!
- Print Speed & Temperature: Slower print speeds generally lead to better print quality and joint success. Ensure your hotend temperature is appropriate for your filament – too hot and you risk oozing and bridging, potentially fusing those delicate joint mechanisms.
- First Layer Adhesion: A perfectly calibrated first layer is paramount. If your first layer isn't sticking well, or if it's elephant footing (squishing out too much), it can compromise the base of your articulated parts, making them brittle or affecting joint fit. Don't be like me and forget to calibrate your printer before a big print – it’s a “panik nggak tuh” (are you panicking?) moment you definitely don’t need!
Bringing it to Life: Assembly, Customization & Beyond

Your 3D printable posable bunny robot figure is off the print bed, but the fun is just beginning! This stage is all about transforming raw plastic into a charming, movable companion.
- Post-Processing the Joints: This is crucial. Gently clean out any stringing or excess filament from within the joints using a hobby knife or small file. For print-in-place designs, gently *work* the joints back and forth until they loosen up. Sometimes, a gentle twist or wiggling motion is all it takes.
- Assembly Techniques: If your bunny is multi-part, follow the designer's instructions. Often, parts will click or slide together. For pins, a dab of superglue on one side can secure them, but *never* put glue on the moving parts themselves!
- Sanding & Smoothing (Optional): For a professional finish, you might want to sand down layer lines. Use fine-grit sandpaper, followed by a primer.
- Painting Your Bunny: Acrylic paints work wonderfully on PLA. Consider primer for better adhesion, and seal with a clear coat for protection. Think about a metallic finish for the robotic parts and a softer shade for the bunny body!
- Adding Accessories & LEDs: This is where personality shines! Create tiny gears, a miniature jetpack, or even embed small LEDs for glowing eyes. I once added tiny felt ears over the printed ones for a softer look – totally transformed the vibe!
Troubleshooting: When Your Bunny Doesn't Cooperate
Even seasoned makers encounter issues. Here's what I learned the hard way about printing a 3D printable posable bunny robot figure that acts a bit *too* stiff.
- Stuck Joints: This is the most common issue.
- Over-extrusion/Too High Temp: Filament oozed into the tiny joint gaps. Try lowering your print temperature slightly and calibrating your E-steps.
- Elephant Footing: The first layer squishes out, binding the initial part of the joint. Adjust your Z-offset and initial layer horizontal expansion settings.
- Bridging Issues: Poor bridging quality over joint gaps can lead to sagging plastic. Ensure good cooling and optimized bridging settings.
- Loose Joints:
- Under-extrusion/Too Low Temp: Not enough plastic is laid down. Check your E-steps calibration or slightly increase print temperature.
- Too Much Tolerance in Design: Sometimes, it’s the model. If possible, scale it up slightly (e.g., 101-102%) which can sometimes tighten tolerances.
- Part Breakage:
- Brittle Filament: Old or damp filament can be brittle. Try drying your filament or using fresh spool.
- Weak Layer Adhesion: Often due to too low print temperature or cooling issues. Ensure proper layer bonding.
- Warping: Your print lifts off the build plate. Ensure good bed adhesion, proper bed temperature, and minimize drafts. You don't want your bunny looking like it had a rough landing!
Beyond the Print: Display, Play, and Community

Your new 3D printable posable bunny robot figure is more than just a successful print; it's a testament to your creativity and skill.
- Creative Display: Pose your bunny in different scenarios – reading a tiny book, holding a miniature wrench, or perched on your monitor like a diligent helper.
- Share Your Creation: Snap some photos or a short video and share them on social media (e.g., Instagram, TikTok), 3D printing forums (like Reddit's r/3Dprinting), or directly on the model's page where you found the file. The 3D printing community is incredibly supportive and loves seeing unique makes!
- Gift-Giving: These figures make fantastic, personalized gifts for friends and family. A customized bunny robot with a funny pose relevant to the recipient? Gold!
- Iterate and Improve: Don't be afraid to try printing the same model with different settings, filaments, or even scales. Each print is a learning opportunity. Perhaps your next bunny will have glowing eyes or an articulated tail!
Tips for Personalizing Your Bunny Robot
Making your 3D printable posable bunny robot figure truly *yours* is part of the fun. Here’s how to inject some personality:
- Color Schemes: Don't just stick to single-color prints. Experiment with multi-color prints if your printer supports it, or use different filament colors for different body parts.
- Paint Details: Even a simple splash of color on the eyes or metallic accents on the joints can elevate the figure. I find that painting the joints a contrasting color works best for small teams of bunny robots, making them feel like a little mech crew!
- Accessories: Design or print tiny props like a carrot, a mini-wrench, a tiny top hat, or even a tiny backpack. These additions can tell a story.
- Base/Diorama: Create a small custom base or a mini-diorama for your bunny to stand on. This provides context and elevates it from a toy to a display piece.
- Engraving/Debossing: If you’re comfortable with 3D modeling software, consider adding a small personalized engraving or deboss on the base or an obscure part of the bunny, like a name or a date.
Common Pitfalls: What to AVOID When Printing Your Bunny Robot Wishes
Nobody wants a wonky bunny robot. Here are some common mistakes to sidestep:
- Ignoring Print Orientation: Don't just throw the model onto the print bed. Proper orientation can significantly reduce the need for supports and improve joint quality. Always consider where overhangs will occur and how gravity will affect your print.
- Over-Tightening Screws/Pins: If your design uses screws or pins for assembly, don't overtighten. You risk cracking the plastic or binding the joint. It's often "snug" not "torqued."
- Using the Wrong Filament for Articulation: While flexible filaments exist, they are generally *not* suited for articulated joints that rely on rigidity and clean separation. Stick to PLA or PETG.
- Forgetting Bed Adhesion: A loose print will cause all sorts of problems. Ensure your bed is clean, leveled, and at the right temperature, with appropriate adhesive if needed. You don't want your print coming off the bed and ending up *zonk*!
- Not Calibrating Your Printer: This is foundational. If your printer isn't calibrated for flow, E-steps, and temperature, you'll be fighting an uphill battle with every print, especially articulated ones.
Your Posable Bunny Awaits!
There's something incredibly satisfying about transforming a digital file into a tangible, movable object. A 3D printable posable bunny robot figure isn't just a fun project; it's an opportunity to hone your 3D printing skills, explore your creativity, and end up with a truly unique piece. Whether it’s for display, play, or gifting, these little robotic bunnies are sure to bring a smile. Now go make their day – or just create an adorable, poseable companion for yourself!