Stepping onto the shooting range, whether for the first time or the thousandth, there's a unique blend of excitement and focused determination. You’ve got your firearm, your ammo, and a keen desire to hit what you’re aiming at. But before you can consistently ring steel or group shots tightly, there’s one fundamental step you absolutely cannot skip: zeroing your optic or iron sights. Trust me, you don’t want to be like me on my first deer hunt, wondering why my shots were consistently 6 inches low because I rushed the zero! That's where a reliable 25 yard zero target printable becomes your best friend.
This isn't just about printing a piece of paper; it's about laying the groundwork for precision, confidence, and safety. A good 25-yard zero is often the perfect starting point for rifles, pistols, and even shotguns, serving as a critical intermediate step for longer distances or a reliable close-range calibration. In this comprehensive guide, we'll dive deep into different types of printable 25-yard zero targets, how to use them effectively, and the wisdom I've gathered from countless hours on the range, ensuring your next shooting session is productive and gratifying.
---
The Essential Arsenal: Different Types of 25 Yard Zero Targets

Not all targets are created equal, and for zeroing, having the right design can make all the difference. Here are several categories of 25 yard zero target printable options, each serving a slightly different purpose and catering to various needs.
### 1. The Classic Grid Zero Target: Simplicity for Beginners
This is often the first target a new shooter encounters, and for good reason. It typically features a bullseye or small aiming point, surrounded by a grid (often 1-inch squares at 25 yards, which correlates nicely with 1 MOA at 100 yards). It’s straightforward and forgiving.
- Why it's great: Easy to understand impact points, straightforward for making click adjustments.
- Best for: First-time zeroing, iron sights, or optics with simple click values.
- Pro Tip: Use a dark marker to outline your aiming point for better visibility at a distance.
- *Personal Scenario:* I used a basic grid target when first zeroing my .22LR rifle. It made understanding how many clicks to adjust the scope incredibly simple, turning frustration into rapid improvement.
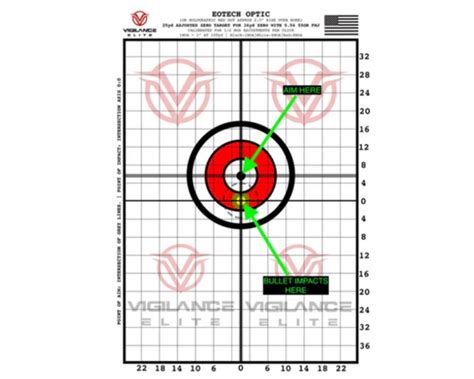
### 2. Precision Dot & Small Bullseye Targets: For the Detail-Oriented Shooter
These targets are designed for accuracy, featuring very small aiming points (dots, crosses, or tiny bullseyes) that encourage precise sight picture and trigger control. While challenging, they provide immediate feedback on tiny changes in your shooting mechanics.
- Why it's great: Forces focus on fundamentals, ideal for fine-tuning optics, excellent for high-magnification scopes.
- Best for: Experienced shooters, competitive shooters, or anyone seeking ultimate precision.
- Pro Tip: If you're struggling to see the small aiming point, try a spotter scope or binoculars to confirm your shots.
- *Personal Scenario:* When I was trying to shrink my groups with my AR-15 for a local competition, I switched to a tiny dot 25 yard zero target printable. It immediately highlighted my tendency to flinch, which I then worked on.
### 3. Diagnostic Zero Targets: Unmasking Shooter Errors
Beyond just showing you where the bullet went, diagnostic targets are designed to help you understand *why* it went there. They often have multiple aiming points or a specific layout that can reveal common shooting errors like jerking the trigger, pushing/pulling, or anticipating recoil.
- Why it's great: Helps self-correct shooting form, provides visual feedback on technique flaws.
- Best for: Shooters struggling with consistent groups, instructors, or those looking to improve their fundamental skills.
- Pro Tip: Pay attention to where your *flyers* land on these targets – they often tell a story about your technique.
- *Personal Scenario:* I once used a target designed to show trigger press issues. My groups were consistently high-left, and the target's visual guide showed it was my trigger finger placement. It was like magic; correcting that small flaw tightened my groups dramatically.
### 4. Multi-Caliber & Versatile Zero Targets: The Adaptable Choice
Some printable targets are designed with versatility in mind, featuring multiple bullseyes or different scale grids, making them suitable for various firearm types and calibers without needing to swap targets. These often include specific sections for rifle, pistol, or even different zero distances on the same sheet.
- Why it's great: Convenience, saves paper, perfect for a mixed range session.
- Best for: Shooters with multiple firearms, range bags where space is limited.
- Pro Tip: Before printing, double-check the scaling to ensure the grid measurements are accurate for your desired zeroing distance and firearm.
- *Personal Scenario:* On a weekend trip to the family property, my buddy and I only packed a few targets. This type of 25 yard zero target printable allowed us to zero both his hunting rifle and my pistol efficiently.
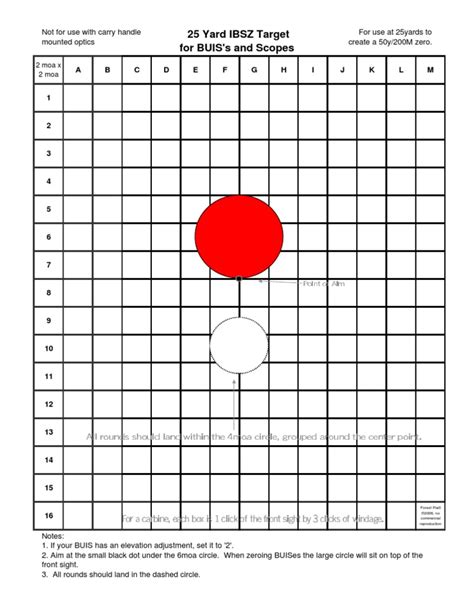
### 5. AR-15 / M4 Specific 25m Zero Targets: Ballistics-Optimized
For the popular AR-15 platform, specific 25m zero targets are widely available. These are calibrated so that a precise point of impact at 25 meters (or yards) will translate to a specific longer-range zero (e.g., 200m, 300m, or 50/200 yard zero), taking into account the ballistic trajectory of common 5.56/.223 ammunition.
- Why it's great: Optimized for common service rifle ballistics, simplifies long-range zeroing, saves ammo.
- Best for: AR-15/M4 owners, military/LE personnel, tactical shooters.
- Pro Tip: Understand the specific zero distance your target is designed for (e.g., "50/200 yard zero") and confirm it matches your training needs.
- *Personal Scenario:* My favorite strategy for my AR is to use a specific 50/200 yard 25 yard zero target printable. It's saved me countless rounds by letting me confirm my zero at 25 yards and trust it out to 200, or even further with holdovers.
---
Optimizing Your 25-Yard Zeroing Session
Getting the most out of your zeroing targets isn't just about shooting. It's about preparation, consistency, and a little bit of patience.
### Tips for Optimizing Your 25-Yard Zeroing Session
- Stability is Key: Use a solid rest (sandbags, bipod, shooting bench) to eliminate as much human error as possible. This helps you isolate the firearm's performance.
- Consistent Sight Picture: Whether using iron sights or an optic, strive for the exact same sight picture (how you align your sights with the target) for every shot.
- Trigger Discipline: Focus on a smooth, consistent trigger press that doesn't disturb your sight picture. No jerking!
- Shoot in Groups: Instead of adjusting after every shot, fire a group of 3-5 shots. The center of that group is your true point of impact.
- Understand Your Clicks: Know your optic's click values (e.g., 1/4 MOA per click). At 25 yards, 1/4 MOA is typically 1/16th of an inch. A little math goes a long way. My personal preference is always to double-check my math before making adjustments; it avoids chasing the zero!
- Label Everything: Mark your target with your firearm, ammunition type, date, and environmental conditions (temperature, wind if significant). This data is invaluable for future reference.
### Common Pitfalls: What to AVOID When Zeroing at 25 Yards
- Rushing It: Zeroing takes time. Don't feel pressured to finish quickly. A hurried zero is a bad zero.
- Shooting Offhand: Trying to zero unsupported (standing, kneeling, etc.) introduces too much human variability. Get stable!
- Ignoring Fundamentals: Zeroing is not just about the target; it's about *your* fundamentals. If your groups are inconsistent, address your technique before blaming the gear.
- Chasing the Zero: Don't adjust after every shot. Wait for a full group. A single shot could be an anomaly or a minor wobble. I've been there, making adjustment after adjustment, only to realize I was just reacting to individual shots rather than the overall group. Don't be like me and waste ammo!
- Using Inconsistent Ammo: Stick to one type/brand of ammunition for zeroing, ideally the one you'll be using most often. Different bullet weights and types have different trajectories.
- Over-Adjusting: Once you've made an adjustment, fire another group to confirm. Don't keep turning turrets without verifying the change.
---
Conclusion: Zero In on Success!

A 25 yard zero target printable is more than just a piece of paper; it's the foundation of your shooting proficiency. By understanding the different types of targets and applying sound zeroing techniques, you're not just calibrating a machine; you're building confidence, consistency, and a deeper understanding of your firearm.
So, download a few targets, pack your gear, and head to the range with purpose. Take your time, focus on your fundamentals, and enjoy the satisfying process of bringing your sights and your point of impact into perfect alignment. Now go make those holes in the paper tell a story of precision!