Oh, the magic of custom apparel! There’s something incredibly satisfying about transforming a plain t-shirt, a drab tote bag, or even a cozy hoodie into a personalized masterpiece. For years, crafters like us have relied on traditional heat transfer vinyl (HTV) for vibrant, durable designs. But what if you wanted to go beyond solid colors and simple shapes? What if you dreamed of intricate patterns, photorealistic images, or designs with a full spectrum of colors, just like you see on your screen? That’s where Siser Printable HTV swoops in, cape flowing, ready to revolutionize your crafting game.
I remember the first time I stumbled upon the concept of printable HTV. I was knee-deep in a project for a friend’s band – they wanted custom t-shirts with their album art, a complex, colorful design that traditional HTV simply couldn't handle. I spent *hours* searching for a solution, feeling frustrated that my vision was bigger than my tools. Then, a fellow crafter casually mentioned "Siser Printable HTV." It was like a lightbulb moment, a true game-changer that unlocked a whole new world of possibilities. Suddenly, the intricate album art wasn't a problem; it was an exciting challenge I could conquer! This guide is born from that very journey – from confusion to clarity, from frustration to absolute creative freedom. We’re going to dive deep into everything you need to know, from the absolute basics to advanced techniques, ensuring you can confidently turn your wildest design dreams into wearable reality. Whether you're a beginner taking your first steps into custom apparel or a seasoned pro looking to refine your craft, prepare to unlock the full potential of Siser Printable HTV.
---
Table of Contents

- [Siser Printable HTV Demystified: What It Is & Why You Need It](#siser-printable-htv-demystified-what-it-is--why-you-need-it)
- [Choosing Your Canvas: A Deep Dive into Siser's Printable HTV Family](#choosing-your-canvas-a-deep-dive-into-sisers-printable-htv-family)
- [The Creative Workflow: Designing & Printing Your Masterpiece](#the-creative-workflow-designing--printing-your-masterpiece)
- [From Print to Press: Mastering the Application Process](#from-print-to-press-mastering-the-application-process)
- [Beyond the Basics: Advanced Techniques & Creative Applications](#beyond-the-basics-advanced-techniques--creative-applications)
- [The Durability Factor: Washing, Wearing, & Longevity Secrets](#the-durability-factor-washing-wearing--longevity-secrets)
- [Troubleshooting Your Transfers: Solving Common Siser Printable HTV Headaches](#troubleshooting-your-transfers-solving-common-siser-printable-htv-headaches)
- [Siser Printable HTV for Business: Scaling Your Craft into a Brand](#siser-printable-htv-for-business-scaling-your-craft-into-a-brand)
- [My Favorite Siser Printable HTV Projects & Inspiration](#my-favorite-siser-printable-htv-projects--inspiration)
- [How to Choose the Best Siser Printable HTV for Your Needs](#how-to-choose-the-best-siser-printable-htv-for-your-needs)
- [Common Pitfalls to Avoid with Siser Printable HTV](#common-pitfalls-to-avoid-with-siser-printable-htv)
- [Advanced Tips for Siser Printable HTV Experts](#advanced-tips-for-siser-printable-htv-experts)
- [Conclusion: Your Creative Journey with Siser Printable HTV Awaits!](#conclusion-your-creative-journey-with-siser-printable-htv-awaits)
---
Siser Printable HTV Demystified: What It Is & Why You Need It
Let's start at the very beginning, shall we? If you're new to the world of custom apparel, the acronyms can be a bit overwhelming. HTV stands for Heat Transfer Vinyl – a material that, when heated, adheres to fabric. Traditional HTV comes in various colors, textures, and finishes (think glitter, metallic, flocked) and is cut using a vinyl cutter (like a Cricut or Silhouette) into shapes and letters. But the game changes entirely with Siser Printable HTV.
This isn't your grandma's iron-on transfer paper. Siser Printable HTV is a specially coated vinyl designed to be fed through your home inkjet printer, allowing you to print *any* full-color design directly onto it. Once printed, you cut out your design (either by hand or with a vinyl cutter), apply it to your fabric using heat (an iron or heat press), and voilà – a custom garment with vibrant, intricate details!
Why is this such a big deal? Let me count the ways:
1. Full-Color Freedom: This is the absolute core advantage. With traditional HTV, you're limited to layering solid colors. With Siser Printable HTV, you can print photographs, gradients, complex illustrations, and anything else your digital design heart desires. Imagine putting a full-color family photo on a t-shirt – that's the power we're talking about!
2. Unleash Your Inner Artist: No longer constrained by vector graphics, you can use raster images, intricate patterns, and designs that would be impossible to cut from traditional vinyl. My friend, a talented digital painter, used to struggle with translating her detailed artwork onto shirts. Once she discovered printable HTV, her small business absolutely exploded!
3. Efficiency for Complex Designs: If you have a multi-colored design, layering traditional HTV can be time-consuming and sometimes tricky to align perfectly. With printable HTV, it's one print, one cut, one press. Much faster, much simpler.
4. Soft Hand Feel: Modern printable HTVs, especially Siser's offerings, are designed to be thin and flexible, resulting in a "soft hand" feel on the garment. This means the design doesn't feel like a thick, rigid patch sitting on top of the fabric.
5. Durability You Can Trust: Siser is a leading name in heat transfer materials for a reason. Their printable HTVs are formulated for excellent wash durability, meaning your designs will stand up to repeated washes without cracking, peeling, or fading when applied correctly.
6. Versatility Across Fabrics: Most Siser Printable HTVs work wonderfully on cotton, polyester, and cotton/poly blends, opening up a huge range of possibilities for customizing t-shirts, hoodies, bags, aprons, and more.
In essence, Siser Printable HTV bridges the gap between digital design and physical apparel, giving you unprecedented control over color and detail. It's not just a product; it's a creative superpower for anyone looking to personalize textiles. Trust me, once you go printable, you'll wonder how you ever lived without it!
### 10 Reasons Why Siser Printable HTV is a Game-Changer
1. Photo-Realistic Prints: Transfer actual photographs onto fabric with stunning clarity.
2. Gradient Support: Smooth color transitions that traditional HTV can't achieve.
3. Intricate Details: Small text, fine lines, and complex illustrations are a breeze.
4. Unlimited Color Palette: Print any color your printer can produce, not just vinyl stock colors.
5. Faster Production: One print, one cut, one press for multi-color designs.
6. Cost-Effective for Small Runs: No need to buy multiple rolls of colored vinyl for one design.
7. Soft & Flexible Feel: Designs move with the fabric, enhancing comfort.
8. Professional Finish at Home: Achieve retail-quality custom garments from your craft room.
9. Expands Creative Horizons: Opens doors to new design styles and project types.
10. Siser Quality Assurance: Backed by a trusted brand known for reliable, durable products.
---
Choosing Your Canvas: A Deep Dive into Siser's Printable HTV Family
Siser doesn't just offer "a" printable HTV; they offer a *family* of products, each with its unique characteristics, strengths, and ideal applications. Understanding these differences is key to achieving the best results for your specific project. It’s like choosing the right brush for a painting – you wouldn’t use a broad house brush for fine detail work, right? The same goes for Siser Printable HTV. Let's break down the most popular members of the Siser printable HTV family.
### 1. Siser EasyColor DTV (Direct-to-Vinyl)
This is the newest kid on the block and a true innovation! Siser EasyColor DTV is designed specifically for standard desktop inkjet printers, making it incredibly accessible for home crafters and small businesses. Its biggest draw? It's often touted as being *more forgiving* with printer settings and offers fantastic color vibrancy.
- Key Features:
- Inkjet Compatibility: Works with common desktop inkjet printers (Epson, Canon, HP, Brother, etc.).
- Vibrant Colors: Produces incredibly bright and true-to-design colors.
- Soft Hand Feel: Very thin and flexible, offering a comfortable, natural feel on the fabric.
- Excellent Stretch & Rebound: Moves well with the garment without cracking.
- Hot or Cold Peel: Offers flexibility during application.
- Works on Light & Dark Fabrics: No need for separate products for different garment colors.
- Ideal For: T-shirts, hoodies, tote bags, aprons, personalized gifts, small business apparel, detailed graphic designs, photographs.
- My Take: If you're just starting out or primarily use an inkjet printer, EasyColor DTV is your go-to. I used this for a batch of custom shirts for my niece's birthday party – a highly detailed, colorful unicorn design – and the results were absolutely stunning, vibrant, and soft. The kids loved them, and they’ve held up to countless washes!
### 2. Siser EasySubli
Don't let the name fool you – while it works with sublimation *ink*, Siser EasySubli is still a printable HTV. It's designed to capture the vibrant, permanent colors of sublimation printing and then transfer them onto fabrics that typically *can't* be sublimated (like cotton or dark polyester). This is where EasySubli truly shines, breaking the barriers of traditional sublimation which usually only works on light-colored polyester.
- Key Features:
- Sublimation Ink Compatibility: Requires a sublimation printer and ink.
- Unparalleled Vibrancy: Sublimation ink provides incredibly rich, deep, and permanent colors.
- Soft Hand Feel: Designed to be thin for a natural feel.
- Excellent Durability: Resists fading and cracking, even on non-sublimatable fabrics.
- Works on Cotton & Dark Fabrics: This is its superpower, opening up endless possibilities.
- Ideal For: Crafters or businesses that already own a sublimation printer and want to expand their offerings to cotton or dark garments. Perfect for highly detailed, vibrant designs where longevity is paramount.
- My Take: I once had a client who wanted sublimated designs on black cotton t-shirts for their band. Impossible with traditional sublimation! EasySubli saved the day, allowing us to achieve the crisp, vibrant, full-color designs they desired on the exact fabric they specified. It felt like magic!
### 3. Siser ColorPrint Easy
This is another great option for inkjet users, offering excellent print quality and a soft finish. It's been a long-standing favorite for many crafters before EasyColor DTV came along.
- Key Features:
- Inkjet Compatibility: Works with standard desktop inkjet printers.
- Good Print Quality: Delivers clear, colorful images.
- Soft & Stretchy: Conforms well to fabric and offers a comfortable wear.
- Warm Peel: Requires peeling the carrier sheet while the design is still warm.
- Ideal For: T-shirts, sportswear, fashion apparel, where a soft and flexible finish is desired.
- My Take: ColorPrint Easy is a reliable workhorse. I used it extensively for custom uniform numbers and logos for a local sports team, and they consistently provided a professional, durable result. While EasyColor DTV is a fantastic evolution, ColorPrint Easy definitely holds its own for consistent quality.
### 4. Siser ColorPrint PU
"PU" stands for polyurethane, indicating a thin, stretchable, and durable film. ColorPrint PU is another printable HTV for inkjet printers, known for its excellent stretch and rebound.
- Key Features:
- Inkjet Compatibility: For standard inkjet printers.
- Superior Stretch: Ideal for activewear and garments that need to move.
- Thin Profile: Virtually undetectable once applied to the fabric.
- Matte Finish: Provides a non-glossy, professional look.
- Warm or Cold Peel: Offers flexibility in application.
- Ideal For: Athletic wear, yoga pants, t-shirts, and any garments where flexibility and comfort are paramount.
- My Take: For my personal workout gear, I always gravitate towards ColorPrint PU. I created a custom design for my running club's moisture-wicking shirts, and even after dozens of intense workouts and washes, the design looks as good as new, stretching perfectly with the fabric.
### 5. Siser ColorPrint Extra
This one is for those heavy-duty projects or tricky fabrics. Siser ColorPrint Extra is designed for more industrial applications and fabrics that might be harder to adhere to, like nylon or leather.
- Key Features:
- Solvent/Eco-Solvent Ink Compatibility: Typically used with wide-format professional printers, not desktop inkjets.
- Aggressive Adhesive: Formulated for difficult-to-adhere fabrics.
- Excellent Opacity: Great for dark fabrics.
- Durable: Built for rugged use and demanding washing conditions.
- Ideal For: Workwear, bags, umbrellas, leather goods, nylon jackets, tents, banners, or projects requiring extreme durability and adhesion.
- My Take: While I don't personally use solvent printers, I've seen ColorPrint Extra work wonders for friends who run print shops. One buddy used it to create custom logos on canvas bags for a local climbing gym – the results were incredibly tough and long-lasting, perfect for high-wear items.
Choosing the right Siser Printable HTV for your project is about matching the material's properties to your printer type, design needs, and garment requirements. Don't be afraid to experiment, but always start by checking the product specifications to ensure compatibility!
### 10 Considerations When Selecting Your Printable HTV
1. Printer Type: Inkjet vs. Sublimation vs. Solvent/Eco-Solvent.
2. Fabric Type: Cotton, Polyester, Blends, Nylon, Leather, etc.
3. Garment Color: Light vs. Dark.
4. Desired Hand Feel: How soft and flexible do you want the final design to be?
5. Wash Durability: How many washes do you expect it to withstand?
6. Stretch/Rebound: Is it for activewear or a rigid item?
7. Finish: Matte, semi-gloss, etc.
8. Peel Type: Hot, warm, or cold peel.
9. Ease of Use: Some are more forgiving for beginners.
10. Cost per Sheet: Budget considerations for different projects.
---
The Creative Workflow: Designing & Printing Your Masterpiece
Alright, you've chosen your Siser Printable HTV – now for the fun part: bringing your design to life! This section is all about getting your digital creation ready for print and ensuring your printer plays nicely with the vinyl. This is where attention to detail really pays off, transforming a good idea into a great, tangible product.
### 1. Designing Your Artwork
Your design is the heart of your project, so let's make sure it's optimized for printable HTV.
- Choose the Right Software:
- Beginner-Friendly: Canva, PicMonkey, Cricut Design Space (for simple images/text).
- Intermediate: Adobe Photoshop Elements, Affinity Photo, GIMP (for raster images/photos).
- Expert/Professional: Adobe Illustrator, CorelDRAW, Adobe Photoshop (for advanced vector graphics, complex layouts, and precise color management).
- Resolution is Key: For raster images (photos, detailed illustrations), use a high resolution (at least 300 DPI) to avoid pixelation. Remember, you can always scale down a high-res image, but you can't truly scale up a low-res one without quality loss.
- Color Mode: Work in RGB color mode. Your home inkjet printer operates in RGB, so designing in CMYK (which is for commercial printing) can lead to unexpected color shifts.
- Mirror Your Image: This is CRITICAL! Just like with traditional HTV, you need to mirror or flip your design horizontally before printing. If you don't, any text will be backward, and directional images will be reversed. I learned this the hard way on my very first printable HTV project – a custom shirt for my band with our logo. Printed it, cut it, pressed it... and the text was completely illegible! Had to scrap the shirt and start over, a valuable lesson in patience and checking settings.
- Registration Marks (for cutting): If you plan to use a vinyl cutter (like Cricut or Silhouette) to cut out your design, ensure your software adds "print then cut" registration marks around your design. These marks guide your machine to cut precisely where it needs to.
### 2. Printer Settings: The Unsung Hero
This is arguably the most crucial step for beautiful, vibrant prints on Siser Printable HTV. Don't just hit print and hope for the best!
- Printer Type: Ensure your printer is an inkjet printer for Siser EasyColor DTV or ColorPrint Easy/PU. If you're using EasySubli, you need a dedicated sublimation printer.
- Load Correctly: Printable HTV often has a printable side (usually matte or slightly tacky) and a carrier sheet side (often glossy or with grid lines). Always load the HTV into your printer so that the design prints on the correct side. A common mistake is printing on the carrier! (Been there, done that, wasted a sheet.)
- "Best Quality" or "Photo Paper" Settings:
- Go into your printer's settings (usually accessible through your design software's print dialog box).
- Select the highest print quality setting available (e.g., "Best," "High," "Photo Quality").
- For the paper type, choose something like "Photo Paper," "Glossy Photo Paper," "Matte Photo Paper," or "Premium Presentation Paper Matte." These settings typically lay down more ink and produce richer colors, which is what you want for printable HTV.
- Nozzle Check/Print Head Cleaning: If your printer hasn't been used in a while, run a nozzle check and clean your print heads if necessary. Clogged nozzles lead to streaky or incomplete prints, which is a total waste of precious Siser Printable HTV.
- Ink Levels: Make sure you have enough ink! Running out mid-print is not only annoying but can ruin your sheet.
- Test Prints (Optional but Recommended): If you're new to printable HTV or using a new design, consider printing a small section of your design on plain paper first to check colors and mirroring. You could also do a small test print on a scrap piece of the printable HTV if you have any.
### 3. Color Management (Advanced Tip for Experts)
For those who want absolute color accuracy, delving into color profiles can be beneficial.
- ICC Profiles: Some manufacturers (including Siser) provide ICC profiles for their printable media. These profiles tell your printer exactly how to interpret colors for that specific material, leading to more accurate results. You'd typically load these into your design software (like Photoshop) and select them before printing. This is really for those trying to match brand colors precisely.
By taking the time to design carefully and optimize your printer settings, you'll ensure that your Siser Printable HTV projects pop with vibrant colors and crisp details, ready for the next step: cutting and pressing!
### 10 Critical Steps in Your Design & Print Workflow
1. Create/Select High-Resolution Design: Start with quality visuals.
2. Optimize Design for HTV: Ensure sharp lines, clear text.
3. Select RGB Color Mode: Crucial for inkjet vibrancy.
4. MIRROR YOUR IMAGE: Seriously, don't forget this!
5. Add Registration Marks: If using a cutter for "print then cut."
6. Load HTV Correctly: Printable side up for most printers.
7. Choose "Best Quality" Print Settings: Maximize ink saturation and detail.
8. Select Appropriate Paper Type: "Photo Paper" or "Premium Matte" works best.
9. Perform Nozzle Check: Prevent streaky prints.
10. Verify Ink Levels: Avoid mid-print disasters.
---
From Print to Press: Mastering the Application Process
You've printed your masterpiece on Siser Printable HTV; now it's time for the grand finale – transferring it onto your chosen garment. This stage is where your patience and precision truly shine, turning a printed sheet into a durable, custom design. Many beginners rush this part, leading to peeling, cracking, or poor adhesion. Trust me, a few extra moments of care here will save you hours of frustration later.
### 1. Cutting Your Design
After printing, your design needs to be cut out. You have two main options:
- Manual Cutting (Scissors/Craft Knife):
- When to Use: For simple shapes, large designs, or if you don't own a vinyl cutter.
- Technique: Carefully cut along the edges of your printed design. For intricate designs, this can be tedious and might not achieve perfectly smooth edges.
- Electronic Cutting Machine (Cricut, Silhouette, Brother ScanNCut):
- When to Use: For intricate designs, precise cuts, or batch production. This is the preferred method for most Siser Printable HTV users.
- "Print Then Cut" Feature: This is what makes these machines so powerful. After printing your design with registration marks (as discussed in the previous section), place the printed sheet onto your cutting mat. The machine's optical sensor will read the registration marks and cut precisely around your printed image.
- Cut Settings: This is where you might need to experiment a bit. Start with Siser's recommended cut settings for your specific printable HTV (usually found on their website or product packaging). A common starting point for Siser EasyColor DTV on a Cricut might be "Everyday Iron-On" or "Printable Iron-On - Light" with increased pressure. For Silhouette, try "Heat Transfer Vinyl, Smooth" with blade depth 2-3 and force 10-15. Always do a small test cut (a "kiss cut" where it only cuts the vinyl, not the carrier) on a scrap piece before cutting your full design. My personal trick is to cut a tiny square in a corner of the printable HTV and try to peel it; if it peels easily, the settings are good!
### 2. Weeding Your Design
Once cut, you'll need to "weed" away the excess vinyl that isn't part of your design.
- Technique: Use a weeding tool (a hook-like tool is best) to carefully remove the vinyl from around your design. Don't forget to remove any small inner pieces (like the center of an "O" or "A"). Be gentle, especially with intricate details, as printable HTV can sometimes be more delicate than traditional HTV.
- Pro Tip: If you're struggling to see your cut lines, try holding the HTV up to a light source or bending the sheet slightly to make the cut lines more visible.
### 3. Pre-Pressing Your Garment
Before applying your design, always pre-press your garment.
- Why: This removes moisture from the fabric (which can interfere with adhesion), eliminates wrinkles, and pre-shrinks the fabric slightly, preventing issues later.
- How: Place your garment on your heat press or ironing surface. Press for 2-3 seconds at your recommended application temperature.
### 4. Applying Your Siser Printable HTV
This is the moment of truth!
- Placement: Position your weeded design (still on its clear carrier sheet) onto your pre-pressed garment. Take a moment to ensure it's straight, centered, and exactly where you want it.
- Heat Press vs. Iron:
- Heat Press (Recommended): Provides even heat and pressure, leading to the best adhesion and durability.
- Home Iron: Can work for smaller, simpler designs, but requires more effort to achieve even heat and firm, consistent pressure. Avoid steam settings!
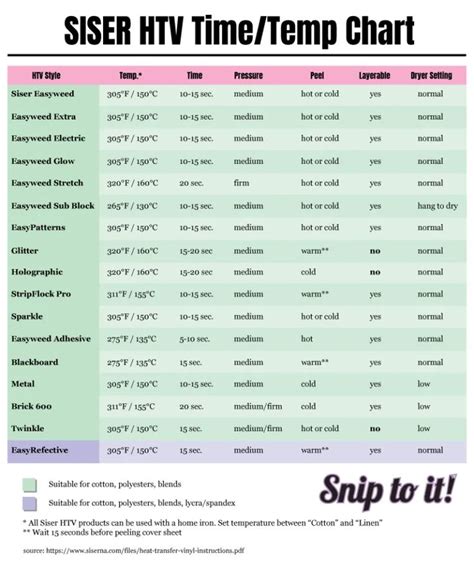
- Temperature, Time, Pressure: These are the three pillars of successful HTV application.
- Temperature: Refer to Siser's specific recommendations for the type of Siser Printable HTV you're using (e.g., EasyColor DTV is often around 305°F/150°C).
- Time: Again, follow Siser's recommendations (e.g., 15 seconds).
- Pressure: This is often overlooked. For a heat press, use medium to firm pressure. For an iron, lean into it with your full body weight, moving it consistently over the entire design for the recommended time. Apply pressure directly, not just gliding.
- Peeling the Carrier Sheet:
- Hot Peel: Peel the carrier sheet immediately after pressing while it's still hot.
- Warm Peel: Let the design cool for a few seconds (but not completely cold) before peeling.
- Cold Peel: Let the design cool completely before peeling.
- Always check the specific instructions for your Siser Printable HTV! EasyColor DTV is a hot or cold peel, offering great flexibility. ColorPrint Easy is usually a warm peel.
- Second Press (Optional but Recommended): After peeling the carrier sheet, place a piece of parchment paper or a Teflon sheet over the design and press again for 2-5 seconds. This helps to fully embed the vinyl into the fabric fibers, increasing durability and washing resistance. This is my secret weapon for ensuring longevity; I always do a second press!
By following these steps meticulously, you'll achieve professional-looking, durable results with your Siser Printable HTV projects every single time. It's a process that rewards precision and patience, and the feeling of pulling off that carrier sheet to reveal a perfectly transferred, vibrant design is truly unmatched!
### 10 Steps for Flawless Application
1. Cut Precisely: Use a cutter or sharp scissors.
2. Test Cut (Machine Users): Validate your cut settings.
3. Weed Thoroughly: Remove all excess vinyl.
4. Pre-Press Garment: Remove moisture and wrinkles.
5. Position Design: Ensure perfect placement.
6. Set Heat/Time/Pressure: Adhere to Siser's guidelines.
7. Press Confidently: Apply even heat and firm pressure.
8. Peel Correctly: Follow hot, warm, or cold peel instructions.
9. Second Press (Optional): Enhance durability with a cover sheet.
10. Allow to Cure: Wait 24 hours before first wash.
---
Beyond the Basics: Advanced Techniques & Creative Applications

Once you've mastered the fundamental application of Siser Printable HTV, a whole new realm of creative possibilities opens up. This isn't just about printing a simple logo anymore; it's about pushing boundaries, combining techniques, and truly making your projects stand out. Let's explore some ways to elevate your craft.
### 1. Layering with Traditional HTV
This is where things get really exciting! You can use Siser Printable HTV for your intricate, full-color elements and combine it with traditional Siser EasyWeed (or other Siser HTV) for solid color backgrounds, outlines, or text.
- Technique:
1. Press your traditional HTV layers first, following their specific temperature and time recommendations. Do *not* over-press, as you'll be adding more heat later.
2. Once your traditional HTV is applied, carefully place your printed Siser Printable HTV design on top.
3. Press the printable HTV layer at its recommended settings. A common strategy is to use the *lowest* recommended temperature/time that works for both materials to avoid over-curing the underlying vinyl.
- Example: Imagine a sports team logo. You could use a solid colored traditional HTV for the team name's background, and then use printable HTV for a detailed mascot illustration that sits on top or integrates with the text. This gives depth and a dynamic look. My friend, who makes custom cosplay outfits, often uses this technique to create incredibly detailed patches for armor and clothing, combining the texture of traditional HTV with the photo-realistic details of printable HTV.
### 2. Creating Custom Patches and Labels
Siser Printable HTV isn't just for direct garment application. You can create custom patches that can then be sewn or adhered to other items.
- Technique: Print and cut your design, then apply it to a piece of blank material (like a sturdy canvas, felt, or even another piece of scrap HTV for a unique texture). Once applied, you can trim around it, heat-seal the edges (if applicable), and then sew or use a strong fabric adhesive to attach it to hats, backpacks, denim jackets, or even non-fabric items.
- Scenario: I once created a series of custom "iron-on" scout badges for a local youth group using printable HTV. They were applied to a sturdy fabric backing, then trimmed and sewn onto their vests. The parents loved the vibrant detail and durability compared to traditional embroidered patches.
### 3. Unique Fabric Applications (Beyond T-Shirts)
While T-shirts are a given, don't limit your imagination!
- Hats & Caps: Use a hat press or a curved platen attachment on your heat press for best results. Printable HTV works wonderfully on cotton and polyester caps.
- Shoes: Yes, you can customize canvas shoes! Just ensure the fabric surface is clean and flat for pressing. Use a mini