Remember that thrill? The crisp snap of paper, the careful crease, the moment of release, and then… the glorious, gravity-defying flight of a paper airplane. For many of us, it was a childhood rite of passage, a simple joy that ignited a spark of wonder. But what if I told you that the world of paper airplanes has evolved far beyond the crumpled sheet you hastily folded in class? What if there was a treasure trove of expertly designed, meticulously engineered blueprints just waiting for you to print, fold, and launch? Welcome to the incredible universe of the printable paper airplane.
This isn't just about nostalgia; it's about accessible creativity, hands-on learning, and the sheer satisfaction of watching something you built take to the skies. Whether you're a parent looking for a fun, educational activity, a teacher seeking engaging STEM projects, a casual enthusiast wanting to relive a simple pleasure, or even a seasoned aerodynamist keen to push the boundaries of paper flight, this guide is for you. I've spent countless hours, from childhood kitchen tables to adult workshops, exploring the nuances of paper aviation. Trust me, I once spent an entire afternoon trying to perfect a design that kept nose-diving, only to realize a tiny adjustment to the tail could make all the difference. That moment of discovery, that blend of art and science, is what makes this hobby so captivating. This comprehensive guide will equip you with everything you need to transform a humble sheet of paper into an aerial marvel, ensuring your next flight is nothing short of spectacular.
---
Table of Contents

- [The Art of Flight: Understanding Printable Paper Airplane Designs](#the-art-of-flight-understanding-printable-paper-airplane-designs)
- [Ready, Set, Print! Your Ultimate Guide to Free Printable Paper Airplane Templates](#ready-set-print-your-ultimate-guide-to-free-printable-paper-airplane-templates)
- [From Flat Sheet to Sky High: Step-by-Step Folding for Printable Designs](#from-flat-sheet-to-sky-high-step-by-step-folding-for-printable-designs)
- [Beyond the Basic Fold: Customizing & Optimizing Your Printable Aircraft](#beyond-the-basic-fold-customizing--optimizing-your-printable-aircraft)
- [The Science of Soaring: How Printable Paper Airplanes Teach STEM](#the-science-of-soaring-how-printable-paper-airplanes-teach-stem)
- [Troubleshooting Your Flight: Common Problems and Quick Fixes for Printable Planes](#troubleshooting-your-flight-common-problems-and-quick-fixes-for-printable-planes)
- [The Paper Airplane Workshop: Fun Activities & Games with Printables](#the-paper-airplane-workshop-fun-activities--games-with-printables)
- [The Global Fleet: Exploring Unique Printable Paper Airplane Designs from Around the World](#the-global-fleet-exploring-unique-printable-paper-airplane-designs-from-around-the-world)
- [Gifting Flight: Presenting Printable Paper Airplanes as Thoughtful, Creative Gifts](#gifting-flight-presenting-printable-paper-airplanes-as-thoughtful-creative-gifts)
- [The Future of Flight: Digital Tools and Advanced Printable Paper Airplane Innovations](#the-future-of-flight-digital-tools-and-advanced-printable-paper-airplane-innovations)
- [How to Choose the Best Printable Paper Airplane for Your Needs](#how-to-choose-the-best-printable-paper-airplane-for-your-needs)
- [Common Pitfalls to Avoid When Working with Printable Paper Airplanes](#common-pitfalls-to-avoid-when-working-with-printable-paper-airplanes)
- [Advanced Tips for Experts: Pushing the Boundaries of Paper Aviation](#advanced-tips-for-experts-pushing-the-boundaries-of-paper-aviation)
- [Conclusion: Your Journey to Paper Flight Mastery](#conclusion-your-journey-to-paper-flight-mastery)
---
The Art of Flight: Understanding Printable Paper Airplane Designs
Not all paper airplanes are created equal! Just like real aircraft, different designs are optimized for different flight characteristics. When you delve into the world of the printable paper airplane, you'll discover a fascinating array of types, each with its own charm and challenge. Understanding these categories is the first step to becoming a true paper aviation aficionado.
1. The Classic Glider: This is perhaps the most iconic design. Characterized by long, broad wings and a stable fuselage, gliders are built for maximum airtime. Their goal isn't speed or acrobatics, but graceful, extended flight. Think of them as the gentle giants of the paper sky.
- *Personal Scenario:* My kids absolutely adore launching gliders from the top of a small hill in our local park. The wide wings catch the updrafts, and they'll often stay airborne for what feels like an eternity, sparking pure joy and shouts of "Look how long it's flying!"
2. The Distance Flyer: Sleek, often with narrow wings and a pointed nose, these designs are all about covering maximum ground. They're built to cut through the air with minimal drag, relying on a powerful initial throw and aerodynamic efficiency.
- *Example Design:* The "Nakamura Lock" is a famous distance design known for its incredible range.
3. The Stunt/Acrobatic Plane: These are the daredevils of the paper airplane world. Featuring smaller wings, often with adjustable flaps or canards, they're designed for loops, dives, rolls, and other aerial tricks. They might not fly far, but they're incredibly fun to manipulate.
- *Example Design:* Designs like the "Sky King" or those with intricate winglets allow for impressive maneuvers.
4. The Delta Wing: Inspired by fighter jets, these designs feature a large, triangular wing. They offer a good balance of speed and stability, making them exciting for both distance and some basic stunts.
- *Personal Scenario:* I once tried to replicate the flight path of a real fighter jet with a delta wing printable. While it didn't break the sound barrier, the sharp turns and surprisingly fast glide were quite exhilarating.
5. The Canard Design: In this less common configuration, the smaller horizontal stabilizer is placed in front of the main wing, rather than at the rear. This can offer unique lift characteristics and sometimes greater stability at certain speeds.
- *Example Feature:* Some advanced printable paper airplane models incorporate canards for experimental flight.
6. The Ornithopter-Inspired: While not strictly paper airplanes in the traditional sense, some printable designs mimic the flapping wing motion of birds or insects. These are often more complex to build and fly, but offer a fascinating glimpse into biomimicry.
- *Note:* These are typically more advanced and might require additional materials like paper clips for balance.
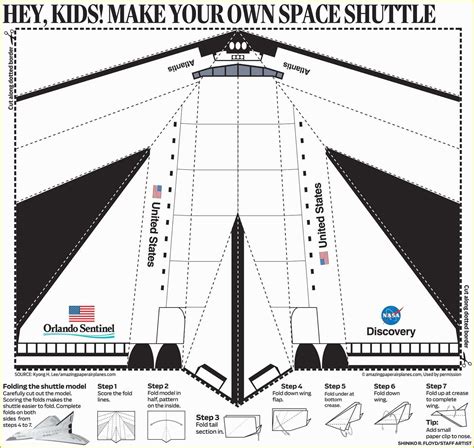
7. The Shuttle/Spacecraft Design: Often heavier and more robust, these designs are inspired by space shuttles or futuristic spacecraft. They usually have a faster descent but can look incredibly cool and offer a satisfyingly solid flight.
- *Personal Scenario:* My nephew, obsessed with astronauts, found a printable space shuttle design. We spent an hour carefully folding it, and even though its flight was short, the sheer joy of launching "his own rocket" was priceless.
8. The "Throw-and-Return" Boomerang: A specialized type, these designs are engineered to fly in a curve and return to the thrower. They require precise folding and a specific throwing technique, but mastering one is incredibly rewarding.
- *Example Design:* Many boomerang paper airplane templates are available, often featuring unique wing shapes.
9. The Heavy-Nosed Dart: Simple, fast, and often surprisingly stable over short distances, these designs rely on a heavy front end to maintain momentum and a straight trajectory. Great for quick, satisfying launches.
- *Tip:* Adding a paper clip to the nose can often convert a standard design into a dart-like flyer.
10. The "Box" or "Cube" Plane: These unconventional designs often feature multiple interconnected wings or a box-like fuselage. They might not be the most aerodynamic, but they offer a unique visual appeal and can sometimes achieve surprisingly stable, albeit slow, flights.
- *Example Feature:* These often challenge conventional aerodynamics, making them interesting for experimentation.
11. The Biplane/Triplane: Mimicking their real-world counterparts, these designs feature two or three sets of wings. They are generally more complex to fold but can offer increased lift and a distinctive aesthetic.
- *Personal Scenario:* Building a printable biplane with my daughter taught us both about the engineering challenges of multi-wing aircraft. It required extra care in alignment, but the result was a truly impressive model.
12. The Propeller-Powered (with external motor): While the paper itself doesn't provide propulsion, some printable designs are specifically built to accommodate small, lightweight propeller motors (often battery-powered). This transforms them into mini RC planes, a fantastic blend of paper craft and electronics.
- *Note:* This goes beyond pure paper craft but utilizes printable templates as the airframe.
Ready, Set, Print! Your Ultimate Guide to Free Printable Paper Airplane Templates
The beauty of the printable paper airplane lies in its accessibility. A vast world of meticulously designed templates is just a few clicks and a print job away! But where do you find them, and what should you look for? Let's dive into the digital treasure chest.
1. Dedicated Paper Airplane Websites: Many sites specialize in paper aviation, offering a wide range of free templates. These are often curated by enthusiasts or even professional designers, ensuring quality and detailed instructions.
- *Example:* Websites like PaperAirplanes.io, Fold'N Fly, or some sections of NASA's education resources.
2. Educational Resource Hubs: Teacher-focused websites (e.g., Teachers Pay Teachers - often free resources, Scholastic) or STEM project sites frequently provide printable templates, often with accompanying lesson plans for kids.
- *Personal Scenario:* My friend, a third-grade teacher, found a fantastic set of printable templates for a science fair project on aerodynamics. The kids loved the visual guides and how easily they could print different designs to test.
3. Craft & DIY Blogs: Many craft bloggers share their own custom designs or compilations of favorites. These can often be very creative, featuring unique aesthetics alongside functional flight.
- *Tip:* Look for blogs that offer clear photos of the finished product and detailed folding instructions.
4. YouTube Channels with Download Links: Many paper airplane experts on YouTube demonstrate folding techniques and provide links to download their specific templates in the video description. This is great for visual learners!
- *Personal Scenario:* I once stumbled upon a Japanese paper airplane master's channel. His designs were intricate, and the accompanying printable template made it possible for me to follow along, even without understanding the language perfectly.
5. Pinterest & Instagram: These visual platforms are goldmines for discovering new designs. While they might link back to other sites for the actual download, they're excellent for browsing and getting inspiration.
- *Strategy:* Search terms like "free paper airplane templates," "printable glider designs," or "DIY paper aviation."
6. Manufacturer Websites (e.g., paper brands): Sometimes, paper manufacturers or stationery companies will offer free printable craft templates, including paper airplanes, as a way to showcase their products.
- *Example:* Look for sections like "Crafts & DIY" on paper company websites.
7. Public Domain Archives & Old Books Scans: For a touch of history, you might find scans of older paper airplane designs from public domain books. These can offer classic designs and a nostalgic feel.
- *Note:* These might require a bit more searching but can yield unique finds.
8. Online Forums & Communities: Enthusiast forums dedicated to paper modeling, origami, or STEM often have sections where members share their own designs and templates.
- *Example:* Reddit communities focused on paper crafts or DIY projects.
9. Google Image Search (with caution): While useful for discovery, always trace the image back to its original source to ensure you're downloading from a reputable site and respecting copyright.
- *Warning:* Don't just download the first image you see; verify the source.
10. Software Specific Templates: Some design software (e.g., Adobe Illustrator, Canva) or even office suites (e.g., Microsoft Word/PowerPoint) might have built-in templates or assets that can be adapted for paper airplanes.
- *Tip:* These might require a bit of customization but offer a good starting point.
11. Academic Institution Pages: Universities or research institutions involved in aerodynamics or engineering sometimes publish simplified paper airplane designs as part of outreach or educational programs.
- *Personal Scenario:* I once found a fascinating, research-backed design from a university's aerospace department. It came with detailed explanations of the aerodynamics, which truly deepened my understanding.
12. Subscription Boxes/Kits (with digital components): Some craft or STEM subscription boxes might offer digital printables as part of their package, allowing you to replicate designs even after the physical kit is used up.
- *Note:* These usually come with a subscription fee but often provide high-quality, curated designs.
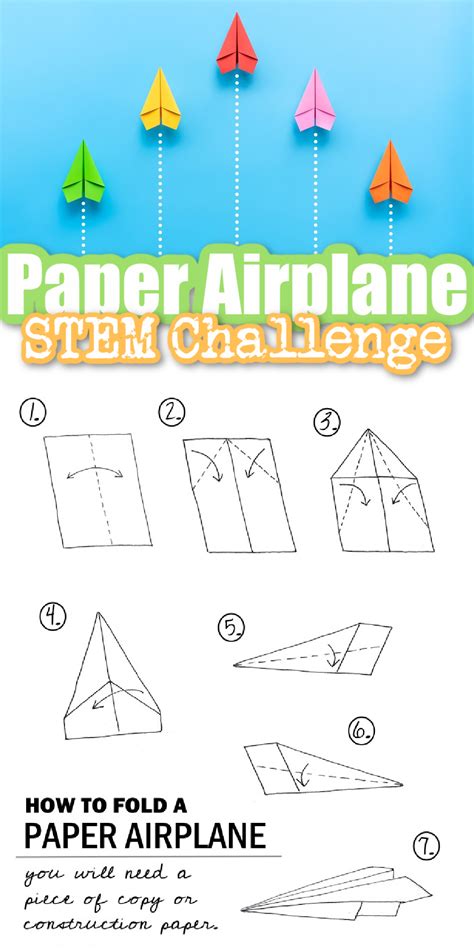
From Flat Sheet to Sky High: Step-by-Step Folding for Printable Designs
So, you've found the perfect printable paper airplane template. Now comes the magic: transforming that flat sheet into a three-dimensional marvel of flight. This isn't just about bending paper; it's about precision, patience, and understanding how each crease contributes to the final flight performance.
1. Preparation is Key:
- Print Quality: Ensure your printer is loaded with fresh ink and the template prints clearly. Faint lines or smudges can make precise folding difficult.
- Paper Choice: Most templates are designed for standard printer paper (20-24 lb bond). Heavier cardstock can be used for sturdier planes but can be harder to fold precisely. My personal preference is 20 lb bond for its balance of crispness and pliability.
- Workspace: Find a clean, flat surface. A cutting mat can be helpful for precise cuts.
2. Follow the Lines (Literally!): Printable templates often have dotted or solid lines indicating where to fold. These are your best friends. Aligning your folds perfectly with these guides is crucial for balance and symmetry.
- *Personal Scenario:* I remember attempting a complex design where I eyeballed one of the initial folds. The resulting airplane spun wildly. The next attempt, meticulously aligned with the printed guide, flew beautifully. Lesson learned: precision matters!
3. Crease with Care and Firmness:
- Initial Folds: Make light creases at first to ensure alignment. Once satisfied, press down firmly to create a sharp, defined crease.
- Tools: A ruler or the back of your fingernail can help achieve crisp creases, especially for thicker paper.
4. Symmetry is paramount: The two sides of your paper airplane must be as identical as possible. Any slight imbalance can cause the plane to veer, spin, or nose-dive.
- *Tip:* Fold the paper in half initially to create a central guiding crease, then use this to ensure subsequent folds are mirrored on both sides.
5. Understanding Reference Points: Many templates will have small marks or arrows indicating where one fold should meet another. Pay close attention to these; they are critical for structural integrity and aerodynamics.
- *Example:* A small triangle might indicate where a wingtip should align with the fuselage.
6. Wing Formation and Dihedral:
- Dihedral: This is the slight upward angle of the wings from the fuselage. Many designs benefit from a small amount of dihedral (wings bending slightly upwards) for stability. Templates often guide this.
- Wingtips: Ensure wingtips are folded sharply and symmetrically.
7. Tail Section Details:
- Elevators (horizontal flaps): These are usually at the rear of the wings. Bending them slightly up will cause the plane to climb; down will cause it to dive. Experiment after the initial build.
- Rudders (vertical flaps): Found on the vertical stabilizer (tail fin), bending these left or right can affect steering.
8. Reinforcement (Optional but Recommended): For designs that see a lot of action, a tiny dot of glue or a piece of tape at critical stress points (e.g., where wings meet the fuselage, or at the nose for durability) can significantly extend the life of your plane.
- *Personal Scenario:* My son's favorite "Stunt King" design kept losing its wingtip during aggressive landings. A tiny piece of clear tape on the inside of the fold solved the problem, and it's still flying months later!
9. The "Dry Run" Fold: For complex designs, sometimes it helps to "dry run" a fold without pressing too hard, just to get a feel for the paper's movement and the next step.
10. Don't Be Afraid to Start Over: If a fold goes significantly wrong and you can't correct it, it's often better to grab a fresh print and start again. A perfectly folded plane will always fly better than a botched one.
11. Practice Makes Perfect: The more you fold, the better your dexterity and eye for precision will become. What seems daunting at first will become second nature.
12. Enjoy the Process: Remember, it's a craft! The joy is not just in the flight but in the meticulous, meditative process of bringing the design to life.
Beyond the Basic Fold: Customizing & Optimizing Your Printable Aircraft
You've mastered the basic folds of your printable paper airplane. But why stop there? The true enthusiast knows that the real fun begins with customization and optimization. This is where you transform a good flyer into a great one, and truly make it your own.
1. Trimming for Performance:
- Winglets: Small upward folds at the very tips of the wings can reduce drag and improve stability, especially for gliders.
- Trailing Edge Adjustments: Tiny snips or folds along the trailing edge of the wings can act like micro-flaps, altering lift and control.
- *Example:* A subtle upward curl on the last centimeter of the wing's trailing edge can give a glider more lift.
2. Weight Distribution is Key:
- Nose Weight: Adding a small amount of weight to the nose (e.g., a paperclip, a tiny bit of clay, or a small coin secured with tape) can prevent nose-diving and improve forward momentum for distance flyers.
- Tail Weight (Rarely): Only add tail weight if a specific design consistently stalls or loops too aggressively, indicating a nose that's too heavy. This is less common.
- *Personal Scenario:* I had a beautifully designed printable that just wouldn't fly straight. It kept stalling. A single paperclip on the nose transformed it into a champion distance flyer, winning a friendly office competition!
3. Adjusting Control Surfaces:
- Elevators (Pitch Control): Slightly bending the horizontal flaps on the tail up will make the plane climb; bending them down will make it dive. A neutral position is often best for straight flight.
- Rudders (Yaw Control): Bending the vertical tail fin to the left or right will make the plane turn in that direction. Use subtle adjustments.
- *Tip:* Make *very* small adjustments at a time, test, and then adjust again.
4. Decorating Your Flyer:
- Coloring/Markers: Print black and white templates and let your creativity soar with markers, colored pencils, or crayons.
- Stickers/Decals: Small, lightweight stickers can add personality without significantly altering aerodynamics.
- Theming: Create a theme! A space-themed glider, a stealth jet, or a colorful fantasy flyer.
- *Personal Scenario:* My niece and I once spent an entire afternoon decorating a fleet of printable paper airplanes with glitter glue and superhero stickers. Their flight performance might have slightly suffered, but their aesthetic appeal was off the charts!
5. Reinforcing High-Stress Areas:
- Tape/Glue: As mentioned before, a tiny piece of clear tape on the inside of wing folds or where the fuselage comes together can prevent tears and prolong the plane's life.
- Lamination (for durability): For a truly robust design, you could print on slightly heavier paper, fold it, and then carefully laminate the *finished* plane (if it's flat enough). This is more for display or very gentle play.
6. Experimenting with Paper Types:
- Cardstock: Provides greater rigidity but is harder to fold precisely. Good for larger, sturdier models.
- Waterproof Paper: Specialty papers exist that can withstand moisture, making them suitable for outdoor play in damp conditions (though not actual water landings!).
- Colored Paper: For instant visual appeal without needing to color.
- *Note:* Always consider how the paper's weight and stiffness will affect the design's intended flight characteristics.
7. Propulsion Modification (Advanced):
- Rubber Band Launchers: Some designs are optimized for launch from a simple rubber band catapult, increasing initial velocity and distance.
- Motor Integration: For the truly adventurous, some larger printable designs can be modified to house a micro electric motor and propeller for sustained flight (requires significant expertise and additional components).
8. Adding a Launching Loop: A small loop of tape or a carefully cut slit on the underside of the fuselage can provide a consistent grip point for launching, ensuring a more stable throw.
9. The Test Flight Log: Keep a simple log! Note down any modifications made, the resulting flight characteristics (distance, airtime, stunts), and what worked or didn't. This iterative process is how engineers optimize real aircraft!
10. Understanding the Center of Gravity (CG): For advanced users, understanding where the plane's center of gravity is located (typically around 1/3 to 1/2 of the way back from the nose) is crucial. Adjusting weight to move the CG can drastically change flight.
- *Tip:* A pencil balance test can help locate the CG.
11. Wing Spars (internal reinforcement): For very large printable designs, you might consider adding a thin, lightweight strip of cardstock or a coffee stirrer along the wing's underside as a "spar" to prevent excessive flapping or bending.
12. Community Sharing & Feedback: Share your customized designs and flight results in online communities. Others might offer tips or be inspired by your innovations. It’s a great way to learn and improve.
The Science of Soaring: How Printable Paper Airplanes Teach STEM
Beyond the sheer fun, the printable paper airplane is a stealthy, engaging tool for teaching fundamental concepts in Science, Technology, Engineering, and Mathematics (STEM). It's a hands-on, low-cost laboratory that brings abstract principles to life in a tangible, exciting way.
1. Aerodynamics in Action:
- Lift: The upward force that opposes gravity. Kids can observe how wing shape (airfoil) and angle of attack generate lift. Wider, flatter wings generate more lift.
- Drag: The resistance force that opposes motion. They can see how a sleek design reduces drag, while a crumpled nose increases it.
- Thrust: The forward force that propels the plane. This is provided by the thrower's arm, demonstrating the initial energy required for flight.
- Gravity: The downward force. The entire flight is a battle against gravity!
- *Personal Scenario:* My son kept asking why his plane fell so fast. We experimented with different wing sizes on printable templates, and he literally saw how a larger wing area created more lift, allowing for a slower, more graceful descent.
2. Engineering Principles:
- Design & Structure: Understanding why certain folds create strength, stability, or control. The process of building a plane from a flat sheet is an exercise in structural engineering.
- Problem-Solving: When a plane doesn't fly as expected, students engage in iterative design: identify the problem, propose a solution (e.g., adjust a wing, add nose weight), test, and refine.
- Material Science (Paper): Exploring how different paper weights and textures affect rigidity, folding ease, and flight characteristics.
- *Example:* Engineers constantly refine designs based on test flights, just like kids do with their paper airplanes.
3. Physics of Flight:
- Newton's Laws of Motion:
- First Law (Inertia): A well-thrown plane continues to fly until external forces (air resistance, gravity) act upon it.
- Second Law (F=ma): The force of the throw determines acceleration.
- Third Law (Action-Reaction): The downward deflection of air by the wings creates an upward reaction force (lift).
- Center of Gravity & Balance: How the distribution of weight affects stability and flight path. A balanced plane flies predictably.
- *Personal Scenario:* I once explained momentum to a group of middle schoolers by demonstrating how a heavier paper airplane, once thrown, maintained its forward motion longer than a lighter one, even if both were thrown with similar initial force.
4. Mathematics in Action:
- Geometry: Identifying angles, symmetry, lines, and shapes created by folds. Understanding how precise measurements (often guided by printable templates) are crucial.
- Measurement: Calculating distance, airtime, wingspan, and comparing results.
- Data Collection & Analysis: Recording flight distances, airtime, or observing flight paths, and then analyzing which design modifications led to improvements.
- Graphing: Plotting flight data to visually compare different designs or modifications.
- *Example:* Students can measure the wingspan and length of different printable designs and see if there's a correlation with flight performance.
5. Iterative Design Process: This is the core of engineering!
- Hypothesize: "If I add a paperclip to the nose, it will fly further."
- Experiment: Add the paperclip, throw the plane.
- Observe: Did it fly further? Did it fly differently?
- Conclude: What did the experiment tell you?
- Refine: Make further adjustments based on observations.
- *Personal Scenario:* My daughter and I designed an "aerodynamic challenge" for her scout troop. Each child started with the same printable template, made one modification, and then tested it. The insights and discussions about what worked and why were incredibly rich.
6. Problem-Solving Skills: Every time a paper airplane veers left, stalls, or crashes, it presents a problem to be solved. This fosters critical thinking and encourages experimentation.
- *Tip:* Encourage kids to articulate *why* they think a plane isn't flying well before attempting a fix.
7. Creative Thinking: While following templates, there's always room for personal touches, decoration, and even modifying the template slightly (with guidance for younger learners).
8. Teamwork and Communication: Building and testing paper airplanes can be a fantastic collaborative activity, encouraging communication and shared problem-solving.
9. Historical Context (briefly): Discussing the history of flight and how early aviation pioneers also experimented with different designs, much like they are doing with paper.
10. Introduction to Scientific Notation: For older students, discussing concepts like lift-to-drag ratio or aspect ratio, even if simplified, can introduce more advanced scientific vocabulary.
11. Understanding Variables: When testing, teach the importance of changing only *one variable* at a time (e.g., only nose weight, not wing shape) to accurately assess the impact of that change.
12. Failure as a Learning Opportunity: Emphasize that "crashes" are not failures but data points that inform the next iteration of the design. This builds resilience and a growth mindset.
Troubleshooting Your Flight: Common Problems and Quick Fixes for Printable Planes
You've painstakingly folded your printable paper airplane, launched it with anticipation, and... it nose-dived, spun, or simply refused to fly. Don't worry, even seasoned paper aviators encounter flight glitches! The good news is that most common problems have simple, effective fixes. Think of it as your in-flight maintenance manual.
1. The Dreaded Nose Dive:
- Problem: The plane immediately points its nose down and crashes.
- Likely Cause: The center of gravity is too far forward, or the tail isn't generating enough lift.
- Quick Fix:
- Gently bend the elevators (the horizontal flaps on the tail) *upwards* slightly.
- If that doesn't work, ensure your wings have a slight dihedral (a subtle upward angle).
- Consider reducing any nose weight if you added too much.
- *Light-hearted warning:* Don't be like me and think "more weight equals more speed!" without considering balance. It's a recipe for a face-plant!
2. The Pesky Stall (Loops Upwards and Crashes):
- Problem: The plane climbs sharply, then loses speed and tumbles backward or sideways.
- Likely Cause: The center of gravity is too far back (tail-heavy), or the elevators are bent too far up.
- Quick Fix:
- Add a small amount of weight to the nose (e.g., a paperclip).
- Gently bend the elevators *downwards* slightly, or ensure they are neutral.
- Ensure the wings aren't bent too far upwards (too much dihedral can sometimes contribute to stalling).
- *Personal Scenario:* My son's beautiful "Eagle" design kept doing dramatic backflips. We realized the tail was too heavy and added a tiny bit of tape to the nose, which immediately stabilized its flight.
3. The Unruly Spin/Veer:
- Problem: The plane consistently turns sharply left or right immediately after launch.
- Likely Cause: Asymmetry in folding, uneven wings, or a bent rudder.
- Quick Fix:
- Check for Symmetry: Inspect the plane carefully. Are the wings identical? Is the tail perfectly straight? Re-crease any uneven folds.
- Rudder Adjustment: If the plane turns right, bend the rudder (vertical tail fin) slightly to the left. If it turns left, bend it slightly to the right.
*