Ever grabbed that "perfect" marker, only for it to dry on your paper a shade you *didn't* expect? Or perhaps you've struggled to find that exact right hue for a blending gradient, wishing you had a crystal ball to predict the outcome. We’ve all been there, staring at a collection of beautiful markers, feeling overwhelmed by their unswatched potential. That's where a printable marker color chart swoops in, not just as a handy tool, but as your artistic best friend, saving you from frustrating color surprises and unlocking your creative flow. I remember starting out, my marker collection was a chaotic rainbow. I’d grab what I thought was a vibrant red, only to end up with a dull burgundy – a lesson learned the hard way about true color representation! This guide is here to ensure you never make that mistake.
The "Aha!" Moment: Why Every Artist Needs a Printable Marker Color Chart
Think of a printable marker color chart not as an optional accessory, but as the foundational map to your artistic territory. It's the secret weapon that separates guesswork from precision.
- Prevent Color Shock: Markers often look drastically different on the cap than they do on paper. Trust me, you don't want to mess this up when a project depends on precise color matching. A chart shows you the *true* color.
- Consistency is Key: When working on larger pieces or projects that span multiple sessions, maintaining color consistency is crucial. Your chart ensures you always pick the exact shade you intended.
- Expand Your Palette Knowledge: You might own a hundred markers, but without swatching, you likely only truly know a fraction of them. A comprehensive chart helps you discover the subtle nuances and hidden gems within your collection.
- Simplify Blending Decisions: Want to achieve a seamless gradient? Your chart lets you see how colors interact *before* you commit them to your artwork, making blending decisions so much easier.
- Inventory Management Made Easy: Beyond just colors, a chart serves as a fantastic visual inventory. You’ll know exactly what you have, what you use most, and what might be running low.
- Future-Proofing Your Art: If a marker ever runs dry, your chart holds the precise visual record of that color, making replacement or finding a close match infinitely simpler.
- The "I've Been There" Scenario: I once tried to color a complex forest scene without a chart, thinking I knew my greens. Halfway through, I realized my 'forest green' was actually closer to 'swamp algae' on paper. Never again!
Charting Your Course: Different Types of Printable Marker Color Charts

Not all charts are created equal, and choosing the right type for your needs can significantly impact its usefulness. The beauty of a printable marker color chart is its versatility!
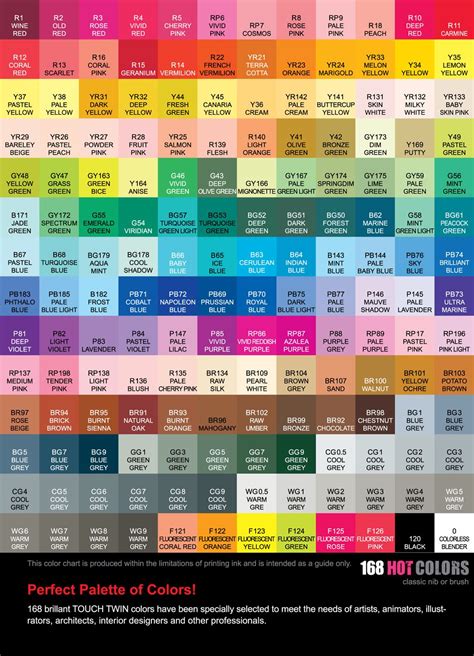
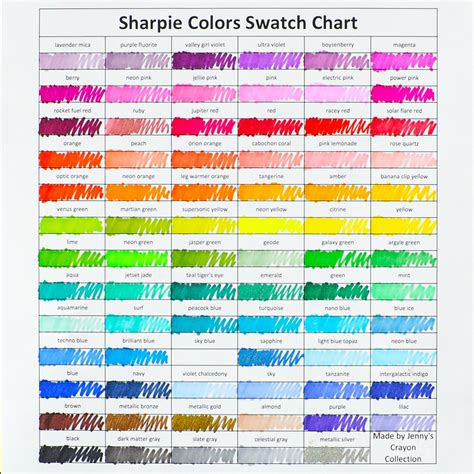
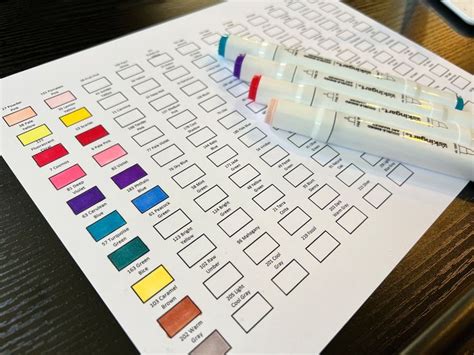
- Simple Swatch Chart: The most basic and common. This chart typically features a grid where you simply swatch a block of color and write the marker's name/number. Great for quick color identification.
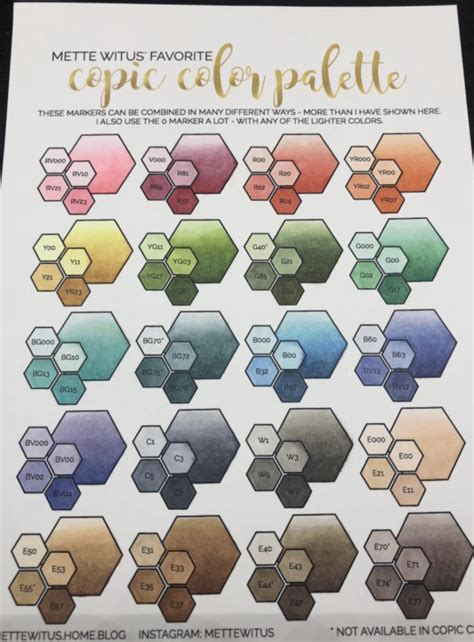
- Gradient/Blend Chart: Designed to show how two or more colors blend together. These are indispensable for artists focused on rendering, shadows, and smooth transitions.
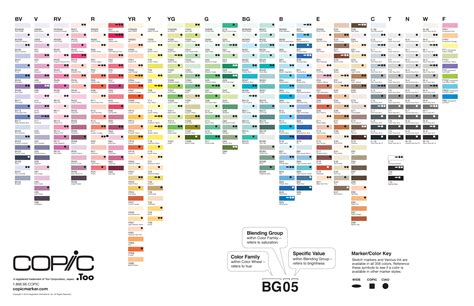
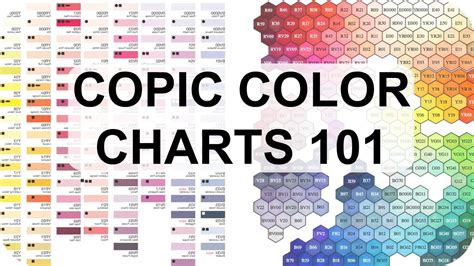
- Brand-Specific Charts: Many popular marker brands (Copic, Ohuhu, Winsor & Newton, etc.) offer their own unique printable marker color chart templates. These are a lifesaver as they often come pre-numbered to match their system. I highly recommend starting with a brand-specific one if available; it's what saved me from hours of manual setup.
- Paper-Specific Charts: Different papers absorb ink differently, affecting the final color. If you work on various paper types, creating a separate chart for each ensures true color representation on that specific surface.
- "Temperature" Charts: Organize your markers by warm tones (reds, oranges, yellows) and cool tones (blues, greens, purples). This helps in choosing colors that evoke certain moods.
- "Value" Charts: Arrange your markers from lightest to darkest, helping you quickly select colors for highlights, mid-tones, and shadows in your artwork.
- Custom Layouts: Don't be afraid to design your own! If you have a specific workflow or frequently use certain color combinations, a custom layout can be incredibly efficient.
Your Palette, Perfected: Step-by-Step Guide to Creating Your Printable Marker Color Chart
Creating your chart is a simple process, but paying attention to the details will ensure it's a truly accurate and valuable tool.
- Step 1: Gather Your Tools: You'll need your full collection of markers, your chosen art paper (the one you use most!), a reliable printer, and a good printable marker color chart template.
- Step 2: Print Your Template: This is crucial: print your chosen chart template on the *actual paper* you'll be using for your final artwork. This is the single most important step for true color accuracy.
- Step 3: Swatch Methodically: Starting with one marker at a time, carefully fill in the designated space on your chart. Ensure consistent saturation across the swatch. I used to rush this, and my messy swatches made the chart less useful. Take your time – it pays off!
- Step 4: Label Clearly: Immediately after swatching, write the marker name, number, and any series information (e.g., Copic B00, Ohuhu 144). Good labeling prevents future confusion.
- Step 5: Let It Dry: Marker inks, especially alcohol-based ones, can look different when wet. Allow your swatches full drying time before making any final judgments.
- Step 6: Laminate (Optional but Recommended): For durability and protection against smudges or wear over time, consider laminating your finished chart. This helps preserve its accuracy.
- Step 7: Organize & Store: Keep your chart in an easily accessible place near your art workspace. Some artists punch holes and keep them in a binder.
Beyond Swatches: Smart Ways to Use Your Completed Marker Color Chart
Your printable marker color chart is more than just a reference; it's a dynamic tool that can enhance every stage of your creative process.
- Pre-Planning Your Art: Before you even touch your main artwork, use your chart to select your desired color palette. Lay out your chosen colors on your chart right next to your sketch.
- Troubleshooting Color Issues: If a color in your artwork looks different than you expected, compare it directly to your chart. This can help you identify if it's the marker, the paper, or just the surrounding colors creating an optical illusion.
- Discovering New Combinations: Play around with blending ideas on a scrap piece, guided by your chart. Seeing the true colors side-by-side inspires new and unexpected harmonies.
- Shopping for New Markers: Take your trusty chart with you to the art supply store! It's the best way to avoid duplicate purchases or accidental selections of shades you didn't truly want. This is my favorite strategy because it saved me countless times from buying the exact same blue marker I already had!
- Teaching/Sharing: If you teach art or share your process, your chart is a fantastic visual aid for explaining color choices and techniques.
- Archiving Your Collection: Over time, your chart becomes a physical record of your marker history, useful for tracking older sets or discontinued colors.
Troubleshooting & TLC: Keeping Your Printable Marker Color Chart Accurate & Useful
Even after creation, your printable marker color chart needs a little care to remain your reliable color companion.
- Fading Colors: Store your charts away from direct sunlight, which can cause some marker inks to fade over time. Not all inks are equally lightfast.
- Ink Bleed: If your chosen paper is too thin, ink can bleed through and distort your swatches. Always use a paper suitable for markers, like cardstock or dedicated marker paper.
- New Markers: The moment you acquire new markers, immediately swatch and add them to your chart. Don't be like me and forget to add that new set – then wonder why your chart feels incomplete later!
- Running Out: When a marker finally runs dry, mark it on your chart. This helps you remember to replace it and prevents you from reaching for a defunct pen mid-project.
- Damage/Wear: Your chart is a working tool. If it starts to get excessively worn or damaged, consider creating a duplicate or laminating your primary one for longevity.
- Different Lighting Conditions: Be aware that your chart's appearance can subtly change under different light sources (e.g., natural daylight vs. warm artificial light vs. cool LED light). For critical color work, always refer to your chart under your usual working light.
Pro Tips & Personal Touches: Elevate Your Marker Chart Game
Ready to take your printable marker color chart from functional to truly inspiring? Here are a few ways to add your own flair and maximize its utility.
- Add Your Own Notes: Don't just swatch and label. Jot down little insights: "Great for shadows," "Perfect for skin tones," "Blends well with [another color]," or "bleeds easily on cheap paper." These personal observations are gold.
- Create Mini-Charts: For specific projects or frequently used color schemes (e.g., a "nature palette" chart, a "urban landscape" chart, or a "character skin tones" chart), create smaller, themed printables.
- Digital Backups: Once your physical chart is complete, consider scanning it. Having a digital reference on your tablet or computer can be incredibly useful when you're away from your physical supplies.
- Explore Community Templates: Dive into online art communities (like Reddit art subreddits or dedicated art forums). You'll often find unique, specialized, or even humorously designed chart templates shared by fellow artists.
- Embrace Imperfection: Your chart is a working tool, not a display piece. My first chart wasn't pristine, but it was *my* chart, and it was invaluable for learning. Don't let perfection be the enemy of functionality.
Tips for Personalizing Your Marker Color Chart Experience

Making your printable marker color chart truly *yours* will make you more likely to use it consistently and effectively.
- Choose Your Perfect Template: Don't settle for the first template you find online. Browse different layouts, search for designs that resonate with *your* creative style, or even sketch out your own before printing.
- Use Your Go-To Paper: This tip bears repeating because it's that important. The paper you swatch on drastically affects how the colors appear. Always use the specific type of paper you actually use for your final artwork.
- Add Your Own Categories: Beyond numerical order, experiment with grouping markers in ways that make sense to *you*. This could be by color family, warm/cool, or even specific uses (e.g., "favorite markers for foliage," "best for bright accents").
- Handwritten Notes Are Gold: Your personal observations about a color (e.g., "bleeds easily," "vibrant," "good for gradients") are invaluable. Write them directly on the chart.
- Subjective Tip: I find that adding a small doodle or a mini example of a common use for each color (like a tiny leaf for greens, or a brick texture for reds) helps me connect with my chart on a deeper level. It transforms it from a mere reference to a creative companion.
Common Pitfalls: What to AVOID When Creating Your Printable Marker Color Chart
Learning from others' mistakes can save you a lot of frustration. Steer clear of these common errors when building your ultimate marker resource.
- Using the Wrong Paper: This is the cardinal sin of marker swatching! If you swatch on printer paper but draw on marker paper, your colors will look wildly different in your final art.
- Rushing the Swatching Process: Sloppy or rushed swatches that don't fully cover the designated area, or are inconsistent in saturation, are misleading. Take your time to ensure full, even coverage.
- Inconsistent Lighting: Swatch all your colors under the same consistent light source (e.g., natural daylight near a window, or under your dedicated art lamp) for true comparison. Swatching some in bright sun and some in dim room light will give inaccurate results.
- Not Labeling Clearly: You *will* forget which "light green" is which without proper, immediate labeling. Don't be like me and think, 'Oh, I'll remember that,' only to face a dozen unlabeled greens later, playing a guessing game!
- Ignoring Drying Time: Some markers, particularly alcohol-based ones, can undergo a slight color shift as they dry. Always allow full drying time before making final judgments or comparisons.
- Overthinking Perfection: While accuracy is important, remember your chart is a functional tool, not a masterpiece for display. Don't get bogged down trying to make every swatch perfectly uniform if it causes undue stress. Focus on functionality.
Your printable marker color chart isn't just a piece of paper; it's an indispensable tool that empowers you to master your medium, unleash your creativity, and banish color guesswork forever. By investing a little time into creating and maintaining this valuable resource, you'll gain confidence, save time, and elevate the quality of your artwork. Now, go forth, organize your colorful chaos, and unlock the true potential of your marker collection. Trust me, your future self (and your artwork!) will thank you.