Ever stood in front of a project, drill in hand, staring blankly at a box full of drill bits, wondering which one to pick? You’re not alone. We’ve all been there. It’s that moment where the excitement of a new DIY task collides with the slightly intimidating reality of needing the *exact* right tool. I remember one particularly frustrating Saturday, trying to hang a heavy mirror. I grabbed a bit I thought was "close enough" for the wall anchor. The result? A hole either too small, requiring a wrestling match with the anchor, or — far worse — too big, leaving the anchor spinning uselessly. That day, I learned a crucial lesson: "close enough" isn't good enough when it comes to drill bits. Precision is paramount, and the secret weapon? A reliable, easy-to-use printable drill bit size chart.
This isn't just about avoiding frustration; it's about achieving professional-looking results, protecting your tools, and most importantly, ensuring safety. Whether you’re a seasoned woodworker, a burgeoning metal sculptor, or just trying to hang a shelf without calling a handyman, understanding drill bit sizes is fundamental. In this comprehensive guide, we're going to demystify the world of drill bits. We'll explore everything from the bewildering array of measurement systems to specialized bits for every material imaginable. We'll help you create your ultimate workshop companion: a printable drill bit size chart that’s tailored to *your* needs. Get ready to transform your drilling dilemmas into perfectly executed holes, every single time. Trust me, your future projects (and your sanity) will thank you for it.
---
Table of Contents

- [The Foundation: Why a Drill Bit Size Chart is Your Workshop MVP](#the-foundation-why-a-drill-bit-size-chart-is-your-workshop-mvp)
- [Decoding the Numbers: Imperial vs. Metric & Beyond](#decoding-the-numbers-imperial-vs-metric--beyond)
- [Beyond the Basics: Specialized Charts for Every Material](#beyond-the-basics-specialized-charts-for-every-material)
- [Your Printable Toolkit: Creating Your Go-To Reference](#your-printable-toolkit-creating-your-go-to-reference)
- [Common Drilling Dilemmas & How Your Chart Solves Them](#common-drilling-dilemmas--how-your-chart-solves-them)
- [The Unsung Heroes: Understanding Drill Bit Types and Their Sizes](#the-unsung-heroes-understanding-drill-bit-types-and-their-sizes)
- [Mastering the Match: Choosing the Right Bit for the Right Fastener](#mastering-the-match-choosing-the-right-bit-for-the-right-fastener)
- [Care & Feeding of Your Bits: Maximizing Longevity & Accuracy](#care--feeding-of-your-bits-maximizing-longevity--accuracy)
- [The Digital Edge: Apps, Online Tools, and Future-Proofing Your Chart](#the-digital-edge-apps-online-tools-and-future-proofing-your-chart)
- [How to Choose the Best Printable Drill Bit Size Chart for Your Needs](#how-to-choose-the-best-printable-drill-bit-size-chart-for-your-needs)
- [Common Pitfalls to Avoid When Using Your Drill Bit Size Chart](#common-pitfalls-to-avoid-when-using-your-drill-bit-size-chart)
- [Advanced Tips for Experts: Optimizing Your Drilling Precision](#advanced-tips-for-experts-optimizing-your-drilling-precision)
- [Conclusion: Empower Your Projects with Precision](#conclusion-empower-your-projects-with-precision)
---
The Foundation: Why a Drill Bit Size Chart is Your Workshop MVP
Let's be honest, in the rush of a project, the drill bit often feels like an afterthought. You grab one that "looks about right," and then wonder why your screw won't seat properly or why your hole is splintered. This is where a printable drill bit size chart steps in as your unsung hero, your Most Valuable Player in the workshop. It’s not just a piece of paper; it’s a blueprint for precision, a guardian against frustration, and a silent mentor for every drilling task.
Here’s why having a readily available, accurate drill bit size chart isn't just a nice-to-have, but an absolute essential:
- Eliminating Guesswork, Embracing Precision: The days of holding a screw next to a drill bit and squinting are over. A chart gives you definitive sizes, ensuring you drill the perfect pilot hole for fasteners, preventing stripped screws, split wood, or loose anchors. I once spent an hour trying to extract a stripped screw from a delicate piece of furniture because I didn't bother with a chart. Never again!
- Protecting Your Materials: Using the wrong bit size can damage your workpiece. Too small, and you risk splitting wood or cracking delicate plastics. Too large, and you compromise the structural integrity or create an unsightly, oversized hole. A chart helps you respect the material you're working with.
- Extending Tool Lifespan: When you use the correct bit size and type for the job, your drill bits work more efficiently and last longer. Overworking a small bit or using a dull one due to incorrect sizing choice puts undue stress on both the bit and your drill.
- Enhancing Safety: A bit that's too small for a demanding material can bind and kick back, potentially causing injury. Bits that are too large can grab and twist. Knowing the right size for the application reduces these risks significantly.
- Saving Time and Money: Think of the countless minutes (or hours!) wasted on redrilling holes, patching mistakes, or running to the hardware store for replacement materials. A chart helps you get it right the first time, every time, saving both precious time and hard-earned cash.
- Mastering Different Materials: Wood, metal, plastic, concrete – each requires specific considerations. A comprehensive chart can guide you on not just size, but sometimes even the *type* of bit recommended for various substrates, leading to cleaner holes and better results.
- Building Confidence: For beginners, a printable drill bit size chart offers a sense of security and guidance. For seasoned pros, it's a quick reference that prevents costly errors when tackling unfamiliar fasteners or materials.
- Facilitating Complex Tasks: When you're working on projects requiring threaded holes (taps and dies), precise doweling, or intricate joinery, the exact bit size is non-negotiable. A dedicated tap and drill chart is a specialized form of drill bit chart that becomes indispensable here.
- Educating Yourself: Regularly consulting a chart builds your practical knowledge and intuition. Over time, you'll develop a better feel for which bit to use, but the chart remains your ultimate verification tool.
- Standardizing Your Workflow: For those with multiple projects or who work in a shared space, a standardized chart ensures consistency across tasks and users, minimizing errors and improving efficiency.
- Quick Conversions: Many projects might involve both imperial and metric measurements. A good chart will include common conversions, eliminating the need for mental math or a separate calculator. This is a lifesaver when a plan calls for a 5mm hole, but your bits are all in fractions of an inch.
- A Professional Touch: The difference between a project that looks "homemade" and one that looks "handcrafted" often comes down to attention to detail. Properly drilled pilot holes and fastener installations are a hallmark of quality workmanship, all starting with the right bit size.
In essence, your printable drill bit size chart isn't just a tool; it's an investment in the success and enjoyment of all your future projects. It takes the guesswork out of a critical step, allowing you to focus on the creative and constructive aspects of your work.
Decoding the Numbers: Imperial vs. Metric & Beyond

One of the first hurdles many DIYers and even experienced craftspeople encounter is the sheer variety of ways drill bits are measured. It can feel like a linguistic puzzle, trying to translate between different systems. Understanding these measurement standards is crucial for effectively using your printable drill bit size chart and ensuring you select the right bit every time.
Let's break down the primary measurement systems and their nuances:
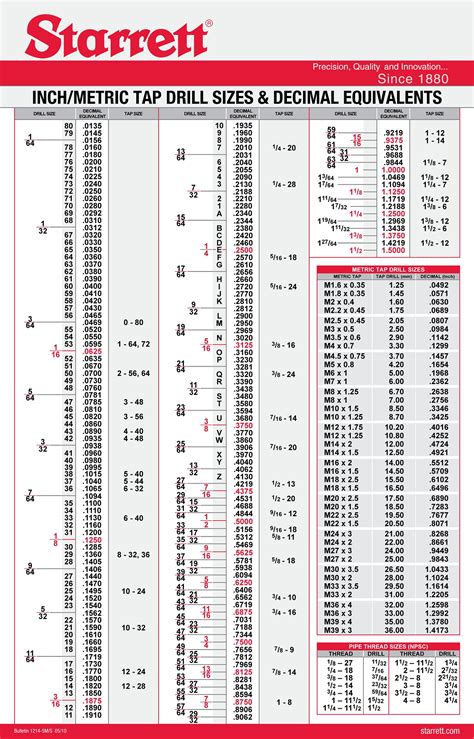
- 1. Imperial (Fractional Inch) System:
- The Dominant Player in the US: This is perhaps the most common system encountered in North America, especially for general-purpose drilling. Bits are typically designated by common fractions of an inch (e.g., 1/16", 1/8", 1/4", 1/2").
- Common Increments: You'll often find sets increasing by 1/64" or 1/32". Smaller sizes can go down to 1/128" or even smaller.
- Challenge: While common, fractional sizes can sometimes feel clunky when trying to find an intermediate size. A 7/32" bit might be slightly too big, and a 13/64" bit might be just what you need, but remembering the exact fractional equivalent can be tricky.
- On Your Chart: Your printable drill bit size chart should clearly list these fractions and ideally their decimal equivalents for easier comparison.
- 2. Metric System:
- The Global Standard: Used predominantly outside the US, and increasingly within specialized trades and manufacturing worldwide. Metric drill bits are measured in millimeters (mm).
- Simplicity and Precision: The metric system is lauded for its decimal-based simplicity. A 5mm bit is exactly that – no fractions to worry about. This makes precise scaling and measurement much more straightforward.
- Common Increments: Bits are typically available in 0.5mm or 1mm increments, though finer increments (e.g., 0.1mm) are common for precision work.
- Challenge: If you primarily work with imperial fasteners or plans, converting metric sizes can be a minor annoyance without a good chart.
- On Your Chart: A good printable drill bit size chart will have a dedicated column for metric sizes, often alongside their imperial fractional and decimal equivalents.
- 3. Numbered Drill Bit Sizes (Gauge Sizes):
- For the Finer Details: This system is primarily used for smaller drill bits, ranging from #1 to #80. The larger the number, the smaller the drill bit.
- Historical Context: This system originated in the wire gauge industry and found its way into drilling, especially for precision work, tapping, and small pilot holes.
- Range: A #1 bit is approximately 0.228 inches (5.79mm), while an #80 bit is a tiny 0.0135 inches (0.343mm).
- Challenge: Without a conversion chart, these numbers are meaningless to most people. You can't intuitively know the diameter of a #30 bit.
- On Your Chart: An invaluable addition to your printable drill bit size chart is a column for numbered drill bit sizes, especially if you deal with threading or very small fasteners.
- 4. Letter Drill Bit Sizes:
- Bridging the Gap: This system covers sizes between the larger numbered bits and the smaller fractional bits. Bits are designated by letters from A to Z.
- Range: An 'A' bit is approximately 0.234 inches (5.94mm), and a 'Z' bit is about 0.413 inches (10.49mm).
- Historical Context: Like numbered bits, this system arose to provide finer increments than easily available fractional sizes.
- Challenge: Similar to numbered bits, letter sizes are not intuitive and absolutely require a conversion chart.
- On Your Chart: For comprehensive coverage, especially for tapping and larger pilot holes, include letter drill bit sizes on your printable drill bit size chart.
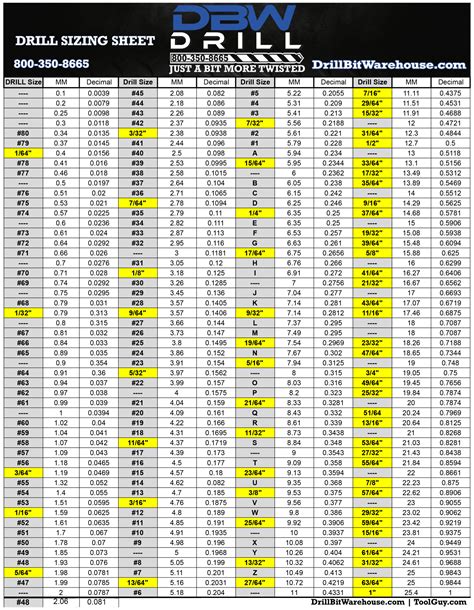
- 5. Decimal Inch Sizes:
- The Universal Translator: While not a separate system of physical bits, decimal inches are the common language that unites all the other systems. Every fractional, numbered, or letter bit can be expressed as a decimal inch.
- Why it's Crucial: When comparing a 1/4" bit to a 6.35mm bit, expressing both as 0.250" allows for direct, unambiguous comparison. Many drill presses or precision tools might specify hole sizes in decimal inches.
- On Your Chart: Absolutely essential. Every entry on your printable drill bit size chart should have its decimal inch equivalent. This is my go-to column when I'm trying to find the *perfect* bit, especially when working with non-standard fastener sizes.
Navigating the Conversion Conundrum:
The beauty of a well-designed printable drill bit size chart is its ability to be a universal translator. When a project calls for a 6mm hole, but you only have imperial bits, your chart should instantly show you that a 15/64" (0.234") or 1/4" (0.250") bit is your closest option, depending on your tolerance. Or, if you need a #21 bit for a specific tap, the chart will tell you it's 0.1590" (approximately 4.04mm).
Understanding these different measurement systems isn't about memorizing them all (who has time for that?!), but about knowing they exist and appreciating how your printable drill bit size chart serves as the bridge between them. It turns a potential measurement nightmare into a simple, confident selection process.
Beyond the Basics: Specialized Charts for Every Material
While a general printable drill bit size chart is fantastic for everyday tasks, the true power of precision drilling comes when you recognize that different materials behave differently. A bit that carves smoothly through pine will struggle, or even fail, when faced with hardened steel or brittle tile. This is where specialized charts come into play, offering nuanced guidance that goes beyond just diameter.
Here are some categories where specialized charts (or sections within a comprehensive chart) become invaluable:
- 1. Wood Drilling Charts:
- Focus: Pilot holes for screws, dowel holes, through-holes for bolts, and specialized joinery.
- Key Information: Often includes recommendations for pilot hole sizes based on screw gauge (e.g., #6, #8, #10 screws) and wood type (hardwood vs. softwood). Hardwoods usually require slightly larger pilot holes to prevent splitting.
- Bit Types: Twist bits, brad point bits (for clean entry), spade bits, Forstner bits (for flat-bottomed holes).
- Scenario: I was once building a custom bookshelf out of oak, and the project called for #8 screws. My wood drilling chart indicated a 7/64" pilot hole for hardwood. If I'd used the 5/64" I typically use for pine, I would have split the oak, ruining hours of work. The chart saved my bacon!
- Chart Detail: Might also suggest countersink sizes for flush screw heads.
- 2. Metal Drilling Charts:
- Focus: Drilling through various metals like steel, aluminum, brass, and sheet metal.
- Key Information: Recommendations for pilot hole sizes for tapping (creating screw threads), and often includes speed and lubricant suggestions. Metal type significantly impacts bit choice and drilling technique.
- Bit Types: High-Speed Steel (HSS), Cobalt (for harder metals), Black Oxide, Titanium Nitride (TiN) coated bits.
- Scenario: My colleague needed to drill holes in a thick steel plate for a custom bracket. He consulted a metal drilling chart that suggested a cobalt bit and a specific feed rate. Without that chart, he might have burned through several HSS bits and wasted significant time.
- Chart Detail: Critical for tap and drill size pairings (e.g., for a 1/4"-20 tap, you need a #7 drill bit).
- 3. Masonry & Concrete Drilling Charts:
- Focus: Drilling into brick, concrete, stone, and mortar.
- Key Information: Specific anchor sizes (e.g., sleeve anchors, wedge anchors) require precise hole diameters. Chart will often pair anchor diameter with the necessary drill bit size.
- Bit Types: Carbide-tipped masonry bits, often used with hammer drills.
- Scenario: Installing a new outdoor light fixture required drilling into brick. My chart clearly stated that for the 3/8" sleeve anchors I had, a 3/8" masonry bit was required. Trying to "eyeball" this would have led to loose anchors or damaged brick.
- Chart Detail: May include depth guides for specific anchor types.
- 4. Plastic Drilling Charts:
- Focus: Drilling various plastics (PVC, acrylic, polycarbonate).
- Key Information: Plastics can melt or crack if drilled incorrectly. Charts might suggest specific bit types (e.g., modified twist bits with a less aggressive angle) or drilling speeds to prevent melting or chipping.
- Bit Types: Standard HSS twist bits, but often with modifications or specific techniques.
- Scenario: I was making a custom cover for a delicate electronic component out of acrylic. A plastic drilling chart advised using a slower speed and a specific type of bit to avoid cracking the brittle material. The result was perfectly clean holes.
- Chart Detail: May mention the importance of backing material to prevent blow-out.
- 5. Tap & Drill Charts:
- Focus: The ultimate precision chart for creating internal screw threads.
- Key Information: Lists standard tap sizes (e.g., 1/4"-20, M6x1.0) and the *exact* corresponding drill bit size needed to create the pilot hole before tapping. This is where numbered and letter bits often shine.
- Bit Types: Any appropriate bit for the material being tapped, but the size is paramount.
- Scenario: When restoring an old engine part, I needed to re-thread a stripped bolt hole for an M8x1.25 bolt. My tap and drill chart told me I needed a 6.8mm drill bit. Using anything else would have resulted in either a stripped tap or a loose thread. This is a non-negotiable chart for precision work.
- Chart Detail: Often distinguishes between "percentage of thread" for different applications (e.g., 75% thread for general use, 50% for harder materials).
- 6. Dowel and Joint Charts:
- Focus: Precision drilling for woodworking dowel joints.
- Key Information: Pairs common dowel diameters with the exact drill bit size for a snug fit.
- Bit Types: Brad point bits are often preferred for clean entry and accurate placement.
- Scenario: Building a series of shelves, I wanted to reinforce the joints with dowels. The chart helped me select the exact bit size to ensure the dowels fit tightly without needing excessive force or being too loose.
By having these specialized insights (either as separate charts or clearly delineated sections within your comprehensive printable drill bit size chart), you elevate your craftsmanship. You move beyond merely making a hole to making the *right* hole, optimizing for the material, the fastener, and the longevity of your project.
Your Printable Toolkit: Creating Your Go-To Reference
Now that we understand the 'why' and 'what' of drill bit size charts, let's get down to the 'how' of creating your own personalized, indispensable printable drill bit size chart. This isn't just about finding a generic chart online; it's about crafting a resource that perfectly fits your workflow, your tools, and your specific project needs. Think of it as customizing your workshop's brain!
Here's a step-by-step guide to building your ultimate printable reference:
- 1. Assess Your Needs & Tools:
- What materials do you drill most often? Wood, metal, plastic, masonry? This dictates which specialized sections you'll need.
- What fasteners do you use? Screws (wood, machine), bolts, anchors, dowels? Note their common sizes.
- What drill bits do you own? Imperial, metric, numbered, lettered? Catalog your existing collection. This will help you ensure your chart covers the bits you actually have. I have a mix of old imperial sets and newer metric bits, so my chart absolutely needs both.
- Do you do any tapping? If so, a comprehensive tap and drill chart is a must-have.
- 2. Source Reliable Data:
- Online Resources: Many reputable hardware manufacturers, tool brands, and woodworking/metalworking forums offer excellent, accurate charts. Look for sources like Starrett, Fastenal, or specific drill bit manufacturers.
- Textbooks/Manuals: If you have any engineering handbooks or machinery manuals, they often contain precise drill bit data.
- My Personal Tip: Don't just grab the first image you see. Cross-reference a few sources to ensure accuracy, especially for critical measurements like tap drill sizes.
- 3. Choose Your Format & Layout:
- Tabular Format: This is generally the clearest. Columns for:
- Fractional Inch
- Decimal Inch
- Metric (mm)
- Numbered
- Lettered
- Recommended Tap Size (if applicable)
- Common Screw Gauge (for pilot holes)
- Material Notes (e.g., "Hardwood," "Steel," "Plastic")
- Visual Elements: Consider adding small icons or color-coding for different bit types or materials.
- Readability: Use clear, legible fonts. Avoid overly dense layouts. Remember, you'll be quickly glancing at this while working.
- 4. Customize and Consolidate:
- Combine Charts: Instead of having separate charts for wood, metal, and metric, try to integrate the most relevant information into one master printable drill bit size chart. Use clear headings or shading to delineate sections.
- Add Personal Notes: Is there a specific bit you always use for a certain type of plastic? Jot it down! Does your favorite #8 screw always work best with a 5/64" bit, even if the chart suggests 3/32"? Make a note. This is *your* chart.
- Include Your Inventory: Mark which sizes you actually own, perhaps with a checkmark or highlighting. This helps prevent buying duplicate bits.
- 5. Print for Practicality:
- Paper Type: Print on sturdy cardstock for durability.
- Lamination: This is a game-changer! Laminating your printable drill bit size chart protects it from grime, sawdust, grease, and accidental spills, making it last years in a busy workshop environment. I laminated mine, and it has survived countless splashes and drops.
- Size: Print it large enough to be easily readable from a short distance, but small enough to fit conveniently on a wall or inside a tool chest lid. A standard letter or A4 size is usually ideal.
- 6. Strategic Placement:
- Wall Mount: The most common and convenient. Place it near your drill press, workbench, or tool storage area.
- Toolbox Lid: Laminate and glue/tape it to the inside of your primary toolbox lid for portability.
- Binder/Folder: If you have many specialized charts, keep them in a workshop binder.
- Magnetic Backing: Attach a magnetic sheet to the back of a laminated chart to stick it to metal surfaces like a drill press column or a metal cabinet.
- 7. Digital Backup (Optional but Recommended):
- Keep a digital copy of your customized chart on your phone or tablet. This is great for when you're at the hardware store and need to quickly check a size. There have been so many times I'm at the store, looking at fasteners, and wish I had my chart. Having a digital version saves so many "I think this is right..." moments.
By following these steps, you're not just downloading a generic image; you're creating a custom-tailored, highly effective workshop tool. Your printable drill bit size chart will become a natural extension of your hands, making every drilling task simpler, more precise, and ultimately, more satisfying.
Common Drilling Dilemmas & How Your Chart Solves Them
Every DIYer and craftsperson has faced those moments of drilling despair. The screw won't bite. The wood splits. The hole is too big, too small, or just plain messy. These aren't failures of skill; they're often failures of proper bit selection. This is precisely where your trusty printable drill bit size chart becomes your problem-solver, turning frustration into flawless execution.
Let's explore some common drilling dilemmas and how your chart provides the immediate solution:
- 1. The "Stripped Screw" Syndrome:
- Dilemma: You're driving a screw, and suddenly, it just spins, refusing to tighten. The head is fine, but the threads in the material are gone.
- Cause: The pilot hole was too large for the screw, giving the threads nothing to bite into.
- Chart Solution: Your printable drill bit size chart clearly lists recommended pilot hole sizes for various screw gauges (#6, #8, #10, etc.) and material types (hardwood, softwood). By consulting the chart *before* drilling, you select the *exact* bit size that allows the screw threads to properly engage and hold firmly. For instance, for a #8 wood screw in softwood, the chart might recommend a 5/64" bit, ensuring a snug fit.
- 2. The "Splintered Wood" Catastrophe:
- Dilemma: You drill through a beautiful piece of timber, and as the bit exits, the wood tears and splinters, leaving an ugly, rough edge.
- Cause: Often, the bit is too large for the material, or the wrong bit type was used without proper backing. Also, an oversized pilot hole can contribute.
- Chart Solution: While primarily about size, a good printable drill bit size chart often includes notes on bit types (e.g., "use brad point bits for cleaner wood drilling") and may implicitly guide you to smaller pilot holes for hardwoods to prevent splitting. Furthermore, by ensuring the *correct* size, you reduce the strain on the wood as the bit passes through. For delicate work, the chart might suggest a slightly smaller bit, and then reaming the hole slightly for a perfect fit.
- 3. The "Loose Anchor" Frustration:
- Dilemma: You're installing a wall anchor, and it just spins freely in the hole, never expanding or gripping the wall.
- Cause: The drill bit used was too large, creating an oversized hole that the anchor can't properly fill or expand against.
- Chart Solution: Specialized sections of your printable drill bit size chart for masonry or drywall anchors will explicitly state the required drill bit diameter for each anchor type and size. For a common 1/4" plastic anchor, the chart will usually specify a 1/4" drill bit, ensuring a perfectly snug fit for the anchor to grip. Don't be like me and assume a 1/4" anchor needs a slightly smaller hole – trust the chart for anchor installations!
- 4. The "Stripped Tap" Travesty:
- Dilemma: You're trying to cut internal threads with a tap, and either the tap breaks, or the threads you create are weak and strip easily.
- Cause: A tap breaking usually means the pilot hole was too *small*. Weak threads mean the pilot hole was too *large*. Precision is absolutely critical here.
- Chart Solution: This is where the dedicated "Tap & Drill" section of your printable drill bit size chart is indispensable. It provides the *exact* drill bit size (often a numbered or letter bit) required for a specific tap. For example, to tap a 1/4"-20 thread, the chart will unequivocally tell you to use a #7 drill bit (0.201"). Without this precise information, tapping is a gamble.
- 5. The "Wobbly Dowel" Disaster:
- Dilemma: You've glued up a dowel joint, but there's too much play, or the dowel is so tight it splits the wood when inserted.
- Cause: The drill bit was either too large (wobbly) or too small (splitting).
- Chart Solution: A woodworking-focused printable drill bit size chart will include recommendations for dowel hole sizes. Typically, you want a hole that's the *exact* same diameter as the dowel for a snug, glue-friendly fit. For example, a 1/4" dowel needs a 1/4" hole, and the chart confirms this and helps you pick the correct bit.
- 6. The "Burned Bit/Material" Blunder (Metal/Plastic):
- Dilemma: You're drilling into metal or plastic, and the bit gets excessively hot, smokes, or melts the material instead