Oh, the humble coffee sleeve! It’s more than just a piece of cardboard protecting your fingers from a piping hot cup; it’s a canvas, a statement, a tiny billboard for your brand or personality. For years, I simply accepted the generic sleeves handed to me, a necessary evil, until one chilly morning, trying to juggle a hot latte and a stack of papers, I thought, "There has to be a better way to make this *mine*." That's when I stumbled into the wonderful, creative world of printable coffee sleeves, and let me tell you, it was a game-changer. What started as a simple desire to personalize my morning ritual blossomed into a full-blown passion for crafting, designing, and even branding with these versatile little wraps. Trust me, if you've ever felt a pang of creative longing for something unique, or wished your daily coffee could tell a story, you don't want to miss this guide.
Whether you're a seasoned crafter looking for new inspiration, a small business owner eager to elevate your brand, an event planner searching for that perfect personalized touch, or just someone who loves a good DIY project, you've landed in the right place. We're going to dive deep into everything you need to know about printable coffee sleeves, from the basic tools and materials to advanced design techniques and even how to monetize your creations. We'll explore the endless possibilities of customization, uncover eco-friendly options, and troubleshoot common challenges so you can create sleeves that are not only functional but also uniquely yours. Get ready to transform your coffee experience, one beautifully designed sleeve at a time!
---
Table of Contents

1. [The Art of the Sleeve: Why Print Your Own?](#the-art-of-the-sleeve-why-print-your-own)
2. [Getting Started: Essential Tools & Materials for DIY Printable Coffee Sleeves](#getting-started-essential-tools--materials-for-diy-printable-coffee-sleeves)
3. [Design Dazzle: Unleashing Your Creativity with Printable Coffee Sleeve Templates](#design-dazzle-unleashing-your-creativity-with-printable-coffee-sleeve-templates)
4. [Beyond Basic: Advanced Printing Techniques & Customization Hacks for Your Sleeves](#beyond-basic-advanced-printing-techniques--customization-hacks-for-your-sleeves)
5. [Branding Brilliance: Printable Coffee Sleeves for Businesses & Events](#branding-brilliance-printable-coffee-sleeves-for-businesses--events)
6. [Eco-Chic & Sustainable Sips: Green Options for Your Printable Coffee Sleeves](#eco-chic--sustainable-sips-green-options-for-your-printable-coffee-sleeves)
7. [Troubleshooting & Triumphs: Common Pitfalls & How to Overcome Them in Printable Coffee Sleeve Creation](#troubleshooting--triumphs-common-pitfalls--how-to-overcome-them-in-printable-coffee-sleeve-creation)
8. [The Ultimate Coffee Sleeve Gallery: Inspiration & Ideas for Every Occasion](#the-ultimate-coffee-sleeve-gallery-inspiration--ideas-for-every-occasion)
9. [Beyond Coffee: Creative Uses for Printable Sleeves](#beyond-coffee-creative-uses-for-printable-sleeves)
10. [Monetizing Your Masterpiece: Selling Your Printable Coffee Sleeves](#monetizing-your-masterpiece-selling-your-printable-coffee-sleeves)
11. [How to Choose the Best Printable Coffee Sleeve Approach for Your Needs](#how-to-choose-the-best-printable-coffee-sleeve-approach-for-your-needs)
12. [Common Pitfalls to Avoid When Making Printable Coffee Sleeves](#common-pitfalls-to-avoid-when-making-printable-coffee-sleeves)
13. [Advanced Tips for Expert Coffee Sleeve Creators](#advanced-tips-for-expert-coffee-sleeve-creators)
14. [Conclusion](#conclusion)
---
The Art of the Sleeve: Why Print Your Own?
Have you ever considered the impact a small detail can have? A customized coffee sleeve isn't just about utility; it's about expression, connection, and making everyday moments a little more special. Printing your own printable coffee sleeves opens up a world of possibilities that generic sleeves simply can't touch. It’s an act of mindful creation, allowing you to infuse your personality or brand identity into something many take for granted.
Here are 12 compelling reasons why diving into the world of custom printable coffee sleeves is an absolute must:
1. Personalized Expression: Your coffee, your style! Design sleeves that reflect your mood, hobbies, or favorite quotes. It’s like wearing your personality on your cup.
2. Unique Gifts & Favors: Imagine giving a friend a beautifully wrapped coffee cup with a sleeve designed just for them. I once made printable coffee sleeves for my friend's birthday, featuring inside jokes and photos, and the joy on her face was priceless. It made a simple coffee run feel like a special occasion.
3. Cost-Effective Branding for Small Businesses: Instead of expensive custom cups, printable sleeves offer an affordable way to brand your cafe, food truck, or even pop-up shop. It’s a walking advertisement!
4. Elevated Event Decor: Weddings, birthdays, baby showers – themed sleeves can tie your event aesthetic together beautifully. Picture a baby shower with cute elephant-themed sleeves for every drink!
5. Eco-Friendly Options: With the right materials, you can create reusable or recyclable sleeves, reducing waste compared to single-use, non-recyclable options. We’ll explore this more later!
6. Creative Outlet & Hobby: For craft enthusiasts, it’s a fantastic new medium to explore. Learning new design software or experimenting with different papers can be incredibly fulfilling.
7. Special Occasion Celebrations: Think holiday-themed sleeves, anniversary designs, or even congratulatory messages for graduations.
8. Marketing & Promotions: Launching a new product? Hosting a sale? Your sleeve can carry a QR code, a discount, or a call to action directly to your customers' hands.
9. Team Building & Corporate Gifting: Companies can use branded sleeves for internal events, staff appreciation, or client gifts, reinforcing brand identity.
10. Educational Opportunities: Teach kids about design, recycling, or even basic geometry by involving them in creating their own sleeves. My niece loves decorating her hot cocoa sleeves!
11. Mood Booster: A cheerful, colorful, or inspiring message on your sleeve can genuinely brighten your day, or the day of someone you hand a cup to.
12. Community Engagement: Host a "design your own sleeve" contest for a local event or charity, fostering creativity and connection.
Getting Started: Essential Tools & Materials for DIY Printable Coffee Sleeves

Alright, aspiring sleeve artisans, let's talk shop! Before you dive headfirst into design, you need to gather your arsenal. Don't worry, you won't need a full-blown print shop in your spare room. Many of these items you might already own, making the barrier to entry for crafting your own printable coffee sleeves wonderfully low. This is where the rubber meets the road, or rather, where the paper meets the printer!
Here are 12 essential tools and materials you'll need, along with some insights:
1. A Reliable Printer: An inkjet or laser printer will work. Inkjet is great for vibrant colors, while laser is often faster and more economical for black and white, and less prone to smudging. For beginners, a standard home printer is perfectly adequate.
2. Quality Paper/Cardstock: This is crucial. You want paper that's sturdy enough to insulate but flexible enough to wrap.
- Recommended: 80-110 lb (216-300 GSM) cardstock. Avoid anything too thin (like printer paper) as it won't offer much insulation or durability.
- My Personal Preference: I always lean towards a slightly textured, matte cardstock. It feels premium and holds ink beautifully without glare.
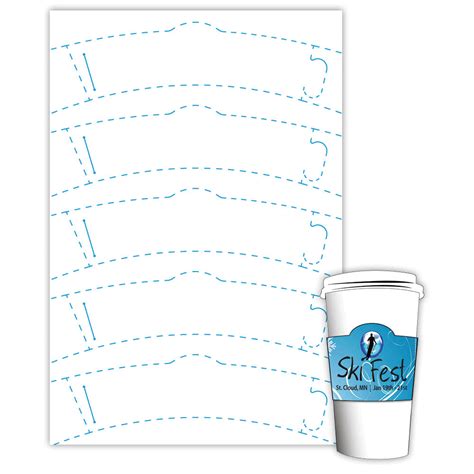
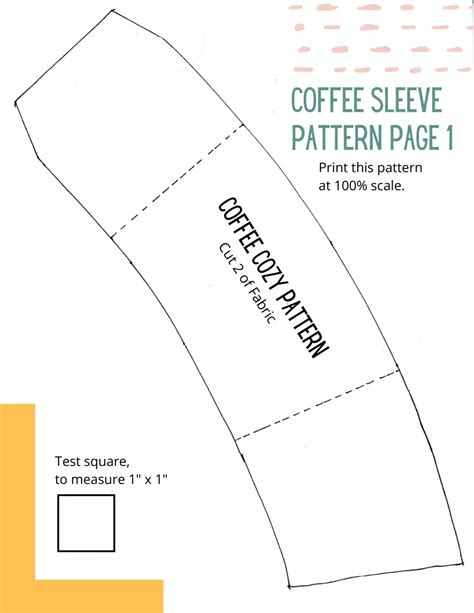
3. Coffee Sleeve Templates: These are your blueprints! You can find free templates online (search for "printable coffee sleeve template PDF") or create your own in design software. They provide the correct shape and dimensions for a standard coffee cup.
4. Cutting Tools:
- Scissors: Good old trusty scissors for basic cutting.
- Craft Knife/X-Acto Knife & Cutting Mat: For cleaner, more precise lines, especially on intricate designs. A self-healing cutting mat is essential to protect your surfaces.
- Paper Trimmer/Guillotine: If you're making sleeves in bulk, this will save you immense time and ensure perfectly straight edges.
5. Adhesive: To secure your sleeve into a cylindrical shape.
- Glue Stick: Easy to use, but can sometimes be less durable.
- Double-Sided Tape: My personal go-to for a clean, strong bond without any drying time or mess.
- Craft Glue (e.g., Tacky Glue): Stronger than a glue stick, but requires drying time.
6. Design Software (Optional but Recommended):
- Free: Canva, GIMP, Inkscape, or even Google Docs/Microsoft Word for basic text and images.
- Paid/Professional: Adobe Illustrator, Photoshop, Affinity Designer for more complex graphics and professional results.
7. Ruler: For accurate measurements and guiding your craft knife.
8. Scoring Tool (Optional but Recommended): A scoring stylus or a dull butter knife can be used with a ruler to create crisp fold lines, making assembly much easier and neater.
9. Stylus or Bone Folder: To help create sharp creases after scoring.
10. Test Sheets: Always print a test sheet on regular paper first to check your design, sizing, and colors before using your good cardstock. This saves precious materials!
11. Stencils/Stamps (for embellishment): If you want to add extra flair after printing, stencils or rubber stamps can add texture and detail.
12. Laminator & Laminating Pouches (for reusable sleeves): If you plan on making durable, reusable sleeves that can withstand spills and repeated use, a simple home laminator is a fantastic investment. I discovered this trick after my first batch of beautifully designed sleeves got ruined by a leaky lid – never again!
Design Dazzle: Unleashing Your Creativity with Printable Coffee Sleeve Templates
This is where the magic truly happens! Designing your printable coffee sleeves is an incredibly rewarding process, whether you're a seasoned graphic designer or someone just starting with a basic word processor. The key is to start with a good template and let your imagination run wild. Remember, your sleeve is a mini-billboard, so make it count!
Here are 12 ways to unleash your creativity and design dazzling sleeves:
1. Start with a Reliable Template: Search for "free printable coffee sleeve template PDF" or "coffee cup sleeve template SVG." These provide the correct dimensions and cut lines. Ensure it fits your specific cup size (standard, small, large).
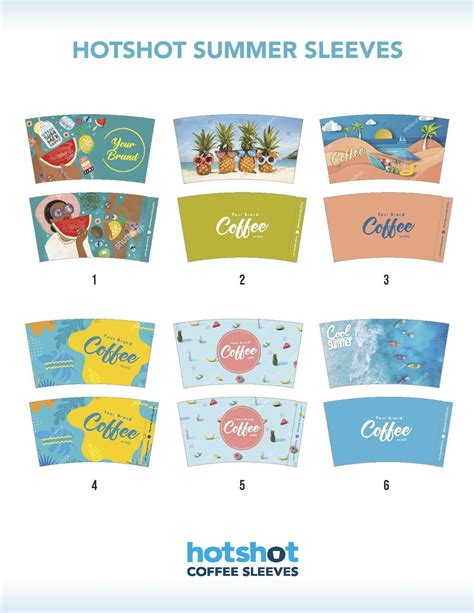
2. Themed Designs: Match your sleeves to seasons, holidays, or special events. Think spooky designs for Halloween, snowflakes for winter, or vibrant florals for spring.
3. Personalized Monograms & Initials: A classic and elegant touch. Use a stylish font and your initial, or that of a gift recipient, for a sophisticated look.
4. Inspirational Quotes & Affirmations: Start your day with a dose of positivity! Print a favorite quote, a motivational phrase, or even a simple "You got this!" on your sleeve.
5. Funny Puns & Jokes: Inject some humor into your morning. Coffee-related puns ("Don't espresso yourself," "Mug Life") are always a hit. I once made a batch for a friend's study group with "May the force be with brew" and they loved it.
6. Geometric Patterns & Abstract Art: For a modern aesthetic, experiment with bold shapes, lines, and color blocking. These can be surprisingly easy to create even with basic tools.
7. Photo Collages: Create a small collage of favorite photos – pets, family, travel memories. This is particularly heartwarming for gifts.
8. Branding with Logos & Slogans: For businesses, integrate your logo, brand colors, and a catchy slogan. Consistency is key here.
9. Interactive Elements: Include a small QR code that links to a website, a playlist, or a special message. Or even a "spot the difference" game for a playful touch!
10. Hand-Drawn & Scanned Art: If you're an artist, draw your design by hand, then scan it and incorporate it into your template. This adds a truly unique, artisanal feel.
11. Minimalist Chic: Sometimes less is more. A simple line drawing, a single elegant word, or a subtle texture can make a powerful statement.
12. Collaborative Design: Get friends or family involved! Have them draw or suggest ideas, then combine them for a truly collaborative sleeve. My kids once helped me design sleeves for a school bake sale, and their quirky drawings were the biggest hit – everyone wanted one!
Beyond Basic: Advanced Printing Techniques & Customization Hacks for Your Sleeves

Once you’ve mastered the basics of crafting printable coffee sleeves, you might find yourself itching to push the boundaries. This is where we elevate from simple DIY to genuine artistry. For seasoned users, these advanced insights will help you optimize further and create truly show-stopping designs. Think textures, special finishes, and techniques that make your sleeves stand out in a crowded coffee shop.
Here are 12 advanced techniques and customization hacks to take your sleeves to the next level:
1. Foil Printing/Embossing: Use specialty foil transfer sheets or an embossing machine (like a Sizzix or Cricut Cuttlebug) to add metallic accents or raised textures. This instantly adds a touch of luxury.
2. Die-Cutting for Unique Shapes: Instead of just a standard rectangle, use a cutting machine (Cricut, Silhouette Cameo) to cut out intricate edges, decorative cut-outs, or even custom shapes that wrap around the cup.
3. Layered Designs: Print a base design, then add smaller, die-cut elements or different paper types on top for a multi-dimensional effect. This adds depth and visual interest.
4. Water-Resistant Coatings: After printing, apply a clear acrylic spray sealant (available at craft stores) to make your sleeves more resistant to condensation and spills, extending their life.
5. Glow-in-the-Dark or UV Reactive Inks: For novelty or event sleeves, consider printing with specialty inks that react under blacklight or glow in the dark. Imagine a Halloween party with glowing cup sleeves!
6. Textured Paper Stocks: Experiment with cardstock that already has a subtle texture, like linen, felt, or even a metallic sheen, before printing. This adds tactile appeal.
7. Heat Transfer Vinyl (HTV) Accents: For reusable fabric sleeves or even laminated paper sleeves, use a cutting machine to cut HTV designs and apply them with a heat press or iron.
8. QR Code Integration with Variable Data: For businesses, create QR codes that change with each sleeve, linking to unique promotions, surveys, or customer loyalty programs. This requires advanced printing software.
9. Scented Paper/Ink: Believe it or not, you can buy or create scented paper or even add scent to certain inks for a truly immersive experience. Imagine a pumpkin spice latte sleeve that actually smells like pumpkin spice!
10. Interactive Pop-Up Elements: Design sleeves with small, pre-cut elements that pop up when the sleeve is removed from the cup, revealing a hidden message or image. This is a delightful surprise.
11. Augmented Reality (AR) Integration: For the truly tech-savvy, embed an AR marker (like a specific image or pattern) that, when scanned with a smartphone app, triggers a digital experience – a video, animation, or interactive game. This gadget-savvy approach is a game-changer for marketing.
12. Edge Painting/Gilding: After cutting, use a fine brush to paint the edges of your cardstock with a contrasting color or metallic paint for a highly polished, professional finish. I learned this trick from a bookbinder, and it made my wedding favor sleeves look incredibly high-end.
Branding Brilliance: Printable Coffee Sleeves for Businesses & Events
In the competitive world of business and event planning, every detail counts. Printable coffee sleeves are an often-overlooked yet incredibly powerful tool for enhancing your brand's presence and making events truly memorable. They offer a low-cost, high-impact way to communicate your message directly into your customers' or guests' hands.
Here are 12 ways to leverage printable coffee sleeves for branding and events:
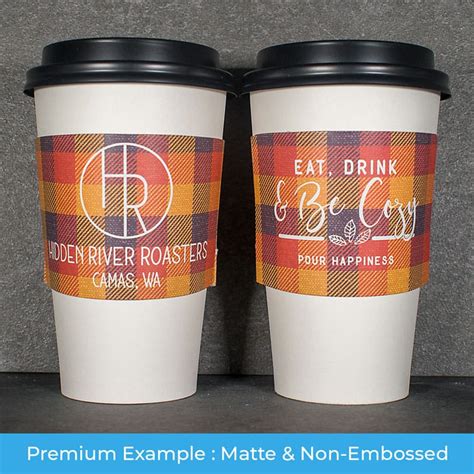
1. Cafe & Coffee Shop Branding: Print your logo, tagline, and social media handles. Consistency reinforces your brand identity and makes your cups instantly recognizable.
2. Product Launch Promotions: Design sleeves with graphics related to your new product, a launch date, or a QR code linking to a landing page. It's a subtle yet effective teaser.
3. Seasonal Marketing Campaigns: Create holiday-themed sleeves (e.g., "Happy Holidays from [Your Brand]") or seasonal promotions (e.g., "Spring into Savings!").
4. Conference & Trade Show Giveaways: Instead of just a business card, offer attendees a coffee with a sleeve branded with your company name, booth number, and a call to action. I once attended a tech conference where a company gave out sleeves with their Wi-Fi password printed on them – genius!
5. Wedding & Party Favors: Personalize sleeves with the couple's names, wedding date, or a "Thank You for Celebrating with Us!" message. For a baby shower, use cute baby-themed designs.
6. Customer Loyalty Programs: Print unique codes on each sleeve that customers can collect or use for discounts, encouraging repeat business.
7. Event Wayfinding & Information: For large events, print sleeves with directional cues (e.g., "Exhibit Hall A ->") or a schedule snippet.
8. Restaurant & Catering Services: Extend your brand beyond the dining room. Branded sleeves for to-go orders maintain your aesthetic and professionalism.
9. University & School Events: Use school colors and mascots for alumni events, sporting events, or student orientations. My alma mater uses them for homecoming, and it really fosters school spirit.
10. Fundraising & Charity Events: Design sleeves with the charity's logo, mission statement, or a QR code for donations. It's a tangible reminder of the cause.
11. Employee Appreciation: Print sleeves with motivational messages or "Thank You" notes for staff meetings or internal events. It's a small gesture that can boost morale.
12. Collaborative Marketing: Partner with another local business and co-brand sleeves, cross-promoting each other's services or products. This expands your reach effectively.
Eco-Chic & Sustainable Sips: Green Options for Your Printable Coffee Sleeves

In an era where environmental consciousness is paramount, embracing sustainability in your crafting and business practices isn't just a trend; it's a responsibility. When it comes to printable coffee sleeves, you have a fantastic opportunity to make choices that are both stylish and eco-friendly. Let's make sure our love for coffee and creativity doesn't cost the Earth!
Here are 12 green options and tips for sustainable printable coffee sleeves:
1. Recycled Content Cardstock: Opt for cardstock made from post-consumer waste. Many brands offer beautiful, sturdy recycled options that print just as well as virgin paper.
2. FSC-Certified Paper: Look for paper certified by the Forest Stewardship Council (FSC), ensuring it comes from responsibly managed forests.
3. Biodegradable/Compostable Paper: Some specialty papers are designed to break down naturally after disposal, reducing landfill waste.
4. Reusable Fabric Sleeves with Printed Tags: Instead of disposable paper, create fabric sleeves (e.g., from old jeans or canvas) and attach small, laminated, printable tags with your design or brand. This is my go-to for personal use; I love the texture and longevity.
5. Soy or Vegetable-Based Inks: These inks are more environmentally friendly than petroleum-based inks, as they are renewable, biodegradable, and often produce vibrant colors.
6. Minimalist Designs to Save Ink: Sometimes, less is more. Opt for designs with less ink coverage, using negative space effectively to reduce your environmental footprint.
7. Print Double-Sided (if applicable): While most sleeves are single-sided, if your design allows for a creative interior message, printing on both sides of the paper before cutting maximizes material use.
8. Water-Based Adhesives: Choose non-toxic, water-based glues or tapes for assembly over chemical-heavy alternatives.
9. Recycle Off-Cuts: Keep a separate bin for paper scraps and off-cuts from your sleeve production. Many local recycling centers accept these, especially if they are clean and unlaminated.
10. Encourage Reusability: If you're designing for a business, add a small message on the sleeve encouraging customers to reuse it or bring their own reusable cup next time.
11. Upcycled Materials: Get creative with materials you already have! Old cereal boxes (clean side in), discarded calendars, or even thick magazine covers can be repurposed into unique sleeves. This is a wonderfully resourceful and budget-friendly approach.
12. DIY Seed Paper Sleeves: This is an incredibly innovative and eco-conscious idea! Print your design on seed paper (paper embedded with plant seeds), and after use, the sleeve can be planted to grow flowers or herbs. Imagine a "plant me!" message on a coffee sleeve – truly full circle sustainability.
Troubleshooting & Triumphs: Common Pitfalls & How to Overcome Them in Printable Coffee Sleeve Creation
Every DIY journey has its bumps in the road, and crafting printable coffee sleeves is no exception. But don't let a few snags deter you! With a little know-how and some patience, you can conquer most challenges. Trust me, I’ve had my share of crumpled paper and smudged ink, but each "fail" was a lesson learned, leading to even greater triumphs. Don't be like me and forget to check your printer settings before a big batch!
Here are 12 common pitfalls and how to navigate them like a seasoned pro:
1. Pitfall: Ink Smudging:
- Overcome: Use quality paper designed for your printer type (e.g., glossy photo paper for photo inkjet prints, or coated cardstock). Ensure your printer settings match the paper type. Allow prints to dry completely before handling or cutting.
2. Pitfall: Incorrect Sizing/Fit:
- Overcome: Always use a template that matches your specific cup size. Print a test sleeve on plain paper, cut it out, and test it on a cup before committing to your good cardstock. Adjust your print scale if needed (e.g., 95% or 105%).
3. Pitfall: Misaligned Cuts:
- Overcome: If cutting by hand, use a ruler and a sharp craft knife. If using a machine, ensure your blade is sharp and your mat has good adhesion. Calibrate your machine if print-and-cut features are off.
4. Pitfall: Flimsy Sleeves:
- Overcome: Use heavier cardstock (80-110 lb / 216-300 GSM). If your design is very intricate, a slightly thicker paper will help it hold its shape.
5. Pitfall: Colors Don't Match Screen:
- Overcome: Screen colors (RGB) often differ from print colors (CMYK). Do test prints to adjust color profiles. If printing professionally, ask for a color proof. For home printing, accept slight variations or adjust your design colors to be slightly brighter/darker to compensate.
6. Pitfall: Adhesion Issues (Sleeves Unsticking):
- Overcome: Use a strong adhesive like double-sided tape or a good quality craft glue. Ensure the tabs overlap sufficiently and apply firm pressure for a secure bond. Let glue dry completely if using liquid adhesive.
7. Pitfall: Paper Jams in Printer:
- Overcome: Ensure your cardstock is loaded correctly and not bent. Check your printer's maximum paper weight capacity. Fan the paper edges before loading to prevent multiple sheets from feeding at once.
8. Pitfall: Blurred or Pixelated Designs:
- Overcome: Always use high-resolution images and graphics (300 DPI is ideal for print). Avoid stretching low-resolution images. Vector graphics are best as they scale without losing quality.
9. Pitfall: Wrinkling During Assembly:
- Overcome: Score your fold lines before folding. This creates a crisp, clean crease and prevents the paper from buckling. Fold slowly and carefully.
10. Pitfall: Running Out of Ink Mid-Project:
- Overcome: Always check your ink levels before starting a large batch. Keep spare ink cartridges on hand. This is a classic "do as I say, not as I do" moment from my early crafting days!
11. Pitfall: Sleeves Slipping Off Cups:
- Overcome: Ensure your template size is correct for the cup. Some templates have a slightly tapered design to grip better. Consider adding a small non-slip texture (like a tiny dot of hot glue) on the inside if this is a persistent issue, though this might make them less recyclable.
12. Pitfall: Overwhelm with Design Choices:
- Overcome: Start simple! Choose one theme or color palette. Use ready-made templates until you build confidence. Break down your design process into small, manageable steps. Don't aim for perfection on your first try; aim for completion and learning.
The Ultimate Coffee Sleeve Gallery: Inspiration & Ideas for Every Occasion
Sometimes, all it takes is a spark of inspiration to ignite your creativity. The beauty of printable coffee sleeves lies in their versatility – they can be transformed to suit any mood, event, or brand. Think of these as jumping-off points, ideas to get your own design juices flowing. From elegant to whimsical, professional to personal, the possibilities are truly endless.
Here are 12 diverse ideas for your coffee sleeve gallery:
1. "Cozy Hygge" Collection: Designs featuring warm textures, muted earth tones, minimalist line art of steaming mugs, knitted patterns, or phrases like "Warm Fuzzies." Perfect for autumn or winter.
2. "Travel Bug" Series: Sleeves adorned with vintage map patterns, passport stamps, iconic landmarks, or quotes about adventure. Imagine a sleeve depicting the Eiffel Tower for a French-themed event.
3. "Botanical Bliss" Line: Elegant floral illustrations, delicate leaf patterns, or vibrant watercolor botanicals. Ideal for spring events, garden parties, or a serene cafe setting.
4. "Geometric Modern" Set: Bold, abstract shapes, clean lines, and contrasting color blocks. Think sleek, contemporary designs that appeal to a minimalist aesthetic.
5. "Literary Lovers" Edition: Sleeves featuring excerpts from classic novels, typewriter fonts, library card designs, or illustrations of open books. A wonderful idea for book clubs or literary events.
6. "Pet Parade" Collection: Adorable illustrations of various dog breeds, cats, or even exotic pets. Personalized with pet names, these make fantastic gifts for animal lovers.
7. "Celebration Squad" Sleeves: Bright, festive designs for birthdays, anniversaries, graduations, or promotions. Think confetti, balloons, and celebratory messages. I once made "Happy Retirement" sleeves for a colleague’s farewell party, and it was such a touching detail.
8. "Foodie Fun" Designs: Whimsical illustrations of coffee beans, pastries, croissants, or clever food puns. Great for bakeries, food trucks, or culinary events.
9. "Art Deco Glamour" Collection: Inspired by the roaring twenties, these sleeves feature intricate geometric patterns, metallic accents, and elegant typography. Perfect for upscale events or sophisticated brands.
10. "Kids' Corner" Whimsy: Bright colors, cartoon characters, friendly monsters, or interactive elements like mazes or coloring areas. Fantastic for children's parties or family-friendly cafes.
11. "Local Love" Series: Designs showcasing local landmarks, cityscapes, state outlines, or regional flora and fauna. Businesses can use these to highlight their community connection.
12. "Mindfulness Moments" Sleeves: Simple, calming designs with mandalas, calming wave patterns, or phrases like "Breathe," "Be Present," or "Sip & Reflect." A beautiful way to encourage a moment of calm in a busy day. One time, I was feeling overwhelmed, and a friend gave me a cup with