Ever stared at a blank canvas or paper, armed with an exciting idea, only to have your finished piece fall flat, lacking that captivating sense of depth and form? Trust me, I’ve been there. I remember spending hours on a portrait, convinced I had nailed the likeness, only to step back and see a flat, lifeless image staring back. It was frustrating, to say the least! That’s when I truly understood the power of value.
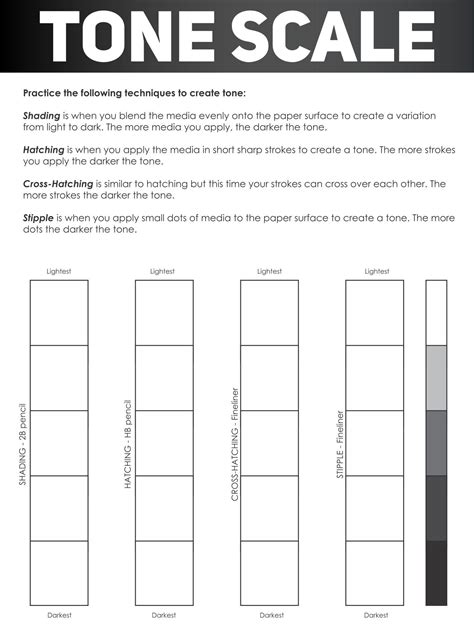
Value, in art, refers to the lightness or darkness of a color or tone. It’s arguably the most fundamental element of art, often more important than color itself, because it defines form, creates depth, and guides the viewer's eye. Without a strong understanding and application of value, even the most vibrant colors or intricate details can look two-dimensional. This is where a printable 10 value scale for artists becomes an indispensable tool – your secret weapon for transforming flat art into masterpieces. This guide isn't just about printing a chart; it's about truly understanding and wielding its power, whether you're just starting your artistic journey or you're a seasoned pro looking for a quick reference.
The Absolute Basics: What is Value and Why Does it Matter?

Before we dive into the scale itself, let's nail down the core concept. Imagine a world in black and white – all you see are shades of grey, from pure white to pure black. That's value in its simplest form. A 10-value scale breaks this down into ten distinct steps, typically from pure white (1) to pure black (10), with shades of grey in between.
- Defining Form: Value is how we perceive three-dimensional objects on a two-dimensional surface. Changes in value around the contours of an object suggest its curves, angles, and surfaces, giving it mass and volume.
- Creating Depth: Objects closer to the viewer often have stronger contrasts in value, while those further away appear lighter and less distinct (atmospheric perspective). Mastering this can pull your viewer into your scene.
- Guiding the Eye (Visual Hierarchy): Areas with higher contrast or a wider range of values tend to draw the eye first. Use this to establish a focal point and tell your visual story.
- Mood & Emotion: Dark, dramatic values can create a sense of mystery or tension, while lighter, softer values often evoke feelings of peace or airiness.
- Translating Reality: The world around us is full of varying light and shadow. A value scale helps you observe these nuances accurately and translate them into your artwork, whether you're working from life or a reference photo.
- Beyond Color: Seriously, even if you paint in full color, understanding your values first (often by doing a monochromatic study) is a game-changer. I once struggled with a colorful landscape until I desaturated a photo of it and realized my values were all over the place. That printable 10 value scale for artists helped me correct my course!
- Avoiding "Muddy" Art: Often, when art looks "muddy" or indistinct, it's not a color problem, but a value problem – too many similar mid-tones, not enough contrast.
Mastering Form & Dimension: Using the Scale for 3D Illusion
Once you grasp the basics, the real magic begins. This is where your printable 10 value scale for artists moves from a theoretical concept to a practical tool that breathes life into your drawings and paintings.
- Breaking Down Complex Objects: Start by simplifying what you see into basic geometric forms (spheres, cubes, cylinders). Then, use your value scale to identify the light, mid-tone, and shadow areas on these forms.
- Light Source Identification: Crucial for consistent lighting. Determine where your light source is coming from. The areas facing the light will be lighter values, and areas turned away will be darker.
- Core Shadow & Cast Shadow: Identify the darkest part of the object that turns away from the light (core shadow) and the shadow the object casts onto another surface. These are typically your darkest values.
- Reflected Light: Often overlooked, reflected light is ambient light bouncing off surrounding surfaces and hitting the shadow side of an object. It adds subtle light to shadows, preventing them from looking flat. Place this value thoughtfully – it should always be lighter than the core shadow but darker than the mid-tones.
- Highlights: The brightest points where light directly hits the object. These are your lightest values, often pure white or close to it, and should be used sparingly for maximum impact.
- Practice with Simple Forms: Draw a sphere, cube, or cone. Tape your printable 10 value scale for artists next to your drawing and consciously assign values from the scale to each area: highlight, mid-tones, core shadow, reflected light, and cast shadow.
- The "Squint Test": My favorite trick! Step back and squint your eyes at your subject or reference. This blurs out details and helps you see the large value masses more clearly. Compare these to your value scale. I used this trick constantly when learning to draw still life setups, and it quickly revealed where my values were off.
Beyond Black & White: Applying Value to Color
This is where many artists get tripped up. How do you apply a black and white value scale to a vibrant, colorful painting? The answer lies in understanding that every color has an inherent value.
- Desaturate to See Value: A fantastic exercise is to take a photo of your subject (or even your painting in progress) and convert it to grayscale. Instantly, you’ll see the underlying value structure without the distraction of color. Your printable 10 value scale for artists will be invaluable here for comparison.
- Value Before Hue: When planning a painting, many experienced artists (myself included!) will do a small value study first, often in monochrome. This ensures the structural integrity of the piece before introducing the complexities of color. It saved me from many "muddy painting" disasters.
- Matching Color to Value: When choosing your paints, consider their inherent value. A light yellow has a naturally higher value than a deep purple. When mixing, try to match the *value* first, then fine-tune the hue and saturation.
- The Power of Limited Palettes: Working with a limited color palette often forces you to think more critically about value, as you rely less on a vast array of hues and more on the interplay of light and dark.
- Value Temperature: Remember that even within a single value, colors can be warm or cool. A cool grey might have the same value as a warm grey, but they will create different effects.
- Preventing "Color Blindness": Sometimes, a strong color can trick your eye into thinking it's a different value than it actually is. The value scale acts as an objective reference.
- Digital Artists: Most digital art programs have a grayscale mode or a value picker. Use these tools in conjunction with your physical printable 10 value scale for artists to train your eye!
Troubleshooting Your Art: When & How the Scale Can Save You
Your printable value scale isn't just for starting a new piece; it's also a powerful diagnostic tool for when things just aren't looking right.
- Is Your Art Flat? This is the most common symptom of poor value usage. If your painting or drawing lacks depth, it's almost certainly because you're staying within a narrow range of mid-tones. Compare your artwork to your printable 10 value scale for artists – do you see values from 1 to 10 represented, or are you clustered in the middle?
- Lack of Focal Point? If the viewer's eye isn't sure where to go, it might be a value issue. Use strong value contrast around your focal point to make it pop.
- Muddy Colors? As discussed, muddy colors often stem from muddy values. Try converting your painting to grayscale to see the underlying value structure and compare it to a well-known master painting. You'll likely see where your values are too similar.
- Is Something "Off" But You Can't Pinpoint It? Often, when a piece feels "wrong," it's a value imbalance. Perhaps your darkest dark isn't dark enough, or your lightest light isn't bright enough.
- The "Squint Test" (Again!): When troubleshooting, this is your best friend. Squint at your artwork, then squint at your reference photo or subject. Do the major value masses align? If not, use your printable 10 value scale for artists to identify where you need to push values lighter or darker. I've used this to fix countless compositions that felt "off" but I couldn't articulate why.
- Photo Reference Struggles: If you're working from a photo, sometimes the camera flattens values. Use your scale to interpret and exaggerate values for more artistic impact, rather than just copying.
- Digital Value Check: Many digital programs allow you to quickly sample values. Use this to compare areas of your digital painting to your physical printable 10 value scale for artists for consistency.
Your Go-To Reference: Making the Most of Your Printable Scale

Having a physical, printable 10 value scale for artists handy is crucial. It's not just a learning tool; it's a reference that you’ll use throughout your artistic career.
- Print and Laminate: Seriously, print it out on good quality paper and laminate it. It will stand up to spills and general studio abuse, ensuring it lasts.
- Keep it Visible: Tape it to your easel, drawing board, or desk. The more you see it, the more you'll subconsciously reference it and train your eye.
- Practice Exercises: Dedicate time specifically to value exercises. Draw simple objects, focusing only on value. Do value studies of photographs.
- Make Your Own: While a pre-made printable 10 value scale for artists is great, creating your own with graphite or charcoal helps you understand how different materials render values. This is my personal favorite way to connect with the concept.
- Cross-Reference: When mixing paints, hold a dab of paint next to your value scale to check its lightness or darkness. This is especially helpful when dealing with saturated colors, as their true value can be deceptive.
- Digital Integration: Even if you work digitally, having a physical scale reminds you to think in values, rather than just picking colors at random.
- Teach Others: Explaining how to use a value scale to a beginner artist reinforces your own understanding.
Integrating the Value Scale into Your Workflow

Making the value scale a natural part of your process will elevate your art consistently. This isn't just a one-off tool; it's a mindset.
- Thumbnail Sketches: Before you even pick up your main drawing tool or paint brush, do tiny thumbnail sketches (1-2 inches) focusing *only* on the big value shapes. Aim for just 3-5 distinct value areas to map out your composition. This is where your printable 10 value scale for artists truly shines in planning.
- Blocking In Values: Once you start your main piece, block in the large value areas first, without getting bogged down in details. Establish your darkest darks and lightest lights early on.
- Layering for Depth: Build up your values gradually, especially in drawing. Each layer adds more depth and richness to your tones.
- Constant Comparison: Keep your printable 10 value scale for artists handy and regularly compare areas of your artwork to it. "Is this really a value 7, or is it closer to a 6?" This self-correction is vital.
- Observe Your Environment: Start seeing the world through a value lens. Notice how light falls on objects, how shadows define form, and how atmospheric perspective lightens distant objects. This constant observation will make value understanding intuitive.
- Critique with Value in Mind: When critiquing your own work or that of others, make "value" one of the first things you assess. This subjective approach is key for me; I often start by asking, "Does the value range here tell the story I want?"
- Don't Fear the Dark: Many beginners are hesitant to push their darks. Embrace those deep values! They provide necessary contrast to make your lights sing. Don't be like me and create an entire series of pastel landscapes before realizing I needed to push my darks *harder* to make them feel real!
Tips for Personalizing Your Value Study

The value scale is a tool, but how you wield it is all you. Make it work for *your* unique artistic journey.
- Choose Subjects You Love: Practice value studies on subjects that genuinely interest you. Whether it's portraits, landscapes, or still life, passion makes practice more enjoyable.
- Experiment with Mediums: Try graphite, charcoal, ink washes, acrylics, oils – each medium handles value differently. A charcoal value study feels very different from an oil painting one, and understanding these nuances will make you a more versatile artist.
- Create Your Own Custom Scales: Beyond the standard 10-value scale, try creating scales with fewer steps (e.g., 5-step) to simplify complex scenes, or more steps (e.g., 20-step) for extremely subtle transitions.
- Focus on a Specific Value Range: Challenge yourself to create a piece using only a high-key value range (mostly lights and mid-lights) or a low-key range (mostly darks and mid-darks). This helps you understand expressive possibilities.
- Learn from Masters: Find artists whose value usage you admire. Analyze their work. How do they use light and shadow to create impact? I find this approach works best for small teams or individual artists who want to dive deep into master techniques.
- Use Limited Time: Set a timer for 10 or 15 minutes and do a quick value sketch. This forces you to capture the essence of the values without getting bogged down in details.
Common Pitfalls: What to AVOID When Using a Value Scale

Even with this powerful tool, there are common missteps that can hinder your progress. Forewarned is forearmed!
- Ignoring the Extremes: Many beginners shy away from truly dark darks and brilliant lights, clustering their values in the mid-range. This results in flat, uninteresting art. Don't be afraid to push those boundaries – your printable 10 value scale for artists is there to show you the full spectrum!
- Copying Instead of Interpreting: Don't just mindlessly copy values from a reference photo. Photos can often flatten values or misrepresent them. Use your value scale to *interpret* and *exaggerate* for artistic impact.
- Forgetting the Light Source: Inconsistent lighting leads to confusing forms. Always be aware of where your light is coming from and how it interacts with your subject.
- Over-Blending (Too Much "Softness"): While smooth transitions are good, sometimes over-blending can remove the contrast needed for sharp edges and clear forms. Maintain some crispness where light meets shadow.
- Obsessing Over Detail Before Value: Get the big value shapes right *first*. Details come last. A beautifully detailed drawing with poor value structure will still fall flat.
- Not Stepping Back: Continuously looking at your work up close makes it hard to see the overall value relationships. Regularly step back (or take a photo with your phone and check it in grayscale) to get a fresh perspective. Don't be like me and only notice your critical value error *after* you've added all the painstaking details!
- Giving Up Too Soon: Value is a fundamental concept that takes time and practice to master. Don't get discouraged if your first few value studies aren't perfect. Keep at it!
---
Congratulations! You now have a comprehensive understanding of why a printable 10 value scale for artists is not just a useful tool, but an absolute necessity for creating compelling, dimensional art. From defining form to guiding the eye, value is the bedrock of visual communication. So, go forth, print that scale, and start seeing the world – and your art – in a whole new, richly textured way. Now go make some truly captivating art!