Oh, the Minions! Those lovable, gibberish-speaking, banana-obsessed yellow creatures have truly captured our hearts. From their mischievous antics to their unwavering loyalty (mostly to Gru, sometimes to bananas), they bring a unique brand of chaotic joy wherever they go. And if you're here, chances are you've fallen under their spell, just like me. You're probably dreaming of transforming everyday objects, party decor, or even yourself into a bona fide Minion, and you know the secret weapon: the iconic minion eye printable.
Trust me, I've been there. I remember scrambling last-minute for my son's birthday party, trying to figure out how to make those adorable Minion treat bags without having to hand-draw a hundred tiny eyes. My first attempt involved freehanding them, and let's just say they looked more like abstract art than Minion eyes! That's when I discovered the magic of printables. It was a game-changer, saving me hours of frustration and turning a potential crafting disaster into a super "A-HA!" moment. This guide is born from that very experience – a desire to help you skip the struggle and dive straight into the fun.
Whether you're a seasoned crafter looking for new inspiration, a busy parent planning an epic Minion-themed bash, a teacher searching for engaging classroom activities, or just someone who loves a good DIY project, you've landed in the right place. We're about to embark on an exciting journey through the world of minion eye printables, exploring everything from classic designs to creative variations, essential printing tips, and even how to design your own. Get ready to transform ordinary items into extraordinary, Minion-tastic masterpieces!
---
Table of Contents

- [The Classic Look: Authentic Minion Eye Printables](#the-classic-look-authentic-minion-eye-printables)
- [Beyond Basic: Creative Minion Eye Variations & Styles](#beyond-basic-creative-minion-eye-variations-and-styles)
- [Crafting with Care: Best Materials & Printing Tips for Minion Eye Printables](#crafting-with-care-best-materials-and-printing-tips-for-minion-eye-printables)
- [Party Perfect: Minion Eye Printables for Celebrations](#party-perfect-minion-eye-printables-for-celebrations)
- [Costume Corner: DIY Minion Eyes for Dress-Up](#costume-corner-diy-minion-eyes-for-dress-up)
- [Learning & Play: Educational Uses for Minion Eyes](#learning-and-play-educational-uses-for-minion-eyes)
- [Digital Delights: Designing Your Own Minion Eye Printables](#digital-delights-designing-your-own-minion-eye-printables)
- [Troubleshooting & Tips: Common Challenges & Solutions for Minion Eye Printables](#troubleshooting-and-tips-common-challenges-and-solutions-for-minion-eye-printables)
- [The Ultimate Collection: Where to Find Free & Premium Minion Eye Printables](#the-ultimate-collection-where-to-find-free-and-premium-minion-eye-printables)
- [Eco-Friendly Fun: Sustainable Minion Eye Crafting](#eco-friendly-fun-sustainable-minion-eye-crafting)
- [How to Choose the Best Minion Eye Printable for Your Needs](#how-to-choose-the-best-minion-eye-printable-for-your-needs)
- [Common Pitfalls to Avoid When Using Minion Eye Printables](#common-pitfalls-to-avoid-when-using-minion-eye-printables)
- [Advanced Tips for Expert Minion Eye Crafters & Designers](#advanced-tips-for-expert-minion-eye-crafters-and-designers)
- [Conclusion: Go Forth and Be Despicably Creative!](#conclusion-go-forth-and-be-despicably-creative)
---
The Classic Look: Authentic Minion Eye Printables

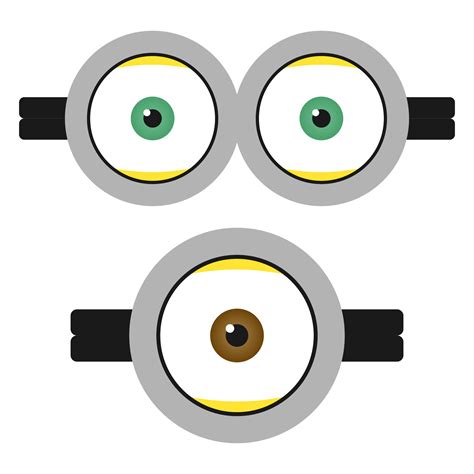
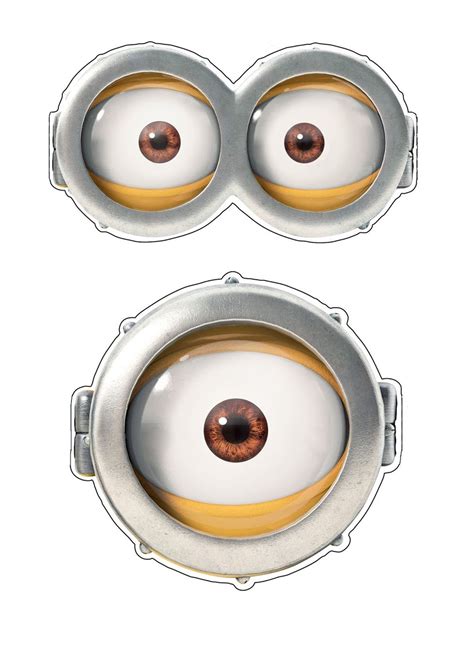
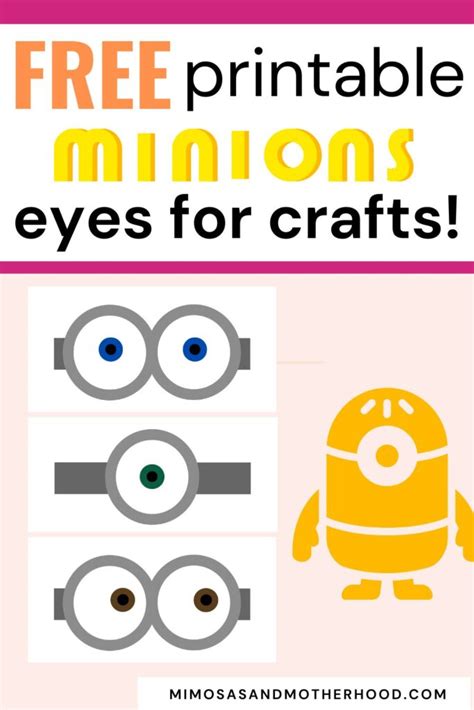
When we talk about minion eye printables, the first image that usually pops into mind is that quintessential, instantly recognizable look: the silver goggle, the black band, and the big, expressive brown eye (or eyes!). This is the foundation, the baseline, the *"Bello!"* of all Minion crafts. Mastering the classic look is essential, as it forms the basis for all other creative explorations.
Here are some key elements and applications of the classic minion eye printable:
- The Single Eye vs. Double Eye: The most fundamental distinction. Stuart famously has one eye, while Kevin and Bob typically have two. Your choice dictates the character you're trying to emulate or the object you're decorating. For example, if I'm making a small, round Minion out of a toilet paper roll, a single eye might be cuter and more fitting, embodying Stuart's quirky charm. If it's a larger, more imposing Minion like Kevin, two eyes are a must for that classic, slightly bewildered expression.
- The Iconic Goggle: This isn't just an eye; it's an eye *with* its goggle. The silver metallic look is crucial. Many printables will include shading and highlights to give the goggle a 3D, shiny appearance, even on flat paper. Don't skip this detail! It truly elevates the look from a simple circle to a recognizable Minion feature.
- Black Goggle Strap: The goggle isn't floating – it's held in place by a sturdy black strap. Often, this is just a rectangular strip of black that you can print and cut, or even just draw on with a marker after applying the eye. For my son's Minion birthday invitations, I printed the eye and then used black construction paper for the strap, giving it a nice layered effect.
- Expressive Pupils: While the classic Minion eye is typically brown, the pupil can convey so much. A small, centered pupil suggests innocence or curiosity (think Bob). A slightly off-center one might hint at mischief (Stuart). Some printables even offer different pupil sizes to convey various Minion emotions, which is a fantastic detail for adding personality to your crafts.
- Varying Sizes for Versatility: A good classic minion eye printable pack will come with eyes in multiple sizes. This is crucial for applying them to different objects – tiny ones for cupcake toppers, medium for treat bags, large for party backdrops or costumes. It saves you the hassle of resizing and ensures pixel-perfect quality.
- High-Resolution Matters: When downloading classic eyes, always prioritize high-resolution files (PDFs or large JPEGs/PNGs). Blurry, pixelated eyes are a crafting sin! You want crisp lines and vibrant colors, especially for those crucial silver goggle details.
- Simple Cut Lines: The beauty of a classic minion eye printable is its simplicity. The best ones will have clear, easy-to-follow cut lines, making them accessible even for little hands (with adult supervision, of course!). This is great for a quick craft session with kids.
- Layering for Depth: While the printable itself is flat, you can add depth. Print the eye, cut it out, then mount it on a slightly larger circle of black paper to simulate the recessed goggle. Then mount that on a yellow background. This simple layering trick makes the Minion pop.
- Matte vs. Glossy Finish: Consider the paper. For a more authentic goggle look, a slightly glossy photo paper can make the silver really shine. For general crafts, matte cardstock works beautifully and is easier to glue. When I was making Minion-themed placemats for a party, I used a semi-gloss paper for the eyes, and they really stood out against the matte yellow background.
- Pre-designed Sets: Look for printables that offer sets of eyes, rather than just one. This means you get a variety of expressions or sizes on a single sheet, maximizing your printing efficiency and giving you options without having to download multiple files.
Beyond Basic: Creative Minion Eye Variations & Styles
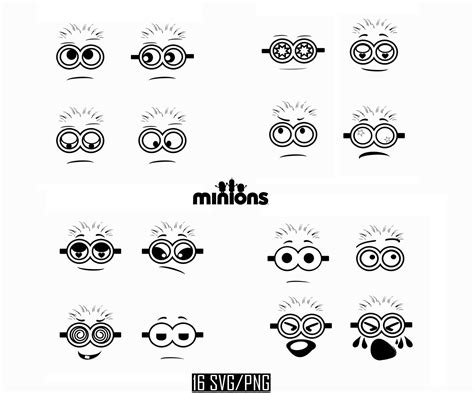
While the classic minion eye printable is iconic, the world of Minions is anything but static! Their expressions are a riot of emotions, from pure joy to utter bewilderment, maniacal laughter to profound sadness (usually after losing a banana). This category dives into how you can use varied minion eye printables to bring even more personality and humor to your projects. Think beyond just one or two eyes and consider the *feeling* you want to convey.
Here's how to get creative with your Minion eyes:
- Expressive Eyebrows: Minions don't just have eyes; they have *eyebrows* (or lack thereof) that convey so much! A furrowed brow, a raised arch, or no brows at all can dramatically change the Minion's mood. Look for printables that include different eyebrow styles or add them in yourself with a black marker above your printed eyes. This is a subtle but powerful way to add character.
- Wacky Pupils: Who says Minion pupils have to be perfectly round? Experiment with oval, rectangular, or even heart-shaped pupils for a truly unique look. Imagine a Minion with star-shaped pupils – perfect for a cosmic Minion theme! I once saw a Minion craft where the eyes had spiral pupils, giving the Minion a dizzy, cartoonish look that was absolutely hilarious for a "party animal" Minion cutout.
- Goggle Glints & Reflections: The goggle itself can be a canvas for creativity. Instead of just a standard silver, what about a goggle with a tiny reflection of a banana? Or a subtle rainbow glint? These small details add a layer of sophistication and bespoke charm to your minion eye printable.
- Textured Goggles: While harder to achieve with simple printables, some advanced designs might offer a subtle texture on the goggle itself, mimicking brushed metal or even a slightly rusted look for a "grungy" Minion. You can also achieve this by printing the goggle onto specialty paper, like metallic cardstock, and then adding the eye.
- Minion "Disguise" Eyes: Sometimes Minions go incognito! Think about eyes peeking out from behind a pirate patch, wearing tiny sunglasses, or even sporting a monocle. These themed minion eye printables are fantastic for specific party themes or storytelling through crafts. For a "spy" themed birthday, Minion eyes with tiny printed sunglasses were a huge hit on the party favors.
- Crying/Tearful Eyes: For a touch of humor or dramatic flair, you might find printables with tiny tears or a sad expression. This is great for a "before and after" scenario in a comic strip or a "boo-hoo" Minion for a silly photo booth prop.
- Angry/Grumpy Eyes: While mostly cheerful, Minions can get grumpy, especially when denied bananas! Eyes with narrowed pupils and a slight furrow in the goggle can convey this perfectly. These are fantastic for adding a bit of edge to your Minion army.
- Sleepy/Winking Eyes: Imagine a Minion just waking up, or one winking conspiratorially. These expressions are pure gold for dynamic Minion scenes. A winking minion eye printable is perfect for greeting cards or secret messages.
- "Pop-Out" Eyes: Not strictly a printable variation, but an application: print two identical eyes, cut out the pupils from one, and layer it over the other with a small foam dot in between. This creates a subtle 3D effect that makes the eyes really pop. This trick works wonders for Minion-themed photo frames.
- Abstract Minion Eyes: Push the boundaries! What if the goggle was square? Or the eye was a swirling vortex? While not canonically accurate, abstract minion eye printables could be used for highly stylized art projects or modern graphic designs inspired by the Minion aesthetic.
- Minion Eyes with Accessories: Think beyond just the eye itself. Some printables might include tiny printed hats, bows, or even a tiny banana dangling in front of the goggle. These add a narrative element without much extra effort. My favorite was a Minion eye with a tiny printed party hat – instant birthday cheer!
- Glow-in-the-Dark Minion Eyes: While you can't print glow-in-the-dark directly, you *can* print your minion eye printable and then trace over the goggle outline with glow-in-the-dark paint or use glow-in-the-dark paper. This is fantastic for Halloween decorations or a late-night Minion movie marathon.
Crafting with Care: Best Materials & Printing Tips for Minion Eye Printables
You’ve found the perfect minion eye printable – now what? The quality of your final craft depends heavily on the materials you choose and how you handle the printing process. Don't underestimate this step! It’s the difference between a sad, faded Minion and a vibrant, professional-looking one. Trust me, I've had my share of streaky prints and flimsy paper woes. Here’s what I learned after hours of crafting (and a few wasted ink cartridges).
- Paper Power: Choosing Your Stock:
- Cardstock (65-110 lb / 176-300 gsm): This is your go-to for most minion eye printable projects. It's sturdy enough for cutting without tearing, holds its shape well, and prevents ink bleed-through. Ideal for party decorations, masks, and general crafts. I prefer a smooth, white cardstock for crisp colors.
- Photo Paper (Matte or Glossy): For a truly authentic goggle shine, especially for single-eye printables where the goggle is prominent, glossy photo paper can be fantastic. Matte photo paper offers rich colors without the glare. Use this for smaller, detailed eyes on special projects like framed art or premium invitations.
- Sticker Paper: If you want peel-and-stick convenience, printable sticker paper is a lifesaver. Perfect for quick applications on water bottles, notebooks, or party favors. Just make sure your printer can handle the thickness.
- Regular Printer Paper (20 lb / 75 gsm): Only use this for rough drafts, practice cuts, or very temporary, low-impact crafts (like a quick game of "pin the eye on the Minion"). It's too flimsy for most finished projects.
- Printer Settings: Don't Just Hit "Print"!
- Best Quality/Photo Quality: Always select the highest print quality setting your printer offers for the sharpest lines and most vibrant colors. This uses more ink but is worth it for the final look of your minion eye printable.
- Paper Type Matching: In your printer settings, tell your printer what type of paper you're using (e.g., "cardstock," "glossy photo paper"). This adjusts ink saturation and drying times for optimal results.
- Color Calibration: If your prints look off, your monitor or printer might need calibration. A quick online search for "printer color calibration" for your model can help. Sometimes, it’s as simple as running a cleaning cycle on your print heads.
- Ink Matters:
- Genuine Ink: While tempting to save money, generic or refilled cartridges can lead to inconsistent colors, streaky prints, and even damage your printer. For critical minion eye printable projects, genuine ink is often worth the investment.
- Full Cartridges: Low ink can result in faded colors or horizontal lines across your print. Check your levels before starting a big batch of Minion eyes.
- Cutting Tools for Precision:
- Sharp Scissors: Invest in a good pair of small, sharp crafting scissors for intricate cuts around the goggle and pupil. Blunt scissors will lead to jagged edges.
- Craft Knife/X-Acto Knife: For super precise cutting, especially for the inner circle of the goggle or if you’re cutting out details within the eye itself, a craft knife with a cutting mat is indispensable. This offers a professional finish.
- Circle Punches: If your minion eye printable is a perfect circle (many are!), a set of circle punches in various sizes is a game-changer. They create perfectly smooth edges and save immense time. I literally bought a set just for making Minion eyes for party hats, and it was the best decision ever!
- Lamination for Durability:
- For Minion eyes that need to withstand wear and tear (e.g., placemats, floor decals, reusable party props), laminating them after printing and cutting is a fantastic idea. It protects against spills, tears, and fading.
- Adhesive Choice:
- Glue Sticks: Good for paper-to-paper adhesion, quick, and mess-free.
- Craft Glue (PVA Glue): Stronger bond, but can warp paper if applied too heavily. Use sparingly.
- Double-Sided Tape/Foam Dots: Excellent for creating depth or a cleaner finish without visible glue. Foam dots are my go-to for making the eyes literally pop off the surface.
- Test Print First: Before printing a whole sheet of minion eye printables, do a single test print on regular paper to check size, color, and clarity. Adjust your settings as needed. This prevents wasting your good cardstock and ink.
Party Perfect: Minion Eye Printables for Celebrations

Planning a Minion-themed party? Then minion eye printables are your secret weapon for transforming an ordinary space into a "Bello!" bash! These eyes are incredibly versatile and can be used on almost anything to instantly inject that lovable Minion charm. From subtle touches to full-blown Minion madness, here’s how to make your celebration truly despicable.
- Minion Water Bottle Labels: Print minion eye printables in a size appropriate for water bottles. Cut them out, add a black strip around the bottle for the goggle band, and you've got instant Minion hydration. For my daughter's 5th birthday, we did this, and every kid grabbed their "Minion juice" with glee!
- Cupcake Toppers & Wrappers: Shrink down your favorite minion eye printable designs, attach them to toothpicks, and stick them into cupcakes. You can also print yellow cupcake wrappers and glue a tiny eye and goggle band to the front for a complete Minion look.
- Party Favor Bags/Boxes: Turn plain yellow gift bags or boxes into Minions by simply gluing on a pair of printed eyes and a black goggle strap. Add some construction paper overalls, and you've got adorable Minion containers for party treats.
- Minion Balloons: If you have yellow balloons, you can print large minion eye printables, cut them out, and carefully glue them onto the balloons. Inflate the balloons first, then attach the eyes. This creates fantastic floating Minions around your party space.
- Wall Decorations & Banners: Print extra-large minion eye printables to create Minion faces for your party backdrop or banner. Combine them with yellow and blue streamers for a full Minion effect. You can even cut out giant Minion bodies from yellow poster board and add the eyes.
- Tablecloth & Plate Decorations: Use minion eye printables as placemats (laminated for durability!) or as decorative elements glued onto plain yellow paper plates. This adds a cohesive theme to your dining area.
- Minion Photo Booth Props: Print large, varied minion eye printables on sturdy cardstock. Cut them out and attach them to sticks. Guests can hold them up to their faces for hilarious Minion photo opportunities. Include some with different expressions like angry, happy, or surprised.
- Minion Game Elements: Integrate minion eye printables into party games. For "Pin the Eye on the Minion," print a giant Minion body (without eyes) and have kids try to pin a cut-out eye in the correct spot while blindfolded. This was a classic hit at my nephew's party – pure chaos and laughter!
- Food Labels: If you're having a food buffet, use small minion eye printables to decorate food labels. For example, a "banana" label with a tiny Minion eye. It's a small detail that ties everything together.
- Invitations & Thank You Cards: Incorporate the minion eye printable directly onto your party invitations or thank you notes. It instantly sets the theme and lets guests know they're in for a fun, Minion-filled time.
- Minion Door Decor: Welcome guests with a giant Minion face on your front door. Cover the door in yellow paper, then add a large minion eye printable and a black goggle band. It's an instant transformation that gets everyone excited.
- DIY Minion Piñata: If you're feeling ambitious, you can create a simple yellow piñata and then use oversized minion eye printables to give it that unmistakable Minion charm. This saves you the hassle of trying to paint or draw perfect eyes onto a bumpy surface.
Costume Corner: DIY Minion Eyes for Dress-Up
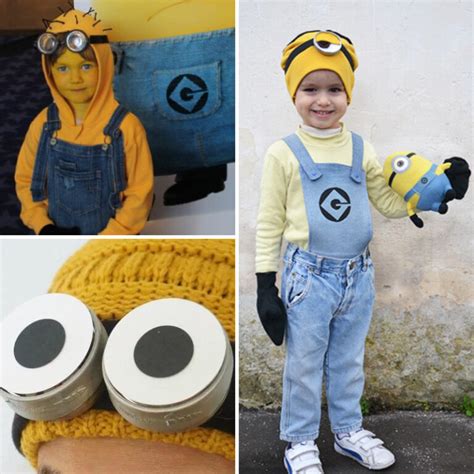
So, you want to *become* a Minion? Fantastic! While a yellow shirt and denim overalls get you halfway there, the eyes are truly the soul of the Minion. Minion eye printables are your best friend for creating incredibly effective and budget-friendly Minion goggles, whether for Halloween, cosplay, or just everyday dress-up fun. This is where your inner Gru really shines!
- The Classic Cardstock Goggles: This is the simplest method. Print your minion eye printable (the whole goggle, not just the eye) onto sturdy cardstock. Cut it out meticulously. Then, attach an elastic band or strips of black paper to the sides to wear it. For a kids' costume, this is quick, safe, and effective.
- Foam Board for Structure: For more durable and dimensional goggles, print your minion eye printable onto regular paper, then glue it onto foam board. Cut out the foam board carefully with a craft knife. This gives the goggle a nice thickness and makes it more rigid. You can then attach a black elastic band for wearing. This is what I used for my own Halloween costume one year, and it held up all night!
- Recycled Material Goggles: Get eco-friendly! Use a clean, empty plastic container (like a yogurt tub or large plastic cup) as the base for the goggle. Print your minion eye printable to size, cut it out, and glue it onto the plastic. You can spray paint the plastic silver first for extra realism. This gives a great 3D effect.
- Fabric Goggles with Printed Eyes: If you're sewing a Minion costume, you can create fabric goggles (e.g., from silver felt or vinyl). Then, print just the Minion *eye* part of your printable onto iron-on transfer paper. Iron the eye onto the fabric goggle for a seamless, professional look.
- Safety Glasses Transformation: Buy a cheap pair of clear safety glasses. Print your minion eye printable (just the eye, or the goggle with the eye) onto sticker paper. Carefully cut and apply the sticker to the lens of the safety glasses. You can paint the frame silver or wrap it in silver duct tape. This creates a wearable, functional goggle base.
- DIY "Welding Goggles" Minion Eyes: Purchase inexpensive toy welding goggles (often found at dollar stores). Disassemble them, print your minion eye printable onto cardstock or photo paper, and carefully glue it over the existing lens area. Reassemble. This gives a very authentic look and feel.
- The "Headband" Approach: For younger kids or quick costumes, print a large minion eye printable and glue it to a yellow or black headband. This is easier to wear than full goggles and still gets the point across. Add a few pipe cleaners for "hair" on top of the headband!
- Full-Face Minion Mask Integration: If you're making a full-face Minion mask (e.g., from paper mache or large cardboard), print your minion eye printable to the exact scale needed. Cut out the eye hole from the mask, then glue the printed eye *behind* the mask, so it peeks through. This creates depth and realism.
- "Gru's Goggles" Variation: For a Gru-like Minion, consider adding a printed magnifying glass effect over one eye, or a slightly more serious, focused expression to the minion eye printable. This adds a layer of character specific to Gru's hench-Minions.
- Weather-Proofing Your Costume Eyes: If you're wearing your Minion costume outdoors, consider laminating your minion eye printable or spraying it with a clear sealant after printing and cutting. This protects it from moisture and wear.
- Adding "Wear and Tear" Details: For a battle-hardened or well-loved Minion, you could subtly add printed cracks, smudges, or even tiny printed "scratches" to the goggle part of your minion eye printable. This gives it character and a story.
- Glow-Up Minion Eyes: For nighttime events, print your minion eye printable and then carefully outline the goggle or pupil with glow-in-the-dark paint or attach small, battery-operated LED fairy lights behind the eyes (if using a foam board or box base). Imagine glowing Minion eyes in the dark – pure genius!
Learning & Play: Educational Uses for Minion Eyes

Who knew those yellow mischief-makers could be educational? Minion eye printables are not just for parties and costumes; they can be fantastic, engaging tools for learning and play. Their instantly recognizable and appealing nature makes them perfect for capturing children's attention and making lessons more fun. As a former educator, I can tell you, anything that sparks joy helps learning stick!
- Emotion Recognition: Print various minion eye printables with different expressions (happy, sad, angry, surprised, confused). Use them as flashcards or glue them onto yellow paper plates. Ask children to identify the emotion, or even mimic it. This helps develop emotional intelligence and vocabulary.
- Number & Letter Recognition: Print eyes with numbers or letters on them. Kids can match the eye to the corresponding number/letter, or arrange them in order. For example, a Minion eye with a "3" on it, matched to a card with three bananas.
- Size Sorting: Print minion eye printables in various sizes. Children can sort them from smallest to largest, or vice versa. This teaches concepts of size and comparison.
- Color Matching: Print multiple sets of Minion eyes, but color the pupil or the goggle strap different colors. Have children match the eyes to objects of the same color. "Find the Minion eye that matches the red apple!"
- Storytelling Prompts: Create a set of minion eye printables with diverse expressions. Give a child an eye and ask them to tell a story about why the Minion feels that way. This encourages creativity, language development, and empathy.
- "Minion Says" (Simon Says): Use the Minion eyes as visual cues for a "Simon Says" style game. "Minion says... make a happy face!" (holding up the happy eye).
- Counting Games: Print a specific number of Minion eyes on a sheet. Ask children to count them. You can also have them add or subtract eyes for simple math problems. "If Minion Bob has 3 eyes and Minion Stuart gives him 1 more, how many does he have?" (Of course, Minions only have 1 or 2 eyes, but it's for illustrative math!).
- Fine Motor Skill Development: The act of cutting out minion eye printables (especially with varying shapes and complexities) helps refine scissor skills and hand-eye coordination. For younger kids, stick to simple circles.
- Pattern Recognition: Create patterns using different minion eye printables (e.g., happy, sad, happy, sad...). Have children identify the pattern and predict the next eye in the sequence.
- Crafting for Purpose: Encourage kids to use minion eye printables to decorate something for a specific purpose – a "Get Well Soon" card for a friend, a "Thank You" note for a teacher, or a decoration for their bedroom. This teaches purpose-driven crafting.
- Role-Playing & Imaginative Play: Print different minion eye printables and glue them onto sticks. Kids can use them as puppets for imaginative play, putting on their own Minion shows and creating new adventures. This boosts creativity and social skills.
- Vocabulary Building: Introduce new adjectives or verbs by associating them with different Minion eye expressions. "This Minion looks *bewildered*," or "He is *giggling*." This expands a child's descriptive language.
Digital Delights: Designing Your Own Minion Eye Printables
Why settle for pre-made when you can create your own unique minion eye printable? Designing your own gives you ultimate control over size, expression, color, and specific details, ensuring your Minion eyes are perfectly tailored to your project. It’s also a fantastic way to flex your creative muscles and perhaps even start a little side hustle! If you’re new to digital design, don’t panic – it’s easier than you think.
- Choose Your Software:
- Beginner-Friendly (Free/Low Cost): Canva, PicMonkey, Google Slides/Draw (yes, really!). These have intuitive interfaces and drag-and-drop features.
- Mid-Range (Paid): Affinity Designer, Procreate (for iPad). More powerful, still relatively user-friendly.
- Professional (Paid): Adobe Illustrator (vector graphics, best for scalable designs), Adobe Photoshop (raster graphics, for image manipulation).
- Understand Vector vs. Raster:
- Vector (e.g., SVG, AI, EPS): These are mathematical paths, meaning they can be scaled infinitely without losing quality. Ideal for logos, illustrations, and anything you need to print at various sizes. *Always* aim for vector when creating minion eye printables if you plan to resize them significantly.
- Raster (e.g., JPG, PNG, GIF): These are pixel-based images. They look great at their original size but become pixelated when enlarged. Good for photos and web graphics. If you're designing in Photoshop, create at a high resolution (e.g., 300 DPI) to allow for some scaling.
- Basic Elements of a Minion Eye:
- Outer Goggle Ring: A large gray/silver circle or oval.
- Inner Eye White: A smaller white circle within the goggle.
- Iris: A brown circle within the white (sometimes blue or green for variations).
- Pupil: A black circle within the iris.
- Highlight/Glint: Small white circles or crescents on the pupil/iris to simulate shine.
- Goggle Strap (Optional): A black rectangle.
- Step-by-Step Design Process (General):
1. Start with Shapes: Use the circle tool to create the goggle, eye white, iris, and pupil. Layer them correctly.
2. Coloring: Use the eyedropper tool on a reference Minion image to get accurate colors for the goggle silver (often a light gray with highlights), brown eye, and black pupil.
3. Highlights & Shading: Add subtle gradients or lighter/darker shades of gray