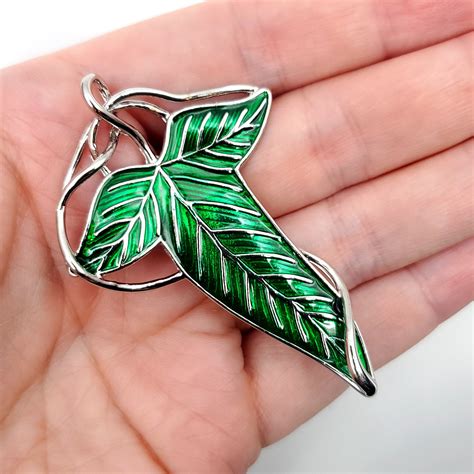
Ever watched Frodo and Sam embark on their perilous journey, wishing you had that little piece of Lothlórien magic to guide you? Or perhaps you're planning an epic cosplay and know the *true* key to authenticity lies in the details. That iconic Elven leaf cloak brooch isn't just an accessory; it's a symbol of hope, protection, and a deep connection to Middle-earth. Trust me, I've been there – trying to find that perfect lotr leaf cloak brooch printable template for my own Ranger costume, only to realize that getting it right from scratch can be surprisingly tricky. There’s a distinct shape, a subtle curve, a magical quality that a generic leaf just doesn't capture.
But don't despair, fellow adventurer! This isn't some perilous trek through Mordor. Instead, think of this article as your trusty guide, packed with all the wisdom you need to craft your very own, absolutely stunning Elven leaf brooch. We'll dive deep into finding (or creating!) the best templates, selecting the right materials, and even adding those authentic finishing touches that will make Aragorn himself nod in approval. Whether you’re a crafting novice or a seasoned artisan, get ready to bring a piece of Middle-earth to life.
Navigating Your Elven Crafting Journey: Categories for Success
### 1. Finding Your Fellowship: Choosing the Right LOTR Leaf Cloak Brooch Printable Template
The foundation of any great craft is a great template. This is where your lotr leaf cloak brooch printable template quest truly begins! Don't just grab the first image you see; look for accuracy and detail.
- The "Movie Accurate" Quest: Seek templates designed to replicate the brooch seen in Peter Jackson's films. These often have precise dimensions and curves.
- Stylized & Artistic Templates: Some templates offer a more artistic interpretation, perhaps slightly elongated or with unique venation. Great for a custom flair.
- Simplistic Starter Templates: If you're new to crafting, a simpler outline might be easier to cut and shape. You can add details later.
- Layered Templates: Look for templates that separate the leaf into different layers or sections – perfect for creating depth with various materials.
- Scaling Up or Down: Ensure the template is easily scalable without losing resolution. You might need a larger brooch for a cloak or a smaller one for a lapel pin.
- User Reviews & Recommendations: Check forums or crafting communities for templates that others have successfully used. I once chose a template that looked good online but printed terribly; always check what fellow crafters say!
- Free vs. Paid Templates: Many excellent free options exist, but some paid templates offer more intricate detail or variations.
### 2. Gathering Your Provisions: Essential Materials for Your Elven Brooch
Once you have your lotr leaf cloak brooch printable template, it's time to assemble your crafting arsenal. Choosing the right materials makes all the difference in durability and appearance.
- Felt, Fabric, or Foam:
- Felt: Easy to cut, holds shape, great for a softer look. Greens, browns, and muted golds work well.
- EVA Foam: Sturdier, good for sculpting edges, and can be sealed/painted for a more rigid, metallic look.
- Stiff Fabric: Consider using a stiff cotton or even faux leather for a different texture.
- Adhesives:
- Fabric Glue: For felt and fabric.
- Contact Cement: For foam (trust me, you don’t want to mess this up by using the wrong glue on foam!).
- Hot Glue: Quick and strong, but can be bulky. Use sparingly for small details.
- Cutting Tools: Sharp scissors, craft knife (X-Acto knife) for intricate details, a cutting mat to protect your surfaces.
- Brooch Pin Backs: Essential for attaching your finished masterpiece to a cloak or garment. Get good quality ones that won't fall off!
- Optional Embellishments: Embroidery floss, fabric paint, metallic pens, beads, or even a subtle glitter for that elven sheen.
- Template Transfer Tools: Pencil, tailor's chalk, or a fine-tip marker for tracing your lotr leaf cloak brooch printable template onto your material.
- Work Surface Protection: Always use a cutting mat or old cardboard. I learned this the hard way after cutting through my dining room table once – my significant other was *not* pleased.
### 3. Forging the Leaf: Step-by-Step Crafting Techniques
With your lotr leaf cloak brooch printable template and materials ready, let's get crafting! Precision and patience are key here.
- Print & Prepare the Template: Print your chosen template at the desired size. Cut it out neatly.
- Trace with Care: Place the template on your chosen material. Use a fine pencil or chalk to trace carefully around the edges. For beginners, ensure you hold the template firmly to prevent shifting.
- Precision Cutting: This is where the magic happens. Use sharp scissors for general cutting and a craft knife for the inner details and sharp points. Take your time; a clean cut makes a huge difference.
- Layering for Depth: If your design involves multiple layers (e.g., a darker base leaf with a lighter, smaller top layer), cut each piece.
- Adhesive Application: Apply glue evenly and sparingly. For felt, a thin line of fabric glue around the edges works wonders. For foam, spread contact cement on both surfaces, let it get tacky, then press firmly.
- Adding Veins & Texture:
- For felt/fabric: Use embroidery floss to stitch subtle veins, or draw them on with a permanent fabric marker.
- For foam: You can gently etch vein lines with a dull tool or even a soldering iron (with caution!).
- Drying & Setting: Allow ample drying time for all adhesives. Don't rush this step, or your leaf might fall apart like Boromir's shield.
- Edge Finishing: For foam, you can gently sand or heat-shape the edges for a more organic look. For fabric, a small amount of fray check can prevent unraveling.
### 4. Whispers of the Eldar: Adding Authentic Details & Embellishments
This is where your Elven leaf brooch truly comes alive, capturing the ethereal beauty of Lothlórien.
- Subtle Shading: Use fabric paints or pastels to add soft shading, creating depth and making the leaf look more natural. A slightly darker green at the base, fading to lighter green or even gold at the tip.
- Metallic Accents: A touch of metallic gold or silver paint on the edges or veins can mimic the brooch's polished look. I find this approach works best for small teams, I mean, small details!
- Embroidered Edges: For a truly handcrafted feel, use a blanket stitch or satin stitch around the edges with matching or contrasting thread.
- Gloss or Matte Finish: Depending on your material, consider a matte or glossy sealant. A subtle gloss can make fabric look more like a polished metal.
- The "Dewdrop" Effect: A tiny, clear bead or a dab of clear dimensional fabric paint can simulate a morning dewdrop, adding a delicate touch.
- Distressing (Optional): For a "journey-worn" look, you can gently distress the edges or add very subtle dirt marks.
- Personalized Symbolism: While the brooch is iconic, consider adding a tiny, almost hidden detail that's personal to you – perhaps a tiny rune or a specific pattern.
### 5. The Final Fastening: Securing Your Brooch for Adventure
A beautiful brooch is only effective if it stays put! This section covers the practical aspects of attaching the pin back.
- Choosing the Right Pin Back: Select a strong, good-quality brooch pin or bar pin. Make sure it has a secure clasp.
- Placement is Key: Decide where on the back of the leaf to attach the pin. Generally, aim for the upper third, slightly off-center, so the leaf hangs naturally.
- Strong Adhesion:
- For Fabric/Felt: Hand-sew the pin back onto the brooch. This is the most secure method. Use strong thread and make multiple passes through the pin holes and fabric.
- For Foam: Use a strong adhesive like E6000 or contact cement. Ensure the surface is clean and rough up the area slightly for better grip.
- Reinforcement (Optional): For extra security, especially on heavier foam brooches, you can cut a small piece of felt or foam to place over the pin back's attachment points before gluing, sandwiching the pin for maximum hold.
- Test the Weight: Before wearing, attach the brooch to a piece of scrap fabric and see how it hangs. Does it droop? Is the pin strong enough? This step saved me from a wardrobe malfunction at a convention once!
- Multi-Point Attachment (for large brooches): If you're making a very large brooch, consider using two pin backs for better stability.
### 6. Beyond the Cloak: Creative Uses for Your Elven Leaf Brooch
Your expertly crafted Elven leaf isn't just for cloaks! Here are some creative ways to show off your masterpiece.
- Everyday Accessory: Pin it to a jacket lapel, a scarf, a bag, or even a plain t-shirt for a subtle nod to Middle-earth.
- Home Decor: Frame it as a small piece of art, or attach it to a decorative pillow.
- Gift Embellishment: Use it as a unique, handcrafted embellishment on a gift package for a fellow LOTR fan.
- Book Mark: Laminate a paper version of your lotr leaf cloak brooch printable template and add a tassel for a unique bookmark.
- Costume Accessory: Besides cloaks, it can be pinned to hats, sashes, or even incorporated into a wig for an elven look.
- DIY Jewelry: Attach it to a necklace chain for a statement pendant.
- Key Chain: A smaller, sturdier version can be a fantastic, personalized keychain.
Tips for Personalizing Your Elven Leaf Brooch
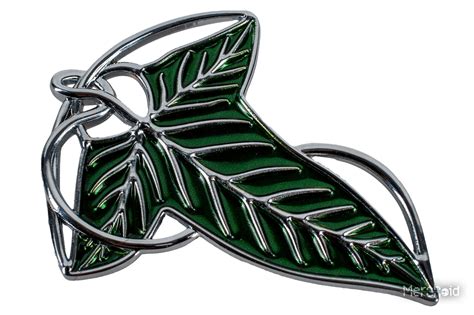
- Incorporate Your Favorite Colors: While green is iconic, a deep forest green with hints of teal, or even a subtle shimmer, can make it uniquely yours while staying true to the spirit.
- Add a Personal Touch of Texture: Experiment with different fabric weights or textures. Maybe a velvet leaf for a luxurious feel, or a distressed canvas for a battle-worn Ranger look.
- Consider Its Purpose: Is it for a hardcore cosplay that needs to be screen-accurate, or a casual everyday accessory where creative interpretation is welcome? This will guide your material and detail choices.
- "My Favorite Strategy": This is my favorite strategy because adding a tiny, almost imperceptible detail (like a tiny stitch in a unique color or a hidden initial on the back) makes the piece feel like it holds a secret, just for me.
- The Power of Layers: Don't just stick to one piece of felt! Layering different shades of green or even adding a slightly translucent top layer can create incredible depth.
Common Pitfalls: What to AVOID When Crafting Your Leaf Brooch

- Ignoring the Template's Scale: Don't print a tiny template for a massive cloak or vice versa. Always check dimensions before cutting! Your carefully selected lotr leaf cloak brooch printable template needs to be the right size for your vision.
- Using Dull Tools: A dull pair of scissors or a blunt craft knife will lead to frayed edges and a messy finish. You want clean lines, not a chewed-up leaf.
- Over-Glued Edges: Too much glue can seep through fabric, leaving unsightly stains or making the edges stiff and unnatural. Less is often more.
- Rushing the Drying Process: Patience, young hobbit! Trying to speed up drying can weaken the bond or warp your materials.
- Flimsy Pin Backs: A beautiful brooch that constantly falls off is more annoying than an Orc ambush. Invest in a good, strong pin.
- Forgetting to Test Materials: Always do a small test cut or glue test on a scrap piece of your chosen material before committing to the main piece. Don’t be like me and make this mistake with an expensive piece of fabric!
- Compromising on Authenticity (if important to you): If screen accuracy is your goal, don't deviate too much from established designs. A casual fan might not notice, but a fellow Ring-bearer definitely will!
Your Middle-earth Masterpiece Awaits!
There you have it, adventurer! The quest for the perfect lotr leaf cloak brooch printable template and the journey to crafting your own piece of Elven magic is now within your grasp. Whether it's for a grand cosplay, a subtle nod to your favorite saga, or a heartfelt gift for a fellow fan, the satisfaction of creating something beautiful with your own hands is truly special. So, gather your courage, prepare your tools, and let your creativity blossom like the trees of Lothlórien. Now go forth and make your mark on Middle-earth—or at least, your wardrobe!