
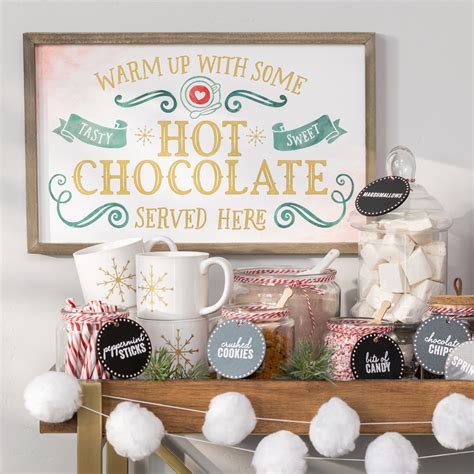
There’s a special kind of magic that happens when you set up a hot chocolate bar. The rich aroma of cocoa, the rainbow of toppings, the promise of warmth on a chilly day – it’s an instant hug in a mug. But what truly elevates a hot chocolate bar from a simple drink station to an unforgettable experience? It’s the details, the thoughtful touches, and, dare I say it, the perfectly chosen hot chocolate bar printable sign. I remember once scrambling to put together a last-minute holiday gathering. The hot chocolate bar was my saving grace, but the generic handwritten labels looked, well, generic. It wasn’t until I discovered the power of a well-designed, easily accessible hot chocolate bar printable sign that my setup truly transformed from "okay" to "oh wow!"
This isn't just about printing a piece of paper; it's about crafting an atmosphere, guiding your guests through a delightful experience, and adding that personalized flair that speaks volumes. Whether you're a seasoned host looking to level up your next soirée, a busy parent planning a birthday bash, or simply someone who loves creating cozy moments, this comprehensive guide is for you. We’ll dive deep into everything you need to know about hot chocolate bar printable signs, from finding the perfect design to printing like a pro, and even creating your own masterpieces. Get ready to sprinkle some extra charm on your next gathering!
---
Table of Contents

- [Thematic Delights: Crafting Your Hot Chocolate Bar Story](#thematic-delights-crafting-your-hot-chocolate-bar-story)
- [Design Magic: From Minimalist to Whimsical](#design-magic-from-minimalist-to-whimsical)
- [DIY Dream: Creating Your Own Printable Signs](#diy-dream-creating-your-own-printable-signs)
- [Printer's Paradise: Ensuring Picture-Perfect Prints](#printers-paradise-ensuring-picture-perfect-prints)
- [Placement Perfection: Where to Put Your Signs for Maximum Impact](#placement-perfection-where-to-put-your-signs-for-maximum-impact)
- [Beyond the Basics: Unique Signage Ideas & Add-ons](#beyond-the-basics-unique-signage-ideas--add-ons)
- [Seasonal Sips: Hot Chocolate Bar Signs for Every Occasion](#seasonal-sips-hot-chocolate-bar-signs-for-every-occasion)
- [Troubleshooting & Quick Fixes: Avoiding Common Sign Snafus](#troubleshooting--quick-fixes-avoiding-common-sign-snafus)
- [Budget-Friendly Brilliance: Free & Affordable Sign Solutions](#budget-friendly-brilliance-free--affordable-sign-solutions)
- [The Digital Download Domain: Navigating Online Resources](#the-digital-download-domain-navigating-online-resources)
- [How to Choose the Best Hot Chocolate Bar Printable Sign for Your Needs](#how-to-choose-the-best-hot-chocolate-bar-printable-sign-for-your-needs)
- [Common Pitfalls to Avoid When Using Printable Hot Chocolate Bar Signs](#common-pitfalls-to-avoid-when-using-printable-hot-chocolate-bar-signs)
- [Advanced Tips for Experts: Elevating Your Hot Chocolate Bar Signage](#advanced-tips-for-experts-elevating-your-hot-chocolate-bar-signage)
- [Conclusion: Sip, Sign, and Celebrate!](#conclusion-sip-sign-and-celebrate)
---
Thematic Delights: Crafting Your Hot Chocolate Bar Story
Every great hot chocolate bar has a theme, whether subtle or overt. Your hot chocolate bar printable sign is the narrator of that story, setting the mood and guiding your guests into the magical world you've created. This isn't just about labeling ingredients; it's about invoking feelings and enhancing the overall experience.
1. "Winter Wonderland" Theme: Imagine crisp snow, twinkling lights, and cozy warmth. Your sign could feature snowflakes, frost-kissed branches, or even a whimsical polar bear or reindeer, perhaps with elegant script saying, "Warm Up at Our Winter Wonderland Hot Cocoa Bar!" This theme is perfect for holiday gatherings or simply to embrace the chill of the season.
2. "Cozy Cabin Retreat" Vibe: Think rustic charm, plaid blankets, and crackling fireplaces. A sign with wood textures, a roaring fire illustration, or even a vintage thermos graphic would be ideal. The text might read, "Escape to Our Cozy Cocoa Cabin!" I once hosted a board game night, and this sign immediately made everyone feel relaxed and ready to settle in.
3. "Sweet & Sparkly Celebration" for Birthdays/Parties: For a vibrant, joyful event, your sign can be playful and colorful. Think confetti, balloons, or even a quirky character enjoying a hot chocolate. A cheerful message like, "Let's Get This Party Started! Hot Chocolate Fun Awaits!" sets a celebratory tone.
4. "Elegant & Classic" Affair: If your event calls for sophistication, your hot chocolate bar printable sign should reflect that. Consider a minimalist design with a clean font, perhaps a touch of gold foil effect or a delicate floral border. "Indulge in Our Signature Hot Chocolate Selection" offers an air of refined taste.
5. "Kids' Dreamland" Theme: For the little ones, go all out with fun! Think bright colors, cartoon characters, or even a "build-your-own monster hot chocolate" concept. A sign with a silly monster or unicorn and the words, "Unleash Your Inner Cocoa Creator!" will spark their imagination.
6. "Movie Night Magic": Planning a film marathon? Your sign can evoke the silver screen. Use a vintage movie ticket design, a clapboard graphic, or even popcorn illustrations. "Grab Your Cocoa & Let the Movie Magic Begin!" ties directly into the event.
7. "Fall Harvest & Hygge": For autumn gatherings, embrace the warm, earthy tones. Your sign could feature pumpkins, falling leaves, or even a cozy knit texture. "Sip, Savor, & Stay Awhile: Autumn Hot Chocolate Delights" perfectly captures the season's essence.
8. "Global Flavors Journey": If you're offering diverse hot chocolate flavors (Mexican, European, etc.), your sign can reflect this adventurous spirit. Incorporate subtle world map elements or flags. "Your Passport to International Hot Chocolate Bliss!" invites guests on a culinary adventure.
9. "Bridal Shower Bliss": For a bridal-themed event, incorporate elements like rings, flowers, or a wedding dress silhouette. A sweet message like, "Love is Brewing! Hot Cocoa Bar for the Bride-to-Be!" adds a personal touch.
10. "Baby Shower Sweetness": Think soft pastels, baby animals, or tiny footprints. "Oh Baby, It's Cold Outside! Warm Up with Our Sweet Cocoa!" is adorable and fitting. This theme is particularly close to my heart; I used a similar sign for my sister's baby shower, and it was a huge hit!
11. "Custom Corporate Event Branding": For professional settings, your sign can incorporate company logos, brand colors, and a more formal yet inviting tone. "Fuel Your Innovation: Enjoy a Warm Welcome at Our Hot Chocolate Bar."
12. "Game Day Grub & Gulp": If you're hosting a sports event, your sign can be energetic and team-spirited. Think team colors, a football or basketball graphic, and a phrase like, "Score Big with Our Hot Cocoa Bar!"
Design Magic: From Minimalist to Whimsical

The aesthetic of your hot chocolate bar printable sign is crucial. It dictates the overall feel and ties into your chosen theme. Let's explore various design styles and how they can transform your setup.
1. Minimalist Elegance: Less is often more. A minimalist sign uses clean lines, ample white space, and a sophisticated font. It’s about refined simplicity. Think a crisp white background with black sans-serif text, perhaps a single delicate line drawing of a cocoa cup. This design style works beautifully for adult gatherings or formal events, conveying a sense of understated luxury.
2. Rustic Charm: Embrace natural textures and earthy tones. This could involve a faux wood background, chalkboard style, or distressed paper effect. Hand-drawn elements like pinecones, leaves, or even little sketched mugs add to the charm. Fonts often mimic handwritten script or vintage typewriter styles. This is my go-to design because it always feels so inviting and warm, especially during the colder months.
3. Bold & Modern: For a contemporary look, opt for vibrant colors, geometric shapes, and striking typography. Think large, blocky fonts, abstract patterns, or a stark color contrast (e.g., bright teal and deep purple). This style is fantastic for lively parties, youth events, or any occasion where you want to make a statement.
4. Whimsical & Playful: Let your imagination run wild! This style often features quirky illustrations, bright, cheerful colors, and fun, bouncy fonts. Think gingerbread men, smiling marshmallows, or even anthropomorphic cocoa cups. It’s perfect for children's parties, holiday celebrations, or just adding a touch of childlike joy.
5. Vintage Nostalgia: Take a trip back in time with designs that evoke a bygone era. This might include retro color palettes (muted tones, sepia), distressed textures, ornate borders, and classic script fonts. Imagine a sign that looks like it came straight out of a 1950s diner or a Victorian-era advertisement.
6. Floral & Botanical: Incorporate beautiful floral arrangements, leafy patterns, or delicate botanical illustrations. This style can be romantic, elegant, or even whimsical depending on the type of flowers and colors used. It's particularly popular for bridal showers, garden parties, or spring/summer events.
7. Hand-Lettered Art: If you appreciate the artistry of calligraphy, a hand-lettered sign offers a personal and unique touch. Even if you're not a calligrapher, many printable options feature stunning, artistic fonts that mimic this style. It adds a bespoke, artisanal feel to your hot chocolate bar.
8. Character-Driven Fun: For themed children's parties, integrate popular characters or create your own cute mascots. A sign featuring a friendly yeti, a mischievous elf, or a beloved cartoon character enjoying hot cocoa will instantly delight young guests. My niece absolutely adored a sign I made for her birthday featuring her favorite cartoon cat!
9. Photo Collage Style: While less common for the main sign, smaller labels can incorporate mini photos – perhaps of the ingredients, or even candid shots from past events to evoke warmth and memories. This works especially well for family gatherings.
10. Interactive Elements: While strictly a "design" element, consider signs that prompt interaction. For example, a sign with a blank space for guests to "vote for their favorite topping" or "share their dream cocoa combo." This engages guests beyond just reading.
11. Text-Only Power: Sometimes, all you need is strong typography. A sign that relies solely on different fonts, sizes, and weights to create visual interest can be incredibly impactful. It's clean, direct, and allows the message itself to shine.
12. Monochromatic Charm: Using varying shades of a single color (e.g., different blues, or greens) can create a sophisticated and cohesive look. This adds depth and visual interest without overwhelming the senses, perfect for a subtle yet stylish hot chocolate bar.
DIY Dream: Creating Your Own Printable Signs
Feeling crafty? Making your own hot chocolate bar printable sign is incredibly rewarding and allows for ultimate customization. It also saves a few bucks, which is always a win in my book!
1. Choose Your Software: You don't need fancy design software.
- Canva (Beginner-Friendly): My personal favorite for quick, beautiful designs. It has tons of templates, fonts, and graphics. I once needed a sign for a last-minute gathering, and Canva saved me hours of design work.
- PicMonkey/Adobe Express (Intermediate): Offer more control and features than Canva, great for slightly more complex designs.
- Microsoft Word/PowerPoint (Basic): Surprisingly capable for simple text-based signs with images.
- Adobe Illustrator/Photoshop (Advanced): For professional designers who want full creative control.
2. Gather Inspiration: Before you start, browse Pinterest, Etsy, or even Google Images for "hot chocolate bar sign ideas." Save designs you love to a mood board. Pay attention to fonts, color schemes, and layout.
3. Select Your Dimensions: Standard paper sizes (8.5x11 inches or A4) are easiest for home printing. However, you might want smaller labels (e.g., 4x6 inches) for individual topping jars or larger signs (e.g., 11x14 inches) if you plan to send them to a print shop.
4. Pick Your Color Palette: Stick to 2-3 main colors that complement your theme. Use online color palette generators (like Coolors.co) if you need inspiration or help creating harmonious combinations.
5. Choose Your Fonts Wisely:
- Readability First: Ensure the text is easy to read from a distance.
- Mix & Match (Carefully): Use no more than 2-3 fonts per sign. A common strategy is one decorative font for the main title and a simple, readable font for the body text.
- Font Pairing Tools: Many online tools can help you find complementary fonts.
6. Add Graphics & Illustrations:
- Free Resources: Sites like Freepik, Pixabay, or Unsplash offer free vector graphics and stock photos. Just check the licensing!
- Software Libraries: Canva and similar tools have extensive built-in graphic libraries.
- Keep it Relevant: Ensure graphics enhance, not distract from, your message.
7. Craft Your Message:
- Main Title: "Hot Chocolate Bar," "Cocoa Corner," "Warm Up Station."
- Topping Labels: "Marshmallows," "Whipped Cream," "Chocolate Shavings," "Peppermint Sticks." Be descriptive and fun!
- Instructions (Optional): "Grab a Mug, Choose Your Cocoa, Add Your Toppings, Enjoy!"
8. Proofread, Proofread, Proofread: A typo on your hot chocolate bar printable sign is a party foul! Read everything carefully. Ask a friend to proofread as well – a fresh pair of eyes catches mistakes.
9. Save in the Right Format:
- PDF: Best for printing as it preserves fonts and layout.
- JPG/PNG: Good for sharing digitally or if you're printing photos.
10. Test Print: Always do a small test print before printing a large batch. Check colors, clarity, and overall appearance. This step saved me from a major printing disaster with off-color signs once!
11. Consider Custom Shapes: Beyond rectangles, think about cutting your signs into unique shapes like a mug, a snowflake, or a cloud if you're feeling ambitious and have the right tools.
12. Add a Personal Touch: Perhaps a small "Est. [Year]" for a family tradition, or a little doodle unique to your family. These small details make your hot chocolate bar printable sign truly one-of-a-kind.
Printer's Paradise: Ensuring Picture-Perfect Prints
You’ve designed the perfect hot chocolate bar printable sign, but the magic truly happens when it comes off the printer looking crisp and vibrant. Printing isn't just hitting a button; it's an art that can make or break your design.
1. Choose the Right Printer:
- Inkjet Printers: Great for vibrant colors and detailed graphics, especially if you’re using photo paper. Most home printers are inkjets.
- Laser Printers: Excellent for crisp text and graphics, generally faster, and more cost-effective for high-volume printing. Colors might not be as vibrant as inkjet on certain paper types.
2. Paper Selection is Key: This is arguably the most important factor for a professional-looking hot chocolate bar printable sign.
- Cardstock (65-110 lb): My top recommendation. It's sturdy, durable, and gives your signs a premium feel. It prevents curling and allows the sign to stand on its own or be easily framed.
- Matte Photo Paper: Offers excellent color reproduction without glare, giving a soft, professional finish.
- Glossy Photo Paper: Produces vibrant, high-contrast prints, but can create glare under certain lighting. Best for very colorful, graphic-heavy signs.
- Specialty Papers: Think textured paper for a rustic look, or even vellum for a translucent, elegant effect.
3. Calibrate Your Printer (If Possible): Over time, printer colors can drift. If you have the option, run a calibration test to ensure colors are accurate. This is more for advanced users but can make a huge difference.
4. Print Quality Settings: Don't just hit print!
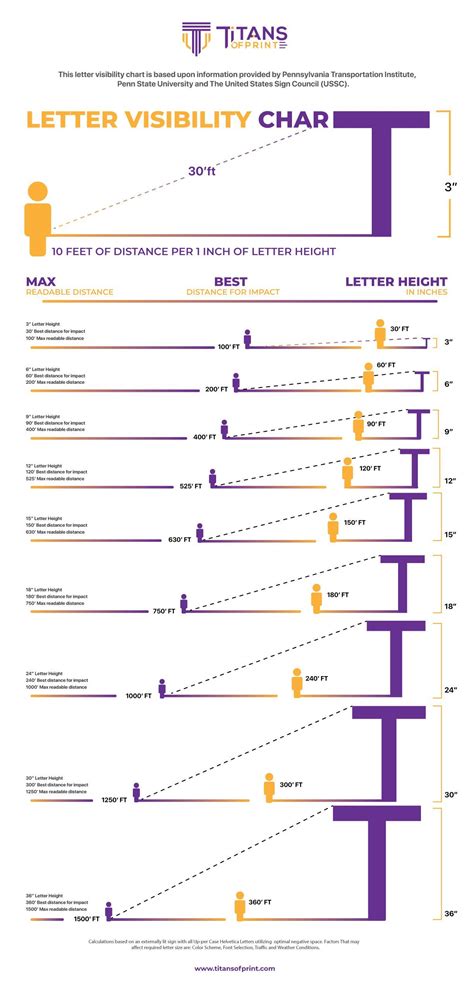
- "Best" or "High Quality": Always select the highest print quality setting in your printer's dialogue box. This uses more ink but results in sharper images and smoother colors for your hot chocolate bar printable sign.
- "Photo Paper" or "Cardstock" Setting: Match the paper type setting to the paper you're using. This optimizes ink distribution and drying time.
5. Check Ink Levels: Running out of ink mid-print is a nightmare. Always ensure you have enough ink or toner before starting a big print job. A sign with streaks or faded colors is a definite no-go.
6. Borderless Printing: If your design goes to the very edge of the paper, enable borderless printing in your settings. Not all printers support this, but it creates a cleaner, more professional look, eliminating the need for precise trimming.
7. Laminating for Longevity: For signs that need to withstand spills (highly likely around a hot chocolate bar!) or be reused, laminate them. Most office supply stores offer lamination services, or you can buy a small home laminator. This also adds a nice sturdy feel.
8. Cutting with Precision:
- Paper Trimmer/Guillotine: For straight, clean cuts. Far superior to scissors for a professional finish.
- X-Acto Knife & Cutting Mat: For intricate cuts or if you need to cut out shapes. Always use a ruler for straight lines.
- Score and Fold: If your sign has a fold (like a tent card), score the fold line first with a scoring tool or a dull knife to get a crisp, clean fold.
9. Allow for Drying Time: Especially with inkjet printers and thicker papers, allow your hot chocolate bar printable sign to dry completely before handling or stacking to prevent smudges.
10. Consider Professional Printing: For very large signs, extremely vibrant colors, or if you don't have a high-quality home printer, consider sending your files to a local print shop or an online service. The quality is often superior, and they can offer specialty finishes. I once ordered a large welcome sign for a family reunion, and the professional print quality was undeniable.
11. Test Different Papers: If you have time and extra paper, print the same design on a few different paper types to see which one gives the best result for your specific hot chocolate bar printable sign.
12. Ink Compatibility: Ensure your printer ink is compatible with your chosen paper type. Some inks perform better on specific paper coatings.
Placement Perfection: Where to Put Your Signs for Maximum Impact
You've got your beautiful hot chocolate bar printable signs, now where do they go? Strategic placement is just as important as the design itself. It ensures your guests see them, understand them, and are guided through the delightful experience you've crafted.
1. The Grand Welcome Sign: This is your centerpiece, the main hot chocolate bar printable sign that introduces the station. Place it prominently at eye level, either above the bar, on a small easel on the counter, or framed right next to the main cocoa dispenser. Its purpose is to draw guests in and announce the theme.
2. Ingredient Labels (Front & Center): Each topping, syrup, and mix should have its own clear, legible label. Place these directly in front of or slightly behind their respective containers. Guests shouldn't have to guess if that's chocolate syrup or caramel! This is where smaller, consistent labels really shine.
3. Instructional Signs (If Applicable): If your hot chocolate bar has a specific order of operations (e.g., "1. Choose Your Cocoa, 2. Add Hot Water/Milk, 3. Toppings Galore!"), place a small, clear instructional sign near the beginning of the bar. This is especially helpful for first-time guests or kids.
4. Flavor Designations: If you offer different types of cocoa (dark, milk, white, peppermint), make sure each dispenser or serving pitcher has a hot chocolate bar printable sign clearly indicating its flavor. This prevents accidental flavor mixing!
5. Dietary Information/Allergen Alerts: For guests with dietary restrictions, discreetly placed signs indicating "Dairy-Free Option," "Nut-Free Toppings," or listing common allergens (e.g., "Contains Dairy, Nuts, Soy") are a thoughtful and responsible touch. Place these near the relevant items or on a general information sign.
6. "Take a Mug" / "Mugs Here" Sign: If you’re providing mugs, guide your guests to them with a simple sign. This helps maintain flow and prevents confusion.
7. "Napkins & Spoons" / "Stir Sticks" Sign: Keep these essential items organized and easy to find with small, clear labels.
8. "Please Enjoy!" / "Thank You for Sipping!" Sign: A small, inviting sign at the end of the bar, or even a thank you note, adds a personal and warm touch. It reinforces the hospitable atmosphere.
9. Vertical vs. Horizontal: Consider the space. If you have limited counter space, a taller, thinner vertical sign might work better. If you have a wide, open area, a horizontal sign can spread out and draw the eye across the bar.
10. Layering for Depth: Don't be afraid to layer signs. A large welcome sign in the back, smaller labels in front, and perhaps a tent card with instructions. This creates visual interest and makes the hot chocolate bar feel more curated.
11. Lighting Considerations: Ensure your hot chocolate bar printable sign is well-lit and not in shadow. Good lighting makes it easy to read and enhances the visual appeal.
12. Consistency is Key: While signs can vary in size, try to maintain a consistent style, font, and color scheme across all your hot chocolate bar printable signs and labels for a cohesive and professional look. My advice here is always to lay everything out before the party starts, just to check the visual flow.
Beyond the Basics: Unique Signage Ideas & Add-ons
Once you've mastered the main signs and labels, it's time to get creative! These unique ideas can add an extra layer of fun, engagement, and personalization to your hot chocolate bar, making your hot chocolate bar printable sign collection truly stand out.
1. "Signature Drink" Recipe Cards: Offer a few suggested "signature" hot chocolate recipes (e.g., "The Peppermint Dream," "Spicy Mexican Cocoa"). Print small recipe cards or a larger sign with the ingredients and steps. This encourages guests to try new combinations.
2. "Flavor of the Day/Week" Sign: If you're hosting an extended event or a series of gatherings, feature a rotating "flavor of the day" and highlight it with a special hot chocolate bar printable sign. This creates anticipation and repeat visits.
3. Photo Booth Props & Signs: Create a small "photo op" area near the hot chocolate bar with fun props (oversized mugs, fake whipped cream mustaches) and a sign encouraging guests to share their photos with a specific hashtag. "Snap, Sip, & Share! #MyCocoaCreation"
4. "Rate Your Creation" Scorecards: Provide small printable scorecards where guests can rate their hot chocolate concoction. This is a fun, interactive element, especially for competitive groups or kids.
5. "Topping Origin Story" Labels: For artisanal or unique toppings, create small hot chocolate bar printable signs that tell a mini-story (e.g., "Locally Sourced Caramel Drizzle," "Grandma's Secret Marshmallow Recipe"). This adds a gourmet touch.
6. "Hot Chocolate Bar Bingo" Cards: For kids' parties, create bingo cards featuring different toppings. Guests mark off toppings as they add them. First to get Bingo wins a prize!
7. "Warm Wishes" Message Board: A larger hot chocolate bar printable sign with a blank area where guests can write warm messages or wishes on small sticky notes and attach them. This makes the hot chocolate bar a communal space.
8. "Donation Station" Sign (Charity Event): If your hot chocolate bar is part of a charity event, include a subtle sign encouraging donations with a QR code or brief message about the cause.
9. Interactive "Choose Your Own Adventure" Signs: For very elaborate bars, create signs that guide guests based on their preferences. "Love Sweet? Go This Way!" "Craving Spicy? Follow the Arrow!"
10. Mini Flag Banners: Instead of just flat signs, print and cut out small flags that can be strung together as a mini banner above certain sections of the bar (e.g., "Toppings," "Syrups"). This adds dimension.
11. Custom Coasters/Mug Tags: Print small, themed coasters or tags that can be tied around mug handles. These can feature the event name, date, or a cute hot chocolate-themed graphic. My subjective opinion is that these small, unexpected touches are what truly make an event memorable.
12. "Cocoa Bar Rules" (Humorous): For a playful touch, create a hot chocolate bar printable sign with humorous rules like, "No Double Dipping Marshmallows (Unless No One's Looking!)," "Warning: May Cause Extreme Warmth & Happiness."
Seasonal Sips: Hot Chocolate Bar Signs for Every Occasion
A hot chocolate bar isn't just for winter! Adapting your hot chocolate bar printable sign to the season or occasion ensures it always feels fresh, relevant, and perfectly themed.
1. Christmas & Holiday Cheer: This is the classic hot chocolate bar season. Your signs can feature jolly Santas, twinkling lights, reindeer, gingerbread men, or festive ornaments. Messages like "Merry & Bright Hot Cocoa Bar," "Sip, Sip, Hooray for the Holidays!" or "North Pole Nook: Warm Up with Santa's Favorites" are perfect.
2. New Year's Eve Sparkle: Ring in the new year with glitter, champagne bubbles (non-alcoholic, of course!), or clock countdown designs. "Cheers to a Sweet New Year! Hot Chocolate Bar Countdown" or "Pop, Fizz, Sip! New Year's Cocoa Celebration."
3. Valentine's Day Love: Infuse romance with hearts, cupids, roses, or soft pinks and reds. "Love is Brewing! Hot Cocoa for My Sweetheart," "Cupid's Cocoa Corner," or "Sip of Love Hot Chocolate Bar."
4. St. Patrick's Day Luck: Go green! Clovers, leprechauns, pots of gold, or rainbow designs are perfect. "Pot of Gold Hot Cocoa Bar," "Lucky Sips & Sweet Treats," or "May Your Cocoa Be Green!" (with a green food coloring option!).
5. Easter & Spring Awakening: Think pastels, bunnies, eggs, chicks, or spring flowers. "Hoppy Easter Hot Cocoa Bar," "Spring into Sweetness," or "Bloom & Sip: Our Garden Cocoa Bar."
6. Summer Fun & Campfire Vibes: Believe it or not, hot chocolate is great in summer too, especially for campfire nights! Your signs can feature campfires, stars, tents, or s'mores elements. "Campfire Cocoa & S'mores," "Summer Night Sips," or "Stay Warm by the Fire: Hot Chocolate Station." I used a "Campfire Cocoa" sign for a summer camping trip, and it was a surprisingly cozy hit!
7. Fall Harvest & Halloween Spooktacular: Embrace autumn leaves, pumpkins, scarecrows, or for Halloween, spooky elements like ghosts, spiders, or witches' cauldrons. "Autumn Harvest Hot Cocoa," "Witch's Brew Hot Chocolate Bar," or "Pumpkin Patch Cocoa."
8. Thanksgiving Gratitude: Focus on themes of thankfulness and togetherness. Leaves, cornucopias, or warm, inviting colors. "Give Thanks & Sip Cocoa," **"Harvest Your Happiness Hot Chocolate Bar,"