Oh, that first day! The crisp new backpack, the perfectly picked outfit, the tiny shoes poised for a giant leap into a new adventure. As a parent, few moments are as bittersweet, as exhilarating, or as deeply emotional as watching your little one embark on their preschool journey. It’s a milestone that marks the beginning of independence, learning, and countless new friendships. And in our modern world, what’s the first thing many of us reach for to commemorate such a moment? A camera, of course! But a photo alone, while wonderful, often yearns for something more – something that captures the essence of that specific day, that fleeting age, that unique personality. That's where the magic of a first day of preschool sign printable comes in.
Trust me when I say, this isn't just about a cute prop for a picture. It’s about creating a tangible memory, a snapshot of time that you’ll look back on for years, marveling at how much they’ve grown. I remember my own daughter's first day. I had meticulously planned her outfit, packed her lunch, and even rehearsed our goodbye. But in the whirlwind of emotions, I almost forgot the sign! A last-minute scramble to find a decent first day of preschool sign printable ended in a rather generic, rushed printout. While the photo is still cherished, I often wish I had put more thought into that sign, making it as special and unique as she was on that momentous morning. That experience ignited my passion for helping other parents avoid that scramble and truly capture the magic.
This comprehensive guide is your personal toolkit for making that first day unforgettable. We’re going to dive deep into everything you need to know about first day of preschool sign printable options, from understanding their emotional significance to practical tips on customization, printing, and even making them a cherished family tradition. Whether you're a first-time parent navigating this exciting new chapter or a seasoned pro looking for fresh ideas, you’ll find actionable advice, creative inspiration, and heartfelt insights right here. Get ready to create not just a sign, but a cherished keepsake that tells a beautiful story.
Table of Contents

- [The Heart Behind the Sign: Why These Printables Matter So Much](#the-heart-behind-the-sign-why-these-printables-matter-so-much)
- [Decoding the Design: Types and Styles of First Day of Preschool Signs](#decoding-the-design-types-and-styles-of-first-day-of-preschool-signs)
- [The Art of Personalization: Making Your Printable Uniquely Theirs](#the-art-of-personalization-making-your-printable-uniquely-theirs)
- [DIY vs. Ready-Made: Navigating Your Printable Options](#diy-vs-ready-made-navigating-your-printable-options)
- [Picture Perfect: Photography Tips with Your First Day Sign](#picture-perfect-photography-tips-with-your-first-day-sign)
- [Beyond Day One: Extending the Tradition with Milestone Signs](#beyond-day-one-extending-the-tradition-with-milestone-signs)
- [Printing Perfection: Troubleshooting and Practical Hacks](#printing-perfection-troubleshooting-and-practical-hacks)
- [Creating a Legacy: Making the First Day Sign a Family Tradition](#creating-a-legacy-making-the-first-day-sign-a-family-tradition)
- [Digital Keepsakes & Sharing: Preserving Memories in the Modern Age](#digital-keepsakes--sharing-preserving-memories-in-the-modern-age)
- [Eco-Conscious Choices: Sustainable First Day Sign Options](#eco-conscious-choices-sustainable-first-day-sign-options)
- [How to Choose the Best First Day of Preschool Sign for Your Needs](#how-to-choose-the-best-first-day-of-preschool-sign-for-your-needs)
- [Common Pitfalls to Avoid When Using a Preschool Sign Printable](#common-pitfalls-to-avoid-when-using-a-preschool-sign-printable)
- [Advanced Tips for Experts: Elevating Your Milestone Photography](#advanced-tips-for-experts-elevating-your-milestone-photography)
- [Conclusion: A Memory Made, A Journey Begun](#conclusion-a-memory-made-a-journey-begun)
---
The Heart Behind the Sign: Why These Printables Matter So Much

The simple act of holding a first day of preschool sign printable might seem trivial, but its significance runs deep. It's more than just a piece of paper; it's a symbol, a memory anchor, and a testament to growth.
1. Commemorating a Milestone: Preschool is often a child's first formal step into the wider world beyond home. It's a huge developmental leap, and a sign visually marks this momentous occasion.
2. Capturing Fleeting Moments: Children grow incredibly fast. This sign captures their age, their tiny hand-drawn dreams, and their unique personality *at that exact moment*. You'll cherish seeing how much they've changed by the end of the year!
3. Emotional Outlet for Parents: For many parents, the first day of preschool is a rollercoaster of emotions – pride, excitement, a touch of sadness, and perhaps a lot of nerves. Preparing the sign can be a therapeutic way to channel these feelings. I remember feeling a lump in my throat filling out "I want to be a unicorn" on my son's sign – it was just so *him* at that age.
4. A Visual Storytelling Tool: The sign tells a story: the date, their age, their favorite things, what they want to be. It adds context and narrative to the photograph, making it richer than just a smiling face.
5. Child Involvement & Excitement: Letting your child help pick or fill out parts of the sign (if age-appropriate) can build excitement and a sense of ownership about starting school. My friend’s little girl was so proud to point to her name on her sign, even though her dad had written it.
6. Creating a Family Tradition: Many families adopt the first day of preschool sign printable as a yearly tradition, creating a visual timeline of their child's educational journey.
7. Shareable Memories: In the age of social media, these signs make for adorable, shareable content for friends and family who want to celebrate your child's big day.
8. Historical Record: Decades from now, these signs will be fascinating glimpses into childhood trends, aspirations, and even handwriting styles.
9. Building Confidence for the Child: For some children, holding a bright, colorful sign can make them feel special and excited about their new adventure, easing separation anxiety.
10. A Sense of Closure and Beginning: The sign helps mark the end of one chapter (toddlerhood) and the exciting beginning of another (preschooler).
11. Reflecting Personality: You can find or create signs that truly reflect your child's interests – whether they love dinosaurs, princesses, superheroes, or simply bright colors.
12. A Source of Future Nostalgia: Imagine pulling out a box of old photos years from now and finding these signs. They’ll instantly transport you back to those precious, fleeting early years.
Decoding the Design: Types and Styles of First Day of Preschool Signs
The world of the first day of preschool sign printable is surprisingly diverse! From minimalist chic to vibrant and whimsical, there’s a style to match every child’s personality and every parent’s aesthetic.
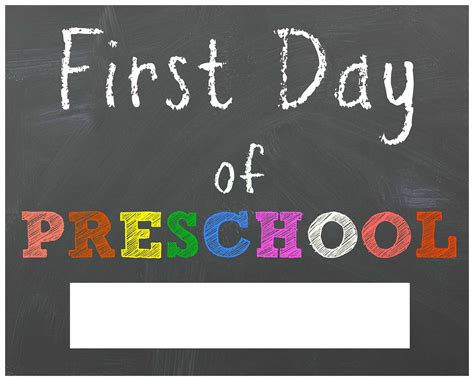
1. Chalkboard Style Printables:
- Description: Mimics the look of a traditional blackboard or chalkboard, often with white or colorful "chalk" text.
- Examples/Points: These are incredibly popular, offering a nostalgic, rustic, yet playful feel. They usually have designated sections for "Name," "Age," "Date," "I Love," "My Teacher," and "When I Grow Up." They often come in various color schemes beyond just black and white.
- Personal Scenario: My sister used a chalkboard style for her son, and it looked so classic and timeless in their photos. It truly gave the impression of a genuine, hand-drawn sign.
2. Bright & Colorful Designs:
- Description: Features vibrant hues, playful fonts, and often illustrations of school supplies, animals, or abstract shapes.
- Examples/Points: Perfect for capturing the joyful, energetic spirit of young children. These are fantastic for making the photos pop and adding a cheerful vibe. Look for designs with rainbows, stars, or friendly monsters.
3. Minimalist & Modern:
- Description: Clean lines, simple fonts, and often monochromatic or muted color palettes. Focus is on clear information.
- Examples/Points: Ideal for parents who prefer a more sophisticated, less "busy" look. These signs emphasize clarity and elegance, letting your child's bright smile be the main focus. Think sans-serif fonts and understated graphics.
4. Themed Printables:
- Description: Centered around specific interests like dinosaurs, princesses, superheroes, space, unicorns, or specific cartoon characters.
- Examples/Points: These are fantastic for personalizing the sign to your child's current obsession. If your little one is obsessed with mermaids, a mermaid-themed sign will make them light up!
- Personal Scenario: For my niece who was mad about dinosaurs, we found a sign with little T-Rexes and Triceratops, and she absolutely adored it. It made her even more excited for her big day.
5. "All About Me" Style Signs:
- Description: Features prompts for more detailed information about the child's personality, beyond just their age and school.
- Examples/Points: These might include sections for "My Favorite Food," "My Best Friend," "What I Want to Learn," "My Favorite Book," or "My Favorite Color." They capture more of their unique personality.
6. Handprint/Footprint Integration:
- Description: Designs that include a designated space for your child's handprint or footprint, often painted.
- Examples/Points: Adds an incredibly personal and tactile element to the sign. It’s a wonderful way to capture just how tiny those hands or feet were. Just be prepared for a little mess!
7. Photo Collage Style:
- Description: Incorporates spaces for small photos alongside the text, perhaps of their favorite toy, pet, or family members.
- Examples/Points: A unique way to add more visual context to the sign, showcasing aspects of their life that are important to them right now.
8. Interactive/Fill-in-the-Blank:
- Description: Designed with blank spaces for you or your child to handwrite in details.
- Examples/Points: This adds a personal touch and can be a sweet way to involve older preschoolers in the creation process. The handwritten element makes it feel more authentic and less "template-y."
9. Vintage or Retro Inspired:
- Description: Uses fonts and color palettes reminiscent of past decades, offering a charming, timeless appeal.
- Examples/Points: Think muted tones, classic schoolhouse imagery, or distressed textures. These can be wonderfully nostalgic.
10. Seasonal/Thematic (e.g., Fall-themed):
- Description: Incorporates elements related to the season the school year begins, like autumn leaves, pumpkins, or summer motifs.
- Examples/Points: If your preschool starts in the fall, a sign with subtle fall foliage can be a lovely touch, tying the sign to the time of year.
11. Multilingual Options:
- Description: Signs available in languages other than English, or with space to add dual language information.
- Examples/Points: Important for diverse families who want to honor their heritage or introduce their child to multiple languages from day one.
12. Cartoon Character Licensing:
- Description: Features popular characters from children's shows or movies (e.g., Paw Patrol, Disney characters).
- Examples/Points: While sometimes requiring a purchase or specific licensing, these can be a huge hit with kids who adore certain characters.
The Art of Personalization: Making Your Printable Uniquely Theirs

A first day of preschool sign printable truly shines when it reflects your child’s unique spirit. Personalization is key to turning a generic template into a cherished family heirloom.
1. Involve Your Child (Age Appropriately):
- Examples/Points: For older preschoolers, ask them what they want to be when they grow up, their favorite color, or what they’re most excited about. Let them pick the font style or a decorative element. Even letting them pick the color of the marker can make a difference.
2. Handwritten Touches:
- Examples/Points: Even if you use an editable template, consider leaving a few sections blank to fill in by hand. Their name written by you, or their aspirations scribbled by them (if they can write), adds an incredibly personal and authentic touch.
3. Incorporate Their Current Interests/Fandoms:
- Examples/Points: If they're obsessed with dinosaurs, add a small dinosaur sticker or drawing to the sign. If they love space, print out a small planet graphic to glue on. This makes the sign immediately resonate with them.
- Personal Scenario: My nephew was going through a serious "train phase" when he started preschool. His mom found a plain sign and then let him decorate the border with train stickers. He was absolutely thrilled to show it off!
4. Add a Personal Photo:
- Examples/Points: Some signs have a small space for a photo. Print a tiny picture of them with their favorite toy, pet, or a silly face to glue onto the sign.
5. Use Their Favorite Colors:
- Examples/Points: If you're designing your own, use a color palette that includes your child's favorite colors. If using a pre-made one, choose a design that aligns with their preferred hues.
6. Include a Quirky Detail:
- Examples/Points: Instead of just "favorite food," maybe "favorite snack for a road trip." Or "my favorite animal sound." These small, unique details make the sign more memorable and specific to *their* personality.
7. Date and Location Specificity:
- Examples/Points: Don't just put "August 2024." Include the full date and the name of their preschool. This adds precision to the memory.
8. Future Aspirations (Humorous or Heartfelt):
- Examples/Points: The "When I Grow Up" section is a goldmine for cuteness. Encourage silly answers like "a dinosaur" or "a cloud" alongside more conventional ones. These are often the most cherished details years later.
9. A "Message from Mom/Dad" Section:
- Examples/Points: Create a small dedicated space where you can write a brief, heartfelt message to your child about this milestone. This turns it into a direct communication and a true keepsake.
10. Hand-Drawn Elements:
- Examples/Points: Even if you print a template, consider adding a quick hand-drawn doodle by you or your child. A small heart, a star, or a happy face.
11. Texture and Embellishments:
- Examples/Points: After printing, consider adding glitter glue, puff paint, or small craft embellishments (stickers, googly eyes, ribbon) to make it more tactile and visually interesting.
12. Focus on What Makes Them Unique:
- Examples/Points: Instead of generic "I love to play," perhaps "I love building tall towers" or "I love splashing in puddles." Specificity makes it shine.
DIY vs. Ready-Made: Navigating Your Printable Options
When it comes to getting your first day of preschool sign printable, you essentially have two main paths: designing it yourself from scratch (DIY) or using a pre-made template. Both have their merits, depending on your time, budget, and creative inclination.
### The DIY Route: Crafting Your Own Masterpiece
1. Pros of DIY:
- Total Customization: You have complete control over every element – fonts, colors, layout, graphics. This ensures the sign is 100% unique to your child.
- Cost-Effective: If you have design software (even free ones like Canva or Google Slides), it can be cheaper than purchasing a template.
- Creative Outlet: For those who enjoy design, it's a fun project.
- Personal Touch: The effort put into creating it yourself adds an extra layer of love.
2. Cons of DIY:
- Time-Consuming: Can take a significant amount of time, especially if you're not experienced with design software. This is definitely not the route for the night-before scramble!
- Requires Design Skills: You'll need a basic understanding of layout, typography, and color theory to make it look good.
- Software Access: You'll need access to design software (Canva, PicMonkey, Adobe Express, Google Slides/Docs, Microsoft Word/Publisher).
3. Examples/Points for DIY:
- Using Canva: Excellent for beginners, tons of free elements and templates to start from. Easy drag-and-drop interface.
- Google Slides/Docs: Surprisingly versatile for simple designs. You can insert text boxes, shapes, and images.
- Microsoft Word/Publisher: Good for basic layouts and text manipulation.
- Hand-Drawn & Scanned: If you're artistic, draw it by hand, scan it, and then print. This offers a truly unique, organic feel.
- Incorporating Personal Art: Let your child draw pictures, scan them, and add them to the digital design.
- Personal Scenario: I once tried to DIY a sign in PowerPoint. It took me way longer than I anticipated, and while it was functional, it definitely didn't have the polished look of a professional template. Live and learn!
### The Ready-Made Route: Convenience and Professionalism
1. Pros of Ready-Made:
- Time-Saving: Instant download and print, or quick editing. Ideal for busy parents.
- Professional Design: Created by graphic designers, ensuring a polished, aesthetically pleasing look.
- Variety: Thousands of options available online, catering to every style and theme imaginable.
- User-Friendly: Many come as editable PDFs or templates that require minimal fuss.
2. Cons of Ready-Made:
- Cost: While often affordable, they aren't free. Prices can range from a few dollars to higher for highly customized or bespoke designs.
- Less Unique: While there are many options, thousands of other parents might be using the exact same design.
- Limited Customization: You're usually limited to changing text, not the overall design elements (unless specified).
3. Examples/Points for Ready-Made:
- Etsy: A treasure trove of designers offering unique, often editable, first day of preschool sign printable options. Many support small businesses.
- Pinterest: A fantastic visual search engine to find free printables (often linked to blogs or freebie sites). Be mindful of quality and licensing.
- Dedicated Printable Websites: Many parenting blogs or craft sites offer free or paid printables.
- Editable PDF Templates: These are common. You download the PDF and type your information directly into designated fields using Adobe Reader.
- Corjl or Templett Links: Some sellers provide a link to an online editor where you can customize the sign directly in your browser before downloading.
- Free Printables: Often simpler designs, but perfect if you're on a budget and just need something quick and effective. Do a quick search for "free first day of preschool sign printable."
- Personal Scenario: For my second child, I bought an editable template from Etsy. It was so easy – I just typed in the details, printed it, and within 10 minutes, I had a beautiful, professional-looking sign. It saved my sanity!
Which Path to Choose?
If you have ample time, a creative spark, and some familiarity with design software, DIY can be a rewarding experience. However, for most busy parents, a high-quality, ready-made first day of preschool sign printable offers unparalleled convenience and a professional finish without the stress. My subjective opinion? For ease and a beautiful result, a well-designed editable template is often the best choice, especially when you're juggling a million other first-day preparations.
Picture Perfect: Photography Tips with Your First Day Sign
The first day of preschool sign printable is, at its core, a photo prop. Getting that perfect shot requires a little planning, but the results will be priceless.
1. Choose the Right Location:
- Examples/Points: Natural light is your best friend! Stand near a window, or better yet, outside in a shaded area (to avoid harsh shadows and squinting). Avoid busy backgrounds; a plain wall, a simple bush, or even just the sky works well.
- Personal Scenario: I learned this the hard way trying to take a photo in our dimly lit hallway. The result was grainy and sad. Moving to the front porch made all the difference!
2. Timing is Everything (Almost):
- Examples/Points: Take photos *before* leaving for school, when emotions aren't running high, and the child is still fresh. If they're a morning person, do it right after breakfast. If they need a bit to wake up, give them some time.
3. Hold the Sign Correctly:
- Examples/Points: Ensure the child holds the sign securely with both hands. It should be legible and not covering their face or body too much. You might need to help them position it.
4. Get Down to Their Level:
- Examples/Points: Kneel or sit down so you're shooting at eye level with your child. This makes the photo more engaging and intimate.
5. Capture Different Expressions:
- Examples/Points: Don't just aim for a perfect smile. Take photos of them looking thoughtful, giggling, making a silly face, or even looking a little nervous. These authentic expressions are truly precious.
6. Include Props (Optional):
- Examples/Points: A new backpack, lunchbox, or even their favorite stuffed animal can add context and personality to the photo. Just don't let them overshadow the child or the sign.
7. Take Many Shots:
- Examples/Points: Digital cameras and phones make this easy. Take a burst of photos! You'll have more options to choose from, increasing your chances of getting that perfect shot.
8. Mind the Glare:
- Examples/Points: If your sign is laminated or in a frame, watch out for glare from windows or lights. Adjust your position slightly to minimize reflections.
9. Consider a "Before & After":
- Examples/Points: Take a photo with the sign on the first day, and then again on the last day of preschool. The comparison of growth is astounding and incredibly moving.
10. Focus on the Eyes:
- Examples/Points: Ensure your camera's focus is on your child's eyes. Sharp eyes make a photo immediately more captivating.
11. Don't Forget the Details:
- Examples/Points: Besides the main photo, grab some close-ups of their little hands holding the sign, their new shoes, or the details on their backpack. These small shots add to the overall memory.
12. Be Patient and Flexible:
- Examples/Points: Little ones can be unpredictable. If they're not cooperating, take a break, try again later, or just capture what you can. The memory of trying to get the photo can be just as sweet as the photo itself! Don't let the quest for perfection overshadow the joy of the moment.
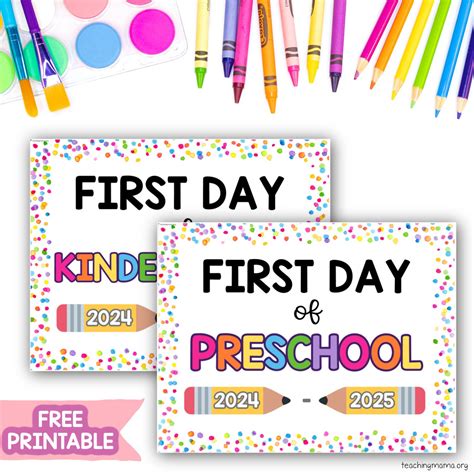
Beyond Day One: Extending the Tradition with Milestone Signs
While the first day of preschool sign printable is iconic, the concept doesn't have to end there! Extending this tradition can create a beautiful, evolving record of your child's growth.
1. First Day of *Every* School Year:
- Examples/Points: Make it a yearly ritual. Create or find a new sign for kindergarten, first grade, and all the way up through high school. It's incredible to see the progression.
2. Last Day of School Signs:
- Examples/Points: A popular counterpart to the first day sign. These often include details like "I learned..." or "My favorite memory was..." and are perfect for comparing with the first day photo.
3. Preschool Graduation Signs:
- Examples/Points: If your preschool has a "graduation" ceremony, a special sign commemorating this transition can be a lovely touch.
4. Monthly Milestone Signs (Infants/Toddlers):
- Examples/Points: While not strictly preschool, this is where many parents start. You can use similar printable concepts for 1 month, 6 months, 1 year, etc., capturing early developmental milestones.
5. Birthday Interview Signs:
- Examples/Points: Instead of school, create a sign for each birthday, asking similar "All About Me" questions. It's fascinating to see how their answers change year to year.
- Personal Scenario: For my son's 5th birthday, I created a sign that asked "What do you want for your birthday?" His answer: "A pet dragon and a giant gummy bear." Priceless!
6. "Lost a Tooth" Signs:
- Examples/Points: A fun, smaller milestone to capture. A simple printable can mark this exciting childhood event.
7. Holiday-Themed Signs:
- Examples/Points: "My First Christmas," "Happy Easter," etc., can be cute for holiday photos, especially for younger kids.
8. Special Achievement Signs:
- Examples/Points: Did they learn to ride a bike? Master a new skill? A simple printable can mark these personal triumphs.
9. First Day of Summer Camp/Activity Signs:
- Examples/Points: Extend the concept to other important "firsts," like their first day at summer camp, dance class, or soccer practice.
10. Family Vacation Signs:
- Examples/Points: Create a sign for a significant family trip (e.g., "Our First Trip to Disney World"). Hold it up in front of a landmark.
11. Pet Milestones (for the truly dedicated!):
- Examples/Points: If your family is pet-obsessed, why not a "First Day of Puppy Obedience School" sign? Just for fun!
12. Digital Albums & Yearbooks:
- Examples/Points: Collect all these milestone photos with their signs into a digital album or even print a small yearly "yearbook" to show their progression.
Printing Perfection: Troubleshooting and Practical Hacks

You’ve found or designed the perfect first day of preschool sign printable. Now, how do you get it from screen to paper looking its best? Printing might seem straightforward, but a few tips can make a big difference.
1. Paper Choice Matters:
- Examples/Points:
- Cardstock: Your best bet. Use heavy cardstock (65-110 lb) for durability. It prevents curling, looks professional, and holds up well for photos.
- Matte Photo Paper: Can give a nice, non-glossy finish that reduces glare in photos.
- Avoid Regular Printer Paper: It's too flimsy and will look cheap.
- Personal Scenario: I once used regular paper for a birthday sign, and it wrinkled and bent within minutes. Never again!
2. Printer Settings are Key:
- Examples/Points:
- "Best" or "Photo Quality": Always select the highest print quality setting on your printer.
- "Actual Size" or "100% Scale": Ensure the print dialogue box is set to print at actual size, not "fit to page," to avoid distortion.
- Color Profile: If your printer has color calibration options, ensure they are set for vibrant, accurate colors.
3. Check Ink Levels:
- Examples/Points: Nothing worse than running out of ink halfway through printing a vibrant sign. Do a test print or check levels beforehand.
4. Consider Professional Printing:
- Examples/Points: If you want truly vibrant colors and professional quality, consider sending the file to a local print shop (e.g., FedEx Office, Staples, local print stores). They can print on large formats (11x14, 16x20) and on thick, quality paper.
- Personal Scenario: For my son's kindergarten sign, I had it printed at a local print shop on heavy matte board. It cost a little more, but it looked incredibly sharp and professional.
5. Lamination for Durability:
- Examples/Points: If you plan to reuse the sign (e.g., for multiple children) or want it to last as a keepsake, consider laminating it. Many print shops offer this service, or you can buy a small home laminator.
6. Frame It or Mount It:
- Examples/Points: For a more polished look and easier handling, place the printed sign in a simple picture frame (without the glass to avoid glare). Alternatively, mount it onto a foam board or cardboard using spray adhesive.
7. Size Matters:
- Examples/Points: Most printables are designed for standard 8.5x11 inch paper. However, larger sizes (like 11x14 or 16x20) can make a bigger impact in photos, especially if your child is holding it from a distance. Check the file's recommended print size.
8. Test Print (If Possible):
- Examples/Points: If you've customized a sign, do a quick draft print on plain paper first to check for any errors, typos, or layout issues before using your good cardstock.
9. Calibrate Your Monitor:
- Examples/Points: Colors on your screen might look different when printed. If you're very particular, you can calibrate your monitor for color accuracy, though this is usually for more advanced users.
10. Troubleshooting Blurry Prints:
- Examples/Points: If your print is blurry, check the resolution of the original file. Low-resolution images will always print poorly. Ensure your printer drivers are up to date.
11. Edge-to-Edge Printing:
- Examples/Points: If your design has colors or patterns that extend to the edge of the page, ensure your printer is capable of "borderless" or "edge-to-edge" printing, or you'll have a white margin.