Hey there, fellow adventurer! Are you feeling that familiar tug, that whisper of mystery calling you to embark on a new creative quest? Perhaps you’ve been rewatching Gravity Falls for the tenth time, or maybe you’re just itching to bring a piece of that quirky, heartwarming world into your own. Whatever your reason, if you’ve landed here searching for "dipper and mabel printable 3d box," you’re in exactly the right place. Trust me, you’re about to discover a treasure trove of information that will transform your crafting dreams into a tangible reality.
I remember the first time I stumbled upon the idea of a printable 3D box for Dipper and Mabel. It was late one night, deep into a Gravity Falls rewatch session (you know the kind, where you suddenly notice all the hidden clues and Easter eggs you missed before!). I thought, "Wouldn't it be amazing to have a little piece of the Mystery Shack, or perhaps a journal, in 3D?" But finding the right template, understanding the materials, and actually putting it together seemed like navigating the Oregon wilderness blindfolded. It felt like deciphering one of Grunkle Stan's shadiest schemes – confusing and a little overwhelming. That initial struggle sparked a passion, leading me to hours of research, countless crafting sessions, and a deep dive into the incredible fan community that surrounds this topic. My goal with this guide is to be your very own Journal 3, illuminating every step of the process so you can avoid the pitfalls I encountered and jump straight into the fun part: creating something truly magical.
This isn't just about printing and folding; it's about connecting with a beloved story, flexing your creative muscles, and perhaps even sharing a piece of your fandom with someone special. Whether you're a seasoned papercraft wizard or someone who just learned what a "tab" is, we're going to explore every facet of creating your very own Dipper and Mabel-themed 3D box. We’ll cover everything from finding the perfect template to advanced customization techniques, troubleshooting common hiccups, and even how to make your creation truly shine. So grab your glue stick, sharpen your scissors, and let's unravel the secrets of the "dipper and mabel printable 3d box" together!
---
Table of Contents

- [The Core Quest: Understanding Your Dipper & Mabel 3D Box Journey](#the-core-quest-understanding-your-dipper--mabel-3d-box-journey)
- [Unlocking the Mystery: Finding the Perfect Printable Files](#unlocking-the-mystery-finding-the-perfect-printable-files)
- [The Crafting Chronicles: Essential Tools & Materials for Your Adventure](#the-crafting-chronicles-essential-tools--materials-for-your-adventure)
- [Beyond the Blueprint: Mastering the Art of Assembly](#beyond-the-blueprint-mastering-the-art-of-assembly)
- [Personalizing Your Portal: Customization Ideas for Ultimate Fan Flair](#personalizing-your-portal-customization-ideas-for-ultimate-fan-flair)
- [Displaying Your Discovery: Creative Ways to Showcase Your Box](#displaying-your-discovery-creative-ways-to-showcase-your-box)
- [Troubleshooting Tales: Conquering Common Crafting Conundrums](#troubleshooting-tales-conquering-common-crafting-conundrums)
- [Sharing the Secrets: Community & Collaborative Crafting](#sharing-the-secrets-community--collaborative-crafting)
- [The Gravity Falls Crafting Universe: Expanding Your Horizons](#the-gravity-falls-crafting-universe-expanding-your-horizons)
- [How to Choose the Best Dipper and Mabel Printable 3D Box for Your Needs](#how-to-choose-the-best-dipper-and-mabel-printable-3d-box-for-your-needs)
- [Common Pitfalls to Avoid When Crafting Your Dipper and Mabel 3D Box](#common-pitfalls-to-avoid-when-crafting-your-dipper-and-mabel-3d-box)
- [Advanced Tips for Experts: Elevating Your Dipper and Mabel 3D Box Craft](#advanced-tips-for-experts-elevating-your-dipper-and-mabel-3d-box-craft)
- [Conclusion: Your Adventure Continues!](#conclusion-your-adventure-continues)
---
The Core Quest: Understanding Your Dipper & Mabel 3D Box Journey
Before we dive headfirst into cutting and folding, let's take a moment to truly understand what a "dipper and mabel printable 3d box" is and why it's such a fantastic project. It's more than just paper; it's a tangible piece of the Gravity Falls universe, a testament to your fandom, and a wonderfully accessible crafting project.
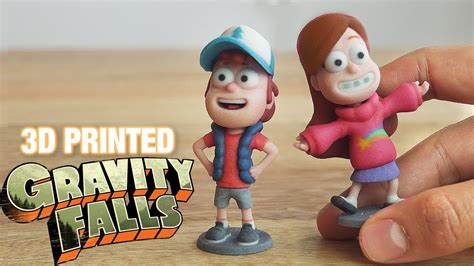
1. What Exactly is a Printable 3D Box? At its heart, a printable 3D box is a flat, two-dimensional template that, once printed, cut, and folded, transforms into a three-dimensional object. For our purposes, this object will be themed around Dipper and Mabel, or other iconic elements from Gravity Falls. Think of it as a paper sculpture, designed with precision to come alive with a bit of elbow grease and a whole lot of heart. It could be a simple cube with character art, a miniature Mystery Shack, or even a replica of Journal 3.
2. Why Choose a Dipper and Mabel Theme? Gravity Falls, with its rich lore, memorable characters, and iconic imagery, lends itself perfectly to this kind of project. Dipper's inquisitive nature and Mabel's boundless optimism and love for all things sparkly provide endless inspiration. A "dipper and mabel printable 3d box" isn't just a craft; it's a small piece of that incredible storytelling you can hold in your hands. It’s a way to celebrate your love for the show in a unique, hands-on manner.
3. The Joy of DIY: Crafting on Your Own Terms. One of the greatest appeals of a printable 3D box is the DIY aspect. You're not just buying a finished product; you're creating it. This journey from a flat sheet of paper to a fully formed box is incredibly satisfying. It’s a project you can do at your own pace, with materials you likely already have or can easily acquire. This freedom makes it perfect for a relaxed weekend activity or a fun project with friends.
4. Beyond Decoration: Practical Uses for Your Box. While often seen as decorative, a well-made "dipper and mabel printable 3d box" can be surprisingly functional. It can serve as a unique gift box for a fellow fan, a quirky desk organizer for small items like paperclips or sticky notes, or even a charming prop for a Gravity Falls-themed party. Imagine tucking a small, mysterious note inside a miniature Journal 3 box!
5. A Gateway to More Complex Papercrafts. For beginners, completing a "dipper and mabel printable 3d box" can be a fantastic introduction to the wider world of papercraft. The techniques learned – precise cutting, scoring, folding, and gluing – are fundamental to more complex origami, paper models, and even intricate pop-up cards. It's a stepping stone that builds confidence and skill.
6. Connecting with Fandom: A Shared Experience. Crafting a "dipper and mabel printable 3d box" isn't just a solitary activity. It's a way to connect with the Gravity Falls community. Sharing your creations online, discussing techniques, or even crafting together in a group fosters a sense of camaraderie and shared passion. I once posted a photo of a simple Dipper-themed box I made, and the comments I received, sharing similar projects and excitement, were truly heartwarming. It felt like finding fellow Pines family members!
7. Cost-Effective Creativity. Compared to buying official merchandise, creating your own "dipper and mabel printable 3d box" is incredibly budget-friendly. All you typically need is paper, a printer, scissors, and glue. This makes it an accessible hobby for everyone, regardless of their budget. You can achieve fantastic results without breaking the bank, leaving more room for, say, buying a new grappling hook!
8. Patience and Precision: Skills You'll Hone. While it's a fun project, it also subtly hones important skills. The act of carefully cutting along lines, scoring precisely, and aligning tabs develops patience and attention to detail. These are valuable skills not just in crafting, but in many aspects of life. It’s a mindful activity that encourages focus.
9. The Satisfaction of Creation. There's an unparalleled sense of satisfaction that comes from holding a finished "dipper and mabel printable 3d box" in your hands, knowing you created it from scratch. It's a tangible representation of your effort and creativity, and a little piece of the supernatural world brought to life by your own hands. This feeling alone makes the entire process incredibly rewarding.
10. Educational Fun for All Ages. For younger fans, this project can be an excellent way to develop fine motor skills, follow instructions, and engage with a beloved story in a hands-on way. For adults, it's a wonderful stress-reliever and a chance to indulge in a bit of nostalgic fun. It truly bridges the gap between different age groups, making it a perfect family activity.
11. A Unique Gift Idea. If you're looking for a personalized gift for a Gravity Falls enthusiast, a handmade "dipper and mabel printable 3d box" is an absolute winner. It shows thought, effort, and a deep understanding of their interests. Imagine filling a custom-made Journal 3 box with small candies or a handwritten note – that's a gift truly from the heart.
12. Understanding Different Box Types. Not all 3D boxes are created equal! You'll encounter various forms: simple cube boxes, pyramid boxes, rectangular boxes (perfect for Journal 3), pillow boxes, or even more complex geometric shapes. Understanding these variations will help you choose the ideal template for your vision. The simpler cube or rectangular boxes are excellent starting points for beginners, while the more intricate designs offer a delightful challenge for experienced crafters.
---
Unlocking the Mystery: Finding the Perfect Printable Files

The first step in creating your "dipper and mabel printable 3d box" is, naturally, finding the template itself. Think of these templates as the blueprints to your very own Mystery Shack – without them, you’re just guessing! The internet is a vast and mysterious place, much like the woods surrounding Gravity Falls, so knowing where to look for reliable, high-quality printables is key.
1. DeviantArt: A Treasure Trove of Fan Creations. DeviantArt is a fantastic starting point. It’s a community platform where artists share their work, and many talented fans have uploaded their "dipper and mabel printable 3d box" templates. Use specific search terms like "Gravity Falls papercraft," "Dipper Mabel 3D box template," or "Journal 3 printable box" to narrow down your search. Always check the artist's description for usage rights (personal use is usually fine, but commercial use is often restricted). I’ve found some incredibly detailed Journal 3 box templates here that look almost identical to the show's prop.
2. Pinterest Power: Visual Inspiration and Links. Pinterest acts like a visual search engine and a fantastic mood board for crafters. Search for "dipper and mabel printable 3d box" or "Gravity Falls DIY." You'll find a plethora of images, many of which link directly back to the original source (like a blog post, an Etsy shop, or a DeviantArt page) where you can download the template. It's great for discovering new designs you might not have thought of.
3. Etsy: Supporting Independent Designers. Many talented designers sell their printable templates on Etsy. While these usually come with a small fee, you're often paying for high-quality, professionally designed files that are easy to use and produce excellent results. This is a great option if you want something unique or if you're struggling to find free options that meet your quality standards. A friend of mine bought a "Mystery Shack" printable box template from Etsy, and the detailed textures were just phenomenal.
4. Specialized Papercraft Blogs & Websites. There are numerous blogs and websites dedicated solely to papercraft and DIY projects. A quick Google search for "free printable papercraft templates" combined with "Gravity Falls" or "Dipper and Mabel" can unearth some hidden gems. These sites often provide detailed instructions alongside their downloads, which is a huge bonus for beginners. They sometimes even have video tutorials, which I find incredibly helpful for visualizing the assembly process.
5. Fandom Wikis and Fan Forums. Sometimes, dedicated Gravity Falls fan wikis or forums will have sections for fan creations, including printables. These are often shared directly by fellow fans, and you might find templates for very specific, niche items from the show that aren't available elsewhere. The community aspect here is a definite plus for getting advice or sharing your progress.
6. Image Search Engines (with Caution). Using Google Images or similar search engines can sometimes lead you directly to a printable. However, be cautious here. Always try to trace the image back to its original source to ensure you're getting a legitimate, high-resolution file and to respect the creator's work. Avoid simply printing an image you find without knowing its origin, as quality can be poor and you might be infringing on rights.
7. Consider Different Box Styles. When searching, remember that "box" can mean many things. Are you looking for a simple cube, a rectangular prism like Journal 3, a pyramid, or something more intricate? Specificity in your search terms ("Journal 3 printable box," "Mystery Shack 3D model") will yield better results. For instance, I once spent ages looking for a simple cube box, only to realize I needed a "gift box template" for the size I wanted.
8. Checking File Formats. Most printable templates come in PDF format, which is ideal for printing. Some might be JPG or PNG images. Ensure your printer can handle the file type. If you encounter a more complex file like an SVG (for cutting machines), make sure you have the necessary software or consider if it’s truly what you need for a simple papercraft project.
9. Resolution is Key. Always check the resolution of the image or PDF. A low-resolution file will result in a blurry, pixelated print, no matter how good your printer is. Look for files that are designed for printing, usually at 300 DPI (dots per inch) or higher. Zoom in on the file before printing to check for crispness.
10. Read Reviews and Comments. If you're downloading from a site with user comments or reviews (like Etsy or DeviantArt), take a moment to read them. Other users' experiences can tell you if the template is easy to use, if there are any issues with the design, or if the instructions are clear. This can save you a lot of frustration later on.
11. Attribution and Respect for Creators. Remember that the people who create these templates put a lot of time and effort into their work. If you download a free template, consider leaving a comment, sharing their work (with proper attribution), or even donating if they offer the option. It’s a small way to show appreciation and encourage more fantastic fan creations.
12. Safety First: Malware and Adware. When downloading anything from the internet, always be mindful of potential malware or excessive adware. Stick to reputable sites, use ad blockers if necessary, and ensure your antivirus software is up to date. This is less common for simple PDFs but always a good practice.
---
The Crafting Chronicles: Essential Tools & Materials for Your Adventure

Alright, you’ve found your perfect "dipper and mabel printable 3d box" template – excellent! Now, it’s time to gather your supplies. Think of this as preparing your expedition kit before venturing into the strange and mysterious woods of Gravity Falls. Having the right tools makes all the difference between a frustrating mess and a perfectly crafted masterpiece.
1. The Printer: Your Portal to the Paper Realm. This one's obvious, but crucial. You'll need a working color printer. While an inkjet printer is perfectly fine for most projects, a laser printer can offer sharper lines and more vibrant, smudge-resistant colors, especially if you're using glossier paper. Ensure your ink cartridges are full – running out mid-print is like encountering a gnomes’ rebellion without your trusty leaf blower!
2. Paper: The Foundation of Your Creation. This is perhaps the most important material.
- Cardstock (65-110 lb / 176-300 gsm): This is your go-to. It's much sturdier than regular printer paper and will give your 3D box the necessary rigidity to hold its shape. Thicker cardstock (like 110 lb) is great for larger, more structural boxes, while 65-80 lb is good for smaller, intricate designs. Don't use regular printer paper (20 lb); your box will be floppy and sad, like Waddles after a bad dream.
- Glossy vs. Matte: Glossy cardstock can make colors pop and give a professional finish, especially for designs with vibrant character art. Matte cardstock offers a more subdued, natural look and is easier to write on if you plan to add personal messages.
- Pro Tip: Always do a test print on plain paper first to check sizing and color accuracy before committing to your good cardstock.
3. Scissors: Your Trusty Blade. A good pair of sharp, fine-tipped scissors is essential for precise cutting. If you have detail scissors, even better! For larger, straight cuts, a craft knife (X-Acto knife) and a cutting mat are highly recommended. This combination offers unparalleled precision, especially for intricate designs or if you want perfectly straight edges. Trust me, trying to cut a straight line with blunt scissors is like trying to convince Grunkle Stan to be honest – nearly impossible and often ends in frustration.
4. Craft Knife/X-Acto Knife and Cutting Mat: Precision Power-Ups. For the sharpest, cleanest lines, especially on straight edges or interior cut-outs, a craft knife is indispensable. Always use it on a self-healing cutting mat to protect your work surface and keep your blade sharp. This tool elevates your precision significantly.
5. Ruler: The Straight Edge of Justice. A metal ruler is best when using a craft knife, as plastic rulers can get nicked. It's crucial for guiding your cuts and, even more importantly, for scoring fold lines accurately.
6. Scoring Tool: The Secret to Crisp Folds. This is where many beginners miss a trick! Scoring creates a crease along your fold lines, allowing the paper to fold cleanly and crisply without cracking or buckling. You can use a dedicated scoring tool, a dull butter knife, an empty ballpoint pen, or even the back of your craft knife blade (very gently!). A bone folder is also fantastic for crisping up folds after they’re made. This step is a game-changer for a professional-looking "dipper and mabel printable 3d box." My first few boxes looked like they'd been in a fight with a gremoblin until I discovered the magic of scoring.
7. Adhesive: The Bonds That Hold.
- Craft Glue (PVA Glue): My personal go-to. It provides a strong, lasting bond and allows for a little repositioning time. Look for quick-drying, clear-drying formulas. Apply sparingly with a fine-tipped applicator or a toothpick.
- Double-Sided Tape: Excellent for quick, mess-free adhesion, especially for smaller tabs. Ensure it's strong and acid-free if longevity is a concern.
- Glue Stick: Good for very light, temporary holds or for attaching larger, flat decorative pieces. Not ideal for structural bonds as it can be weak.
- Hot Glue (Use with Caution): Dries instantly and is very strong, but can be messy and create bulky seams. Best for attaching embellishments rather than structural elements of the box itself.
8. Tweezers (Optional, but Handy): For intricate designs or small tabs, tweezers can be a lifesaver for holding and positioning tiny pieces.
9. Bone Folder (Optional, but Recommended): After folding, a bone folder (or the back of a spoon) can be used to press down on the crease, making it super sharp and professional-looking. This adds a level of polish that really makes your "dipper and mabel printable 3d box" stand out.
10. Small Container for Glue (Optional): If using liquid glue, pouring a small amount into a disposable cap or dish makes it easier to apply with a toothpick or small brush, preventing over-application.
11. Pencil and Eraser: For marking cut lines or fold lines *before* scoring, especially if you're modifying a template. Make sure it's a light pencil mark that can be easily erased.
12. Clean Work Surface: A well-lit, clean, and stable work area is crucial. You don't want to get dirt or dust on your pristine paper, and a wobbly table is a recipe for crooked cuts and frustration. Clear your area, put on some Gravity Falls background music, and get ready to create!
---
Beyond the Blueprint: Mastering the Art of Assembly

You've got your template, your tools, and your enthusiasm! Now comes the exciting part: bringing your "dipper and mabel printable 3d box" to life. This is where the magic happens, transforming flat paper into a dimensional masterpiece. Precision and patience are your best friends here, like Dipper and Mabel themselves!
1. Print with Purpose: Settings Matter. Don't just hit print!
- Scale: Ensure your printer settings are set to print at "Actual Size" or "100% scale," not "Fit to Page." If you don't, your box might end up disproportionate or too small/large for its intended use. I once printed a Journal 3 box at "Fit to Page" and it came out tiny, only fit for a hamster!
- Quality: Select the highest print quality setting for vibrant colors and sharp details.
- Paper Type: If your printer allows, select "Cardstock" or "Heavy Paper" in the print settings. This often adjusts the ink saturation and feed mechanism for best results.
2. Cut with Confidence: Precision is Power.
- Outer Lines First: Start by cutting out the entire template, carefully following the solid outer lines. Take your time, especially around curves or intricate shapes.
- Inner Cuts Next: If your design has any internal cut-outs (like a window or a specific shape within the box), do these next. This is where a craft knife shines. Place your template on a cutting mat and use a metal ruler to guide your blade for perfectly straight lines.
- Don't Rush: Rushing leads to jagged edges and mistakes. Think of it like Dipper meticulously researching a creature – every detail matters.
3. Score for Success: The Secret to Sharp Folds. This step is often overlooked by beginners but is *critical* for a professional finish.
- Identify Fold Lines: These are usually indicated by dashed lines or lighter solid lines on your template.
- Use Your Scoring Tool: With a ruler as a guide, gently run your scoring tool along *all* fold lines. You want to create a crease, not cut through the paper. A light, consistent pressure is key.
- Benefit: Scoring prevents the paper from cracking when folded, especially on thicker cardstock, and ensures perfectly crisp, straight folds.
4. Fold with Finesse: The Art of Creasing.
- Mountain and Valley Folds: Most 3D boxes use a combination of "mountain" folds (the crease points upwards like a mountain peak) and "valley" folds (the crease points inwards like a valley). Understanding which is which will be clear from the template design.
- Crease Firmly: Once folded, use a bone folder or the back of a spoon to press down firmly along the crease. This flattens the fold and gives it that professional, sharp edge.
- Fold Away from the Design: For most boxes, you'll fold the tabs *inwards* so they are hidden inside the box. Always test-fold without glue first to ensure everything aligns.
5. Adhere with Accuracy: The Gluing Game.
- Less is More: When it comes to glue, less is definitely more. Applying too much will cause wrinkles, oozing, and a messy final product. A thin, even bead or a light application of tape is all you need.
- Apply to Tabs: Apply glue to the designated tabs (the small flaps designed to be adhered).
- Align Carefully: Press the glued tab against the corresponding edge of the box. Hold firmly for a few seconds to allow the adhesive to bond. For liquid glue, you might need to hold it longer or use small clips or clothespins to secure it while it dries.
- Work Systematically: Start with one corner or seam and work your way around. Don't try to glue everything at once. A common approach is to form the main body of the box first, then attach the top or bottom flaps. I found that gluing the side tabs first, then one bottom flap, then the remaining bottom flaps, worked best for a standard cube.
6. Patience, Young Padawan: Let it Dry! This is perhaps the hardest step for the eager crafter! Resist the urge to poke, prod, or move your box before the glue is completely dry. Rushing this step can lead to your box falling apart, like a poorly planned scheme by Gideon Gleeful. Drying times vary by adhesive, so check your product instructions.
7. Troubleshooting Alignment: If tabs aren't perfectly aligning, don't panic. If the glue is still wet, gently try to reposition. If it's starting to dry, a small amount of carefully applied additional glue can sometimes save it. For stubborn misalignments, a tiny trim with scissors on an offending tab can often fix it without being noticeable.
8. The "Dry Assembly" Test: Before applying any glue, I always recommend doing a "dry assembly." Fold all your pieces and hold them together with tape or paper clips to see how they fit. This allows you to identify any cutting errors or design flaws before committing to glue, saving you potential headaches. It’s like a rehearsal for your Mystery Shack grand opening!
9. Working with Complex Designs: If your "dipper and mabel printable 3d box" template is more intricate (e.g., a specific character shape, or a box with multiple compartments), break it down into smaller, manageable sections. Assemble the simpler parts first, then gradually combine them. Follow the template's instructions meticulously, as complex designs often have a specific assembly order.
10. Cleaning Up Excess Glue: If you do get a little glue squeeze-out, try to wipe it away immediately with a damp cloth (for water-based glues) or a dry cotton swab. Once dry, clear-drying glue can often be carefully scraped away with the edge of a craft knife, but be very gentle not to damage the paper.
11. Practice Makes Perfect: Your first "dipper and mabel printable 3d box" might not be perfect, and that's absolutely fine! Each attempt will teach you something new. The more you practice cutting, scoring, and gluing, the more confident and skilled you'll become. Soon, you'll be assembling boxes with the speed and precision of a multi-bear!
12. Enjoy the Process! Remember, crafting is meant to be fun. Put on some Gravity Falls music, grab a snack, and enjoy the meditative process of bringing your creation to life. The joy is in the journey as much as the destination.
---
Personalizing Your Portal: Customization Ideas for Ultimate Fan Flair
Once you've mastered the basic "dipper and mabel printable 3d box" assembly, it's time to unleash your inner Mabel and add some dazzling flair! Personalization is where your unique fan spirit truly shines, transforming a simple box into a one-of-a-kind Gravity Falls artifact.
1. Add Internal Surprises: Hidden Secrets. Just like the show is full of hidden messages, make your box a discovery! Before closing it up, consider adding a small, secret message inside one of the flaps, a tiny drawing of Bill Cipher, or even a miniature "Question Mark" sticker. For a gift box, tuck in a small, flat piece of candy or a custom-printed "Mystery Shack" dollar bill. I love adding a tiny, hand-drawn "Lil' Gideon was here" note inside my Journal 3 boxes.
2. Glow-in-the-Dark Accents: Supernatural Shine. For a truly spooky touch, use glow-in-the-dark paint pens or stickers for accents. Outline Bill Cipher's eye, add glowing stars, or make the number "3" on Journal 3 eerily luminous. This works particularly well for boxes you plan to display in a dimly lit room or as a Halloween decoration.
3. Fabric or Felt Accents: Tactile Textures. Bring in some tactile elements! Use small pieces of brown felt for a "wood" texture on a Mystery Shack box, or a tiny scrap of fuzzy pink fabric for Mabel's sweater. These small additions add depth and a lovely sensory experience. Just use a strong fabric glue to ensure they stick well.
4. Glitter, Glitter, Everywhere! (Mabel Approved). No "dipper and mabel printable 3d box" is complete without a touch of Mabel's signature sparkle! Use glitter glue, fine glitter powder (applied with a brush and craft glue), or glitter cardstock for accents. A glittery Waddles, or a sparkling shooting star, can truly make your box pop. Just be prepared for the glitter to spread – it's part of the charm!
5. Hand-Drawn Details: Your Artistic Touch. Even if you're not an artist, adding small hand-drawn details can make your box unique. Use fine-tipped markers or gel pens to add extra patterns, small symbols from the show (like the "six-fingered hand" or the "pine tree"), or even tiny speech bubbles. This is where your personal style really comes through.
6. Interactive Elements: Pop-Ups and Pull-Tabs. For the more advanced crafter, consider adding simple pop-up elements inside the box or a pull-tab mechanism that reveals a hidden image. Imagine opening a box and a tiny Bill Cipher pops up, or pulling a tab to reveal a new message. There are many basic pop-up tutorials online that can be adapted.
7. Lamination for Durability and Sheen. If you want your "dipper and mabel printable 3d box" to last longer or have a professional, glossy finish, consider laminating the printed template *before* cutting and assembling. You can use self-adhesive laminating sheets or send it to a print shop. This adds significant durability and a lovely sheen, making it more resistant to moisture and wear.
8. 3D Embellishments: Bringing Characters to Life. Think beyond flat paper! Use small craft foam pieces, polymer clay, or even cut-out cardstock layers to add dimensional elements. For instance, you could layer Dipper's hat or Mabel's grappling hook to make them slightly raised, giving a more dynamic look to your "dipper and mabel printable 3d box."
9. Sound Chips (for the Tech-Savvy): This is for the truly adventurous! You can buy small, recordable sound chips online. Record a classic Gravity Falls quote ("Waddles!") or the theme song, and embed it within the box so it plays when opened or pressed. This truly elevates your "dipper and mabel printable 3d box" into an interactive experience.
10. Adding a "Found Object" Feel: To truly embody the spirit of Gravity Falls, consider incorporating small, found objects or natural elements. A tiny, dried leaf, a small twig, or a piece of twine could be glued onto a "Mystery Shack" themed box for an authentic, rustic feel. Just ensure they are clean and securely attached.
11. Aged Paper Techniques: