Remember those science fair projects that made your eyes glaze over? Or trying to explain complex topics like the human brain to an inquisitive little mind? Trust me, I’ve been there. I once tried to teach my nephew about the cerebrum and cerebellum using only a diagram, and let’s just say his attention span evaporated faster than a water drop on a hot pan. But then, I discovered the magic of the brain hat printable, and everything changed.
This simple yet brilliant tool transforms abstract anatomy into a tangible, wearable, and incredibly engaging experience. Whether you’re a parent looking for a fun educational activity, a teacher seeking an interactive classroom aid, or even just someone who wants a unique costume accessory, you’ve landed in the right place. We’re about to dive deep into how you can make your very own cerebral crown, ensuring a fun, accurate, and truly unforgettable learning adventure.
The Anatomy Ace: Educational Brain Hats
When the goal is to truly understand the different lobes and functions of the brain, a brain hat printable is your secret weapon. These aren't just hats; they're wearable textbooks!
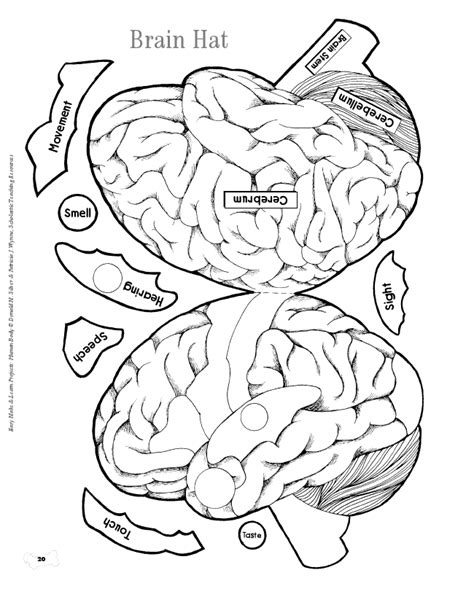
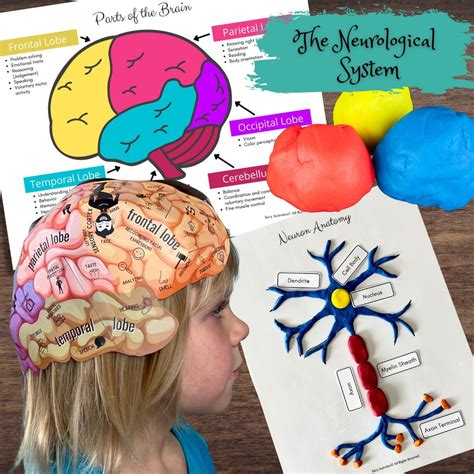
- Basic Lobes Unveiled: A simple, clear printable showing the frontal, parietal, temporal, and occipital lobes. Perfect for introducing the core structures.
- *My experience: I used this version with a group of 2nd graders, labeling each lobe with a different color. They absolutely loved pointing to "their frontal lobe" when asked a question!*
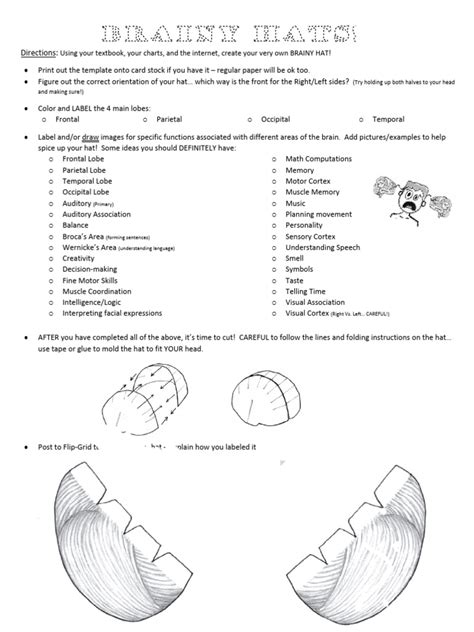
- Functional Regions Highlighted: Printables that go a step further, indicating areas like the motor cortex, sensory cortex, Broca's area, or Wernicke's area.
- Color-Coding for Clarity: Designs where each lobe or section is easily distinguishable, often with suggested colors for shading or painting.
- Cut-and-Paste Labels: Some printables come with separate labels to cut out and glue onto the corresponding brain parts, adding an interactive element.
- The "Brainstem & Cerebellum" Boost: Don't forget these vital lower brain structures! Look for printables that accurately include them at the base of the brain hat.
- Neuron Pathways Simplified: While complex, some advanced printables can illustrate the general direction of neural pathways, perhaps with dotted lines.
- Left vs. Right Hemisphere Focus: A hat that visually separates the two hemispheres, ideal for discussing lateralization.
- The "Neuro-Navigator" Brain Hat: A printable with small, blank sections for kids to write down a function they associate with each part as they learn.
- "What Am I Thinking?" Hat: A fun design that allows you to draw or write what you’re currently processing in different brain areas.
- "Brain Cross-Section" Explained: For a slightly more advanced view, a printable illustrating a simplified internal view once assembled.
Costume & Role Play: Brain Hats for Fun!

Sometimes, it's less about anatomical precision and more about embodying the "brain" for a costume, play, or a quirky photo op. These brain hats are all about the visual impact!
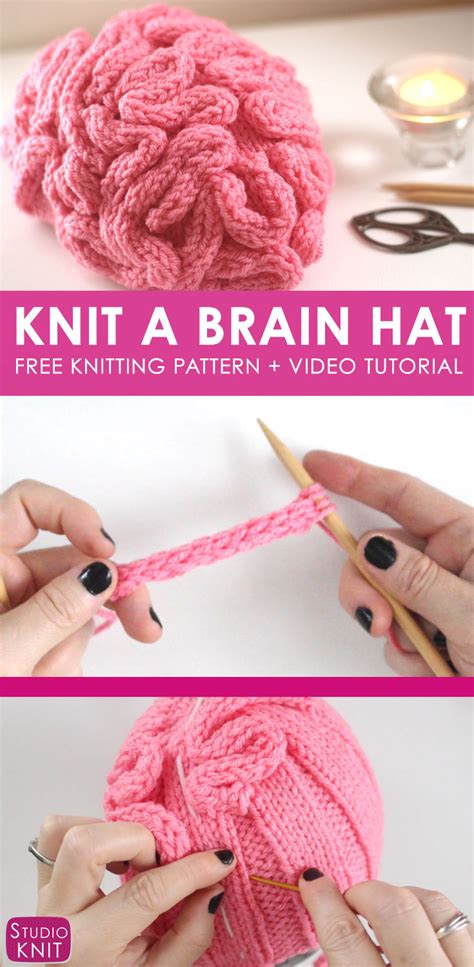
- Classic "Zombie Brain" Look: A simple, bulbous, exposed brain design that's instantly recognizable for Halloween or themed parties.
- *Here’s what I learned the hard way: Make sure the brain's "folds" are deep enough for visual effect, otherwise it just looks like a lumpy white cap!*
- Mad Scientist's Accessory: A slightly more exaggerated, perhaps glowing-effect brain hat to complete a zany inventor costume.
- "Big Brain Time" Hat: A comically large brain hat printable designed to make a humorous statement about intellect (or lack thereof!).
- Alien Brain Prop: Imagine a pulsating, oddly shaped brain for an extraterrestrial costume – printable and easily customizable with glow-in-the-dark paint.
- The "Thinking Cap" Reinvented: A fun, cartoonish brain hat for a brainstorming session or a playful "I'm thinking!" declaration.
- "Mind Reader" Ensemble: A more artistic, stylized brain that suggests psychic powers, perhaps with a third eye drawn on.
- "Brain Freeze" Fun: A comical brain hat that looks like it's covered in ice, perfect for a summer event.
- "Eureka!" Moment Hat: A brain hat with a lightbulb icon printed on the side, ideal for celebrating discoveries.
- "Brainiac" Headwear: A straightforward, clean brain shape for a character that's super smart.
- "Brain-Storm" Buddy: A whimsical brain hat that looks like a storm cloud, symbolizing a flurry of ideas.
DIY & Crafting Corner: Getting Your Brain Hat Ready
Beyond just printing, the magic happens in the crafting! This section covers the practical tips for turning your brain hat printable from a flat sheet of paper into a magnificent mind-cap.
- Choosing the Right Paper: Cardstock is your best friend here. It offers durability and holds its shape much better than standard printer paper.
- Precise Cutting is Key: Take your time with the folds and cuts. Sharp scissors or a craft knife (with adult supervision!) will make cleaner edges.
- Folding for Form: Most brain hats rely on strategic folds to create their 3D shape. Crease lines firmly for a professional look.
- *I find that using a ruler to press down on fold lines gives you super crisp edges, which makes a huge difference in the final product.*
- Adhesive of Choice: Glue sticks are good for quick assembly, but strong tape or craft glue (like PVA glue) will give you a more robust hat. Don’t be like me and use weak tape – your hat will fall apart mid-lesson!
- Sizing It Up: Many printables have tabs or adjustable strips. Measure the wearer's head circumference beforehand for a snug fit.
- Pre-Coloring vs. Post-Assembly: For detailed coloring, it's often easier to color the flat sheet *before* cutting and assembling.
- Laminating for Longevity: For hats that will see repeated use (hello, teachers!), laminating the printed pieces *before* cutting can make them virtually indestructible.
- Adding Straps: If the printable doesn't include a head strap, use elastic string or a paper strip stapled to the sides.
- Embellishing Safely: Use non-toxic markers, crayons, or paints. Glitter glue can add a fun, sparkling neuron effect.
- Troubleshooting Awkward Folds: If a fold isn't sitting right, gently re-crease or even make a tiny snip at the edge of the paper to release tension.
Neuroscience Fun for All Ages: Beyond the Brain Hat
The brain hat printable is just the beginning! Use it as a springboard to explore broader neuroscience concepts in an engaging way.
- The "Neurotransmitter Match-Up": Create small cards with neurotransmitter names (e.g., dopamine, serotonin) and have kids match them to brain functions discussed while wearing their hats.
- "Brain Protection" Discussion: While wearing the hats, talk about the skull's role, helmets, and brain safety.
- Memory Games: Connect specific parts of the brain (like the hippocampus) to memory by playing simple memory card games.
- "Sense-ational Brain" Activity: Use the brain hat to point to areas responsible for different senses (occipital for vision, temporal for hearing).
- "Brain Food" Chat: Discuss foods that are good for brain health while wearing the hats, making the lesson more tangible.
- The "Brain Network" Game: Use yarn to represent neural connections between students wearing brain hats, showing how different parts "talk" to each other.
- "Brain Power" Challenge: Give a simple riddle or puzzle and have them "activate" their frontal lobe (by tapping their hat) to solve it.
- "Brain vs. Body" Reflex Test: Discuss the cerebellum's role in coordination by doing simple balance exercises while wearing the hats.
- Brain Scavenger Hunt: Hide facts about the brain around the room and have kids (wearing their hats) find them and attach them to the correct lobe.
- "Dream Weaver" Exercise: For older kids, discuss the brain's activity during sleep and dreams, connecting it to the brain hat.
Personalizing Your Cerebral Crown: Making it Yours

A brain hat printable is a fantastic template, but true engagement comes from making it uniquely your own! Here’s how to inject some personality.
- Vibrant Color Schemes: Don't stick to boring grays. Use bright blues, greens, yellows, or even rainbow colors for different lobes.
- Textured Brains: Glue crumpled tissue paper, cotton balls, or even pasta (like fusilli!) onto your hat to give it a unique tactile texture.
- Glitter & Sparkles: A little glitter on the "synapses" or along the sulci (grooves) can make the brain hat sparkle with intelligence.
- Adding Your Own Labels: Instead of pre-printed labels, have kids research and write in the names and functions of each part in their own handwriting.
- "Thoughts" & Doodles: Encourage drawing small symbols or words on different lobes that represent the functions (e.g., an eye on the occipital lobe, a heart on the limbic system).
- Pop-Out Elements: Add small, paper-crafted pop-out neurons or a miniature cerebellum that springs up.
- The "Glow Brain": Use glow-in-the-dark paint or markers for a hat that shines in a darkened room, perfect for nighttime learning or costume fun.
- Custom Chin Straps: Decorate the chin strap with ribbons, beads, or even attach small, brain-themed charms.
- "Brain Waves" Art: Draw squiggly lines or patterns on the hat to represent different brainwave states (alpha, beta, theta, delta).
- Subjective Tip: *This is my favorite strategy because I love seeing the creativity: Allow kids to draw what they think "thought" looks like on their hat – it sparks amazing conversations about abstract concepts!*
Troubleshooting & Advanced Brain Hat Hacks
Even the best plans can hit a snag. Here’s what to look out for and how to elevate your brain hat printable game to the next level.
- Floppy Sides Fix: If your hat sides are collapsing, reinforce the inside with extra strips of cardstock or even thin cardboard (like from a cereal box).
- "Too Small/Too Big" Dilemma: Most printables come with adjustable bands. If not, carefully cut slits into the back band and use tape or staples to resize.
- Printing Woes: Check your printer settings for "fit to page" or "actual size." Sometimes printers automatically scale, distorting the proportions.
- Advanced Contouring: For a truly realistic look, gently curve the paper before assembly, not just fold. Use a cylindrical object (like a rolling pin) to get natural-looking curves.
- Adding Interior Details: Print out small, labeled diagrams of inner brain structures (like the thalamus or hypothalamus) and glue them inside the hat for a peek-a-boo effect.
- The "Magnetic Neuron" Hack: Glue small magnets onto key brain areas on the hat and create small "neuron" pieces with magnets to connect and disconnect, showing neural pathways.
- Creating a "Brain Backpack": For a larger, more detailed project, create a brain shape that can be worn on the back, offering more surface area for intricate labeling.
- Wearable vs. Display: Decide if your hat is for wearing or for a static display. Wearable hats need stronger construction.
- Multi-Layered Brains: Print multiple copies, cut out individual lobes, and glue them slightly offset to create a layered, almost 3D effect.
- Don't be like me and forget the ventilation! If it’s a full head covering, remember to add a few small holes for air circulation, especially if it's for extended wear. Nobody wants a stuffy brain!
Conclusion
From a simple piece of paper to a captivating conversation starter, the brain hat printable is an incredibly versatile tool for learning, fun, and even a dash of creative expression. It transforms the complex into the comprehensible, making the amazing world of the human brain accessible to everyone. So go ahead, download that printable, grab your scissors and glue, and prepare to make some unforgettable memories. Now go make their day – or ace that science presentation!