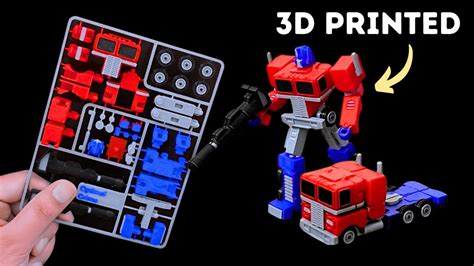
Remember that thrill of unboxing a brand-new toy? Or perhaps the satisfying click of LEGO bricks coming together to form something magnificent? Now, imagine that feeling, amplified by the power of creation, as you watch the legendary Optimus Prime materialize layer by layer on your 3D printer. A 3d printable Optimus Prime kit isn't just a project; it's a journey into the heart of a childhood dream, combining cutting-edge technology with classic heroism. I once spent an entire weekend battling print failures on a complex transformer arm, only to finally nail it and feel like a true mechanical wizard! If you're ready to roll out into the world of DIY Transformers, you’re in the right place. We're going to break down everything you need to know to bring the leader of the Autobots to life, from choosing the right kit to adding that final, glorious shine.
This isn't just about pressing print; it's about craftsmanship, patience, and a whole lot of fun. Whether you’re a seasoned maker or just diving into the fascinating world of additive manufacturing, getting your very own Optimus Prime model off the print bed is an incredibly rewarding experience. Let’s transform that ambition into reality!
Choosing Your Prime: Navigating Kit Types & Scales
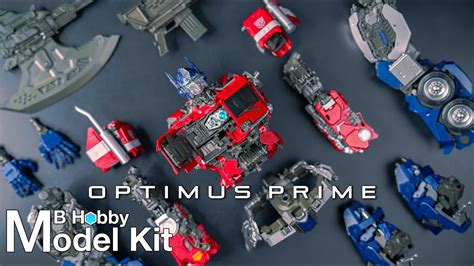
So, you’ve decided to build the ultimate Autobot leader. But where do you start? The world of 3d printable Optimus Prime kit files is vast, offering everything from highly detailed, articulated collector's pieces to simpler, more stylized versions perfect for display.
- The "G1 Perfectionist" Kit: These kits aim for cartoon accuracy, often with incredible articulation. *Pro tip: Look for kits with pre-split parts designed for easier printing and assembly, often labeled "print-in-place" or "multipart assembly."*
- The "Movie-Accurate Beast" Kit: If you're a fan of the live-action films, these kits offer complex mechanical details and battle-worn aesthetics. *Be warned: They can be highly intricate and require more advanced printing skills.*
- The "Simplified & Stylized" Kit: Great for beginners or quick builds, these kits prioritize form over extreme detail, often resulting in quicker print times and simpler assembly. *I started with one of these when I was nervous about wasting filament, and it built my confidence!*
- Scale Matters: Kits come in various scales (e.g., 1:100, 1:60, or specific height targets like 20cm). Consider where you’ll display your finished Prime. A large-scale model is impressive, but also requires more material and print time.
- Articulation vs. Static Display: Decide if you want a poseable action figure or a static display piece. Articulated models are amazing but involve many small, interlocking parts that can be tricky.
- Transformation Ready? Some incredibly ambitious kits even allow for transformation! These are for the brave and experienced. *Trust me, you don’t want to mess this up by attempting a transforming Prime as your first complex print!*
- Community Reviews are Key: Before downloading or buying a kit, check reviews and photos from other makers. Are there common print issues? Is the designer responsive?
Pre-Flight Checklist: Essential Tools & Slicer Settings
Before you hit 'print', a little preparation goes a long way. This is where your expertise in your printer settings truly shines. A well-calibrated machine and optimized slicer settings are your best friends when tackling a complex 3d printable Optimus Prime kit.
- Printer Calibration is Non-Negotiable: Ensure your printer's E-steps are calibrated, and your bed is perfectly leveled. *I learned this the hard way after my first Prime’s leg looked like a warped spaghetti monster.*
- Filament Choice Matters: PLA is generally the easiest to print and comes in a vast array of colors. PETG offers more durability but can be trickier. ABS is strong but requires an enclosure. *My personal preference is a good quality matte black PLA for the base, then painting over it.*
- Slicer Settings for Success:
- Layer Height: For detail, use a lower layer height (0.12-0.16mm). For speed, go higher (0.2mm+).
- Infill: 15-25% infill is usually sufficient for structural integrity without excessive weight or material usage.
- Supports: Critically important for overhangs. Use tree supports if your slicer offers them; they're often easier to remove.
- Print Speed: Don't rush perfection. Slower speeds (40-60mm/s) often yield better detail and fewer errors, especially for intricate parts of an Optimus Prime model.
- Nozzle Size: A standard 0.4mm nozzle is fine for most kits. If you want ultra-fine detail, consider a 0.2mm or 0.25mm, but be prepared for much longer print times.
- Test Prints: Before committing to a huge print, run a small test print of a problematic part (like a joint or a small detailed piece) to dial in your settings.
The Print & Post-Processing Journey: From Spool to Hero
You’ve prepared, chosen your kit, and dialed in your settings. Now comes the magic! But the journey doesn't end when the printer stops. Post-processing is crucial for that polished, factory-fresh look.
- Orientation is Key: Orient your parts on the build plate to minimize supports and maximize strength. *I always orient large flat surfaces face down to reduce warping, even if it means more supports on other areas.*
- Patience is a Virtue: Complex parts can take hours, even days. Don't hover over the printer, but do check in periodically for any obvious failures.
- Removing Supports Carefully: This is where you can easily damage your print. Use flush cutters, deburring tools, or a hobby knife. Heat (like a heat gun) can sometimes help stubborn supports release.
- Sanding & Filling: For a truly smooth finish, sand away layer lines and support marks. Bondo or wood filler can be used for larger gaps or blemishes. *This is tedious, but it makes an enormous difference to the final product.*
- Washing & Curing (Resin Prints): If you're using a resin printer for your Optimus Prime kit, proper washing (with IPA) and curing (under UV light) are essential for durability and safety.
Assembly & Articulation: Bringing Your Leader to Life

This is where your collection of printed parts finally starts to resemble the iconic leader. Careful assembly is paramount, especially for articulated models.
- Organize Your Parts: Lay out all your printed components before starting. It helps to have the kit’s instructions or a reference image handy. *I label my parts with masking tape when they come off the printer, especially if there are mirrored pieces.*
- Test Fit Everything: Before gluing, test fit all joints and connections. If something is too tight, gently sand it down. If too loose, a dab of super glue on the pin can add friction.
- Adhesive of Choice: Super glue (cyanoacrylate) is standard for bonding PLA and PETG. For stronger bonds on large surfaces, consider epoxy. Don't overdo it! A little goes a long way.
- Pinning for Strength: For high-stress joints or large parts, consider "pinning" them with small metal rods (like paperclips or specific hobby pins) for added strength. *I did this for Optimus's hips after a previous model's leg snapped off.*
- Articulation Check: As you assemble, periodically check the articulation of your joints. Are they moving freely? Are they too loose and floppy? Adjust as needed before the glue dries.
- Follow Instructions (Loosely): Many kits come with assembly diagrams. Follow them, but don't be afraid to deviate slightly if a different order makes more sense for your specific print or preferences.
Painting & Detailing: Adding That Iconic G1 Shine
This is where your 3d printable Optimus Prime kit truly becomes a work of art. The right paint job can elevate a good print to a phenomenal display piece.
- Priming is Essential: Always prime your prints before painting. This creates a uniform surface, helps paint adhere better, and reveals any remaining imperfections. Automotive primer works well.
- Paint Types: Acrylic paints (either brushed or airbrushed) are popular due to ease of cleanup and variety. Model paints from brands like Tamiya or Citadel are excellent.
- Layering for Depth: Don't try to get full coverage in one thick coat. Apply several thin layers for a smoother finish and richer color.
- Masking for Sharp Lines: Use painter's tape or liquid mask to achieve crisp lines for Optimus's iconic red, blue, and silver sections. *This is critical for that classic G1 look; don’t skip it!*
- Weathering & Battle Damage (Optional): For a more "realistic" or battle-worn look, use washes, dry brushing, and sponge techniques to simulate dirt, grime, or laser blasts.
- Top Coat Protection: Once painted, apply a clear matte or gloss top coat to protect your paint job and unify the finish. This is like the final polish on a masterpiece.
- Small Details, Big Impact: Don't forget the small details: the Autobot insignia, the silver on his mouth plate, the yellow on his lights. These tiny touches bring him to life.
Troubleshooting & Triumphs: When Good Prints Go Bad (and How to Fix Them)
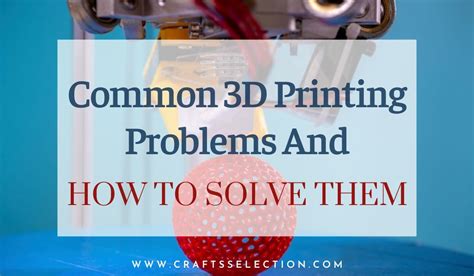
It’s inevitable: at some point, a print will fail. Don't despair! Every failed print is a lesson. This section taps into my expertise in diagnosing and fixing common 3D printing woes, ensuring your 3d printable Optimus Prime kit doesn't end up in the scrap heap.
- Warping Woes: If your prints lift off the bed, increase bed temperature, use a brim or raft, or apply adhesive like gluestick. *I once had Optimus’s foot curl up like a sad croissant mid-print; a larger brim solved it.*
- Stringing Sagas: Blobs or strings of filament indicate retraction issues. Adjust retraction distance and speed, or check for nozzle clogs.
- Layer Shift Lament: If layers mysteriously offset, check belt tension, motor drivers, or for physical obstructions on your print path.
- Under/Over Extrusion: Inconsistent lines or gaps mean your flow rate isn't dialed in. Calibrate your E-steps and adjust flow multiplier in your slicer.
- Support Scars: If supports leave nasty marks, experiment with Z-gap settings for supports, or use different support types (tree supports often leave cleaner surfaces).
- Joint Too Tight/Loose: Don't force parts! If a joint is too tight, gently sand it. If too loose, a tiny amount of super glue on the peg, allowed to dry, can add friction. *I’ve fixed countless wobbly limbs this way.*
- Embrace the Journey: Think of print failures as puzzles to solve, not setbacks. The triumph of a perfect print after overcoming challenges is incredibly satisfying.
Beyond the Build: Customization & Display Ideas
Your Optimus Prime isn't just a model; he's a statement. Once assembled and painted, there are countless ways to make him truly your own and display him proudly.
- LED Lighting: Integrate small LEDs into his eyes or chest Matrix for an awesome glowing effect. *This is my favorite strategy because it truly brings Optimus to life, especially in a dimly lit room.*
- Custom Base/Diorama: Create a themed base – a war-torn Cybertronian landscape, a patch of Earth, or even a simple Autobot symbol stand.
- Weaponry & Accessories: Print additional weapons (like his iconic ion blaster or energon axe) or even swappable hands for different poses.
- Weathering for Realism: Even if you didn't weather during painting, you can add subtle dust, oil, or battle damage effects after assembly.
- Protective Display Case: To keep dust away and protect your masterpiece, invest in or build a clear display case.
- Photo Shoot! Take high-quality photos of your finished Optimus Prime. Share them with the online 3D printing and Transformers communities – they'll appreciate your hard work!
- Next Project: Once you've conquered Optimus, maybe a Megatron, a Soundwave, or even a full Autobot crew is next on your list!
Tips for Personalizing Your Optimus Prime Build
Making your 3d printable Optimus Prime kit truly *yours* is part of the fun. Here’s how to inject your unique style into this iconic build.
- Choose Your Era: Decide if you want a classic G1 look, a movie aesthetic, or even a stylized, cartoonish version. Your choice dictates your paint scheme and detailing focus.
- Go Beyond the Colors: While red and blue are iconic, consider subtle variations. A metallic blue, a deeper crimson, or even a pearlescent finish can make your Prime stand out.
- Add Your Own Battle Scars: Think about where Optimus would realistically take damage. A few well-placed "laser burns" or chipped paint can tell a story.
- Custom Insignia: Instead of a simple decal, try a raised 3D printed Autobot symbol, painted separately and then affixed.
- Display It with Purpose: Don't just put him on a shelf. Give him a dynamic pose, set him on a custom base, or even create a small diorama to highlight his heroism. *I find this approach works best for small teams of printed figures, telling a miniature story.*
- The "Why" Matters: Why did you choose this particular kit? What does Optimus Prime mean to you? Let that personal connection guide your creative choices.
Common Pitfalls: What to AVOID When Printing Your Optimus Prime Kit
We’ve all been there – those moments when you realize you've made a rookie mistake. Learn from my misadventures to ensure your 3d printable Optimus Prime kit comes out glorious, not gloomy.
- Don't Rush the Print: Lowering print speed for complex parts of your Optimus Prime model can prevent a host of issues like ringing, ghosting, and skipped layers. Patience is truly a virtue here.
- Never Skip Calibration: Thinking your printer is "good enough" without recent calibration is a recipe for warped bases and misaligned layers. Don't be like me and wish you'd calibrated when your Prime's chest piece is an embarrassing trapezoid!
- Avoid Over-Supporting: While supports are necessary, too many, or supports too densely packed, can lead to rough surfaces and a nightmare of post-processing. Find the balance.
- Don't Underestimate Post-Processing: Ignoring layer lines or rough spots during sanding will haunt you once the paint goes on. What looks like a minor flaw unpainted becomes a glaring error when highlighted by paint.
- Never Glue Before Test-Fitting: This is a cardinal sin. Always, *always* test fit parts before applying adhesive. A misaligned piece glued firmly in place is a tragedy.
- Don't Overlook Small Details: Sometimes, the tiniest parts are the most crucial for articulation or aesthetic. Don’t lose them, and don’t dismiss their importance in the overall build.
- Resist the Urge to Force Parts: If something doesn't fit, don't jam it. You’ll snap a joint or break a part. Identify the interference and sand or trim it carefully.
Conclusion

Bringing a 3d printable Optimus Prime kit to life is more than just a hobby project; it’s an ode to creativity, patience, and the enduring power of heroism. From carefully selecting your kit to painstakingly painting the final details, every step is a chance to learn, grow, and unleash your inner maker. So, go forth, calibrate your machines, choose your filament, and prepare for an incredibly rewarding adventure. The Autobots need a leader, and with your skills, you’re about to deliver the best one they’ve ever had. Now go make him roll out!