Have you ever felt that tingling curiosity about the hidden patterns of the universe? That yearning to understand the fundamental forces that shape our reality, not just through abstract theory, but through something tangible, something you can build with your own hands? If you’ve landed here, chances are you’re on the cusp of exploring one of the most intriguing and potentially profound concepts in modern electromagnetism and sacred geometry: the Rodin Coil. For years, I chased down every snippet of information, every diagram, every whispered theory about these enigmatic coils. *I remember my own journey vividly, starting with blurry diagrams and confusing forum posts, feeling like I was trying to decipher an ancient alien language.* The frustration of not having clear, actionable guidance was real. That's why I'm so passionate about bringing you this comprehensive guide.
This isn't just another article; it's an invitation to a hands-on adventure. We're going to dive deep into the world of Rodin coils, from their mind-bending mathematical foundations to the practicalities of bringing one to life. Most importantly, we're going to demystify the "rodin coil printable templet"—your essential blueprint for construction. Whether you're a seasoned electrical engineer, a curious student of sacred geometry, or someone who just loves a good DIY project, this guide is crafted to empower you. We’ll cover everything from selecting the right template to winding your coil with precision, exploring common pitfalls, and even peeking into advanced applications. Get ready to transform abstract ideas into a physical reality that just might change the way you see the world. Trust me, you don’t want to miss this!
---
Table of Contents
- [What Exactly is a Rodin Coil, Anyway? The Vortex Math Connection](#what-exactly-is-a-rodin-coil-anyway-the-vortex-math-connection)
- [The Magic Behind the Numbers: Sacred Geometry & the Rodin Coil](#the-magic-behind-the-numbers-sacred-geometry-the-rodin-coil)
- [Why Build a Rodin Coil? Applications & Potential Discoveries](#why-build-a-rodin-coil-applications-potential-discoveries)
- [Decoding Your Rodin Coil Printable Templet: A Beginner's Guide to Layouts](#decoding-your-rodin-coil-printable-templet-a-beginners-guide-to-layouts)
- [Choosing Your Templet: Variations, Sizes, and What to Look For](#choosing-your-templet-variations-sizes-and-what-to-look-for)
- [Materials & Tools: Gearing Up for Your Coil Build](#materials-tools-gearing-up-for-your-coil-build)
- [Step-by-Step: Winding Your Rodin Coil with Precision](#step-by-step-winding-your-rodin-coil-with-precision)
- [Troubleshooting & Common Pitfalls: When Your Coil Doesn't "Sing"](#troubleshooting-common-pitfalls-when-your-coil-doesnt-sing)
- [Beyond the Basic Build: Advanced Rodin Coil Designs & Experiments](#beyond-the-basic-build-advanced-rodin-coil-designs-experiments)
- [The Rodin Coil Community: Sharing, Learning, and Innovating Together](#the-rodin-coil-community-sharing-learning-and-innovating-together)
- [How to Choose the Best Rodin Coil Templet for Your Needs](#how-to-choose-the-best-rodin-coil-templet-for-your-needs)
- [Common Pitfalls to Avoid When Building Your Rodin Coil](#common-pitfalls-to-avoid-when-building-your-rodin-coil)
- [Advanced Tips for Rodin Coil Experts & Experimenters](#advanced-tips-for-rodin-coil-experts-experimenters)
- [Conclusion: Your Journey into the Vortex Awaits](#conclusion-your-journey-into-the-vortex-awaits)
---
What Exactly is a Rodin Coil, Anyway? The Vortex Math Connection
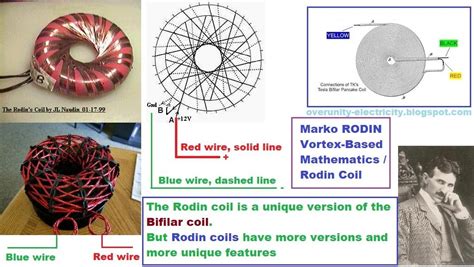
Let's cut to the chase: A Rodin Coil is not your average electromagnetic coil. While traditional coils are typically wound in a cylindrical or toroidal shape, a Rodin Coil (also known as a Mark Rodin Coil or a Vortex-Based Mathematics coil) is designed based on a specific mathematical pattern derived from Vortex-Based Mathematics (VBM). Developed by Marko Rodin, VBM proposes a unique number map that reveals an underlying energetic signature of the universe. It's a fascinating concept that suggests numbers aren't just quantities, but qualities that describe the flow of energy.
Here’s a breakdown of what makes it special:
1. The Number Pattern: At its core, the Rodin Coil is based on a repeating digital root pattern of the numbers 1, 2, 4, 8, 7, 5, which forms a continuous loop. The numbers 3, 6, and 9 are considered "flux numbers" or "vectors" that represent higher dimensions and control the flow. This isn't just arbitrary; it's derived from doubling and halving numbers and then reducing them to a single digit (e.g., 1 doubled is 2, 2 doubled is 4, 4 doubled is 8, 8 doubled is 16 which is 1+6=7, 7 doubled is 14 which is 1+4=5, 5 doubled is 10 which is 1+0=1, and so on).
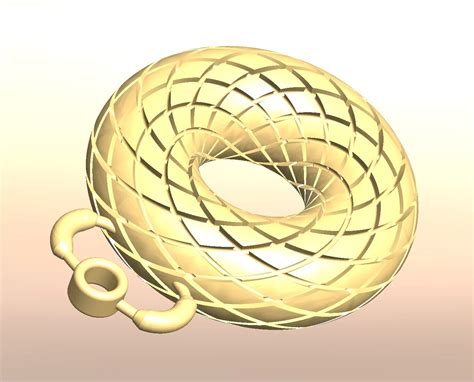
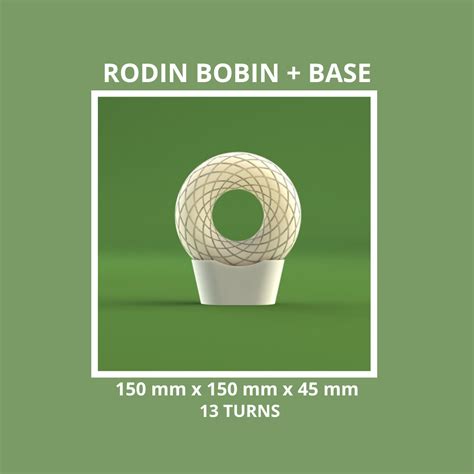
2. Toroidal Geometry: While the numbers are the abstract blueprint, the coil itself often takes a unique three-dimensional form, typically wound around a toroid (a donut shape) or a sphere. The winding pattern isn't a simple helix; it's a specific "figure-eight" or "infinity" pattern that crisscrosses itself, creating a series of nested loops. This is where the rodin coil printable templet becomes indispensable.
3. Magnetic Field Generation: The unique winding pattern is theorized to create a distinct type of magnetic field, different from conventional coils. Proponents suggest it generates a vortex-like magnetic field that contracts towards a central point, rather than expanding outwards. This "implosive" field is a key aspect of its potential applications.
4. Beyond Electromagnetism: The Rodin Coil often sparks discussions about "free energy," "zero-point energy," and scalar waves. While these are areas of intense debate and ongoing research, the design itself offers a fresh perspective on how electromagnetism might be harnessed or understood. *My first encounter with a functioning Rodin Coil was eye-opening; the way it interacted with a simple magnet felt profoundly different, almost as if it was drawing energy in rather than pushing it out.*
5. A Bridge Between Science and Spirituality: For many, the Rodin Coil represents a tangible link between the seemingly disparate worlds of mathematics, physics, and sacred geometry. It's a physical manifestation of ancient patterns found in nature and esoteric traditions. It's truly a device that makes you ponder the deeper symmetries of the universe.
The Magic Behind the Numbers: Sacred Geometry & the Rodin Coil
The Rodin Coil isn't just about copper wire and magnetic fields; it's a physical representation of profound mathematical and geometric principles. If you're going to build one, understanding these underlying concepts will deepen your appreciation for the rodin coil printable templet you're using.
Here's how sacred geometry and the Rodin Coil intertwine:
1. Vortex-Based Mathematics (VBM): As mentioned, VBM is the foundation. It posits that the number pattern 1, 2, 4, 8, 7, 5 represents the path of energy in a toroidal flow. The numbers 3, 6, and 9 act as a higher-dimensional control system. This is seen as a digital map of the universe, revealing a perfectly ordered system where energy is conserved and efficiently distributed.
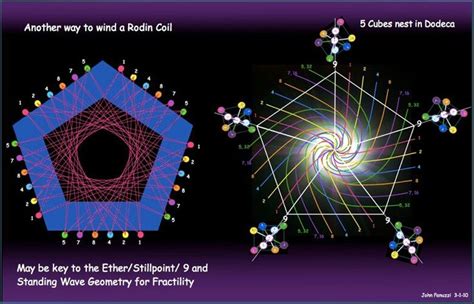
2. The Flower of Life and Platonic Solids: Many proponents of Rodin Coils draw parallels between VBM and ancient sacred geometry symbols like the Flower of Life. The nested, spiraling patterns of the coil can be seen as echoing the fundamental building blocks of creation found in these symbols. The geometric precision required for the coil aligns perfectly with the harmony found in Platonic solids.
3. The Torus Shape: The natural flow of energy in the universe often manifests in a toroidal (donut-shaped) pattern – from atoms to galaxies. The Rodin Coil, when fully wound, often forms a toroid or a sphere, reflecting this fundamental cosmic design. The rodin coil printable templet provides the precise guide for creating this complex, self-organizing pattern. *I once spent hours studying diagrams of natural toroids, from smoke rings to the Earth's magnetic field, and suddenly the Rodin Coil's shape made perfect intuitive sense.*
4. The Significance of the "9": In VBM, the number 9 is considered unique. It's the point of singularity, the "God number," representing the higher dimension or the "flux." In the Rodin Coil, the 9 isn't directly wound, but it's where the energetic potential is said to reside, acting as a gateway or a source of infinite energy. Some theorize that the coil acts as an antenna for this "9" energy.
5. Implosion vs. Explosion: Traditional electromagnetism is often described as an "outward" or "explosive" force. Sacred geometry, particularly in the context of the Rodin Coil, focuses on "implosion"—energy spiraling inward to a point of infinite density. This shift in perspective is key to understanding the claims of unique energy generation associated with these coils. The winding pattern on a rodin coil printable templet is designed to facilitate this specific energy dynamic.
6. Resonance and Frequency: The precise mathematical ratios within the Rodin Coil's design are believed to create specific resonant frequencies. This aligns with the idea that everything in the universe vibrates at a particular frequency, and by tuning into these fundamental frequencies, we can access or influence energy in novel ways. This is where the potential for new technologies truly excites enthusiasts.
Why Build a Rodin Coil? Applications & Potential Discoveries
So, why would anyone go through the effort of finding a rodin coil printable templet and winding one of these intricate devices? Beyond the sheer intellectual curiosity and the satisfaction of a challenging DIY project, Rodin Coils are associated with a range of fascinating, albeit often theoretical, applications.
Here are some of the compelling reasons and potential discoveries that motivate builders:
1. Exploration of "Free Energy" Concepts: This is arguably the most well-known and controversial aspect. Proponents believe that the unique magnetic field generated by a Rodin Coil can tap into ambient energy, often referred to as "zero-point energy" or "radiant energy." While mainstream science remains skeptical due to a lack of reproducible, peer-reviewed evidence, the allure of unlimited, clean energy drives many to experiment.
2. Enhanced Magnetic Fields: Even without claims of free energy, the distinct implosive magnetic field generated by a Rodin Coil is a subject of scientific interest. Researchers hypothesize that this field could have unique properties compared to conventional coils, potentially leading to new forms of propulsion, magnetic shielding, or even medical applications.
3. Scalar Wave Generation: Some theories suggest Rodin Coils can generate or interact with "scalar waves"—hypothetical longitudinal electromagnetic waves that differ from conventional transverse waves. If proven, scalar waves could have revolutionary implications for communication, energy transmission, and healing.
4. Water Restructuring/Energizing: A popular area of experimentation involves placing water near or within a Rodin Coil's field. Claims range from altering water's molecular structure to "energizing" it, potentially improving taste, agricultural growth, or even health benefits. *My friend, a keen gardener, swears by placing his plant water near a small Rodin Coil I helped him build. He's convinced it makes his tomatoes grow plumper!*
5. Therapeutic and Healing Applications: Building on the idea of scalar waves and unique energetic fields, some enthusiasts explore the Rodin Coil for therapeutic purposes. This often falls under the umbrella of "energy medicine," with claims of influencing biological systems, promoting healing, or reducing stress. These are largely anecdotal but inspire continued personal experimentation.
6. Advancing Electromagnetism Research: Regardless of the more speculative claims, building and testing Rodin Coils provides a hands-on way to explore alternative electromagnetic theories. It encourages critical thinking and experimentation, pushing the boundaries of what we understand about fields and energy.
7. Educational and Experiential Learning: For students and hobbyists, constructing a Rodin Coil is an excellent educational project. It combines mathematics, physics, engineering, and fine motor skills. It's a tangible way to engage with complex concepts and witness the beauty of sacred geometry in action. *I taught a workshop where we used a simple rodin coil printable templet, and seeing the lightbulb go off in participants' eyes as they understood the winding pattern was incredibly rewarding.*
8. Personal Exploration and Discovery: For many, the motivation is simply personal curiosity. It’s about the joy of discovery, the challenge of building something unique, and the desire to personally investigate claims that fall outside mainstream science. It's an act of empowerment and a testament to the human spirit of inquiry.
9. Community and Collaboration: The Rodin Coil community is vibrant and passionate. Building one connects you with a global network of fellow experimenters, fostering collaboration, idea-sharing, and collective learning. This shared journey of discovery is a powerful motivator.
Decoding Your Rodin Coil Printable Templet: A Beginner's Guide to Layouts
Alright, you're ready to get your hands dirty! The rodin coil printable templet is your golden ticket to successfully building a Rodin Coil. But what exactly are you looking at when you download one? Let's break down the common elements and how to interpret them.
Here's how to decode your template:
1. The Base Shape: Most Rodin Coil templates are designed for a toroidal (donut-shaped) or flat circular base. The templet will typically show a flattened, unfolded pattern that you'll either print and glue onto a physical core, or use as a guide for drawing directly onto your chosen material.
- *Example:* A common templet will show a large circle with a smaller circle cut out of the center, resembling a washer. This is your core shape.
2. The Winding Paths/Grooves: This is the most critical part. The templet will have a series of lines or channels indicating the precise path the wire needs to follow. These aren't just arbitrary spirals; they follow the 1-2-4-8-7-5 vortex pattern.
- *Example:* You'll often see lines that crisscross each other, forming "figure-eight" or "infinity" symbols that wind around the toroid. These lines will be numbered or color-coded to guide specific winding layers.
3. Start and End Points: Every good rodin coil printable templet will clearly mark where each winding segment begins and ends. This is crucial for maintaining the correct polarity and direction of the current.
- *Personal Scenario:* I once ignored the start/end points on a templet, thinking I could just "figure it out." Big mistake! The resulting field was weak and erratic. Always follow these markers!
4. Layer Indicators: Rodin Coils are often multi-layered. Your templet might have different patterns for each layer, or it might indicate how many times you need to follow a single pattern to build up the necessary depth.
- *Example:* "Layer 1 (Inner Wind)," "Layer 2 (Outer Wind)," or "Repeat Pattern X times."
5. Scale and Dimensions: The templet will usually specify the intended size of the coil (e.g., "for a 4-inch diameter toroid") and might include a scale bar to ensure you print it correctly.
- *Tip:* Always print a test page with the scale bar and measure it to confirm accuracy before printing the full templet.
6. Winding Direction Arrows: To ensure the proper vortex field is created, the direction of each wire winding is paramount. The templet will often include arrows indicating whether to wind clockwise or counter-clockwise for specific segments.
7. Terminal Connections: Where do you connect your power source? The templet might show designated points for your input and output wires, ensuring they align with the coil's internal structure.
8. Cut-Out Lines: If you're cutting the core from a flat material, the templet will have clear lines indicating where to cut. If you're using a pre-made core, these lines might simply be guides for marking.
9. Numbering System: Some templates might explicitly label the 1, 2, 4, 8, 7, 5 paths, helping you visualize the Vortex Math directly on the physical design. This is great for understanding the theory in practice.
10. Instructions/Legend: A good templet will come with a legend or brief instructions explaining the symbols, colors, and numbering system used. Don't skip this!
11. Material Recommendations: While not strictly part of the visual layout, many downloadable rodin coil printable templet files will include recommendations for wire gauge, core material, and other essentials.
Choosing Your Templet: Variations, Sizes, and What to Look For

With various Rodin Coil designs and templates floating around, how do you pick the right rodin coil printable templet for your project? It's not a one-size-fits-all situation. Your choice will depend on your experience level, the materials you have, and your experimental goals.
Here’s what to consider when choosing your templet:
1. Complexity Level (Beginner vs. Advanced):
- Beginner Templets: Look for simpler, often single-layer designs or those with very clear, large winding paths. These are excellent for understanding the basic principle without getting overwhelmed. They might be for a flat, circular coil rather than a full toroid.
- Advanced Templets: These will feature multi-layered windings, intricate figure-eight patterns, and sometimes spherical designs. They require more precision and patience.
2. Coil Geometry (Flat, Toroidal, Spherical):
- Flat Coil Templets: Easiest to start with. You print the templet, glue it to a flat surface (like cardboard or acrylic), and wind the wire directly on top.
- Toroidal Templets: More common for true Rodin Coils. These are designed to be wrapped around a donut-shaped core. The templet might come as a flat pattern that you cut out and glue onto the toroid, or it might be a guide for marking.
- Spherical Templets: The most challenging. These typically involve winding around a sphere, often with two toroidal halves. Very few printable templates exist for this, often requiring 3D printing for the core.
3. Size and Scale:
- Small Templets: Great for desktop experiments, learning, or using less wire. Easy to handle.
- Medium/Large Templets: Suitable for more robust experiments, potentially requiring more power. Requires more material and space. Ensure your printer can handle the scale or that the templet is tiled for easy printing.
- *Subjective Tip:* For a first build, I always recommend starting with a smaller, simpler templet. It’s less intimidating, uses less wire (which can be expensive!), and helps you master the technique before tackling a larger project.
4. Clarity and Instructions:
- A good rodin coil printable templet will have clear lines, distinct numbering, and ideally, accompanying instructions or a video guide. Avoid templates that are blurry, poorly labeled, or lack context.
5. Source Reliability:
- Where are you getting your templet from? Is it a reputable source within the Rodin Coil community? Look for creators who provide detailed explanations, acknowledge sources, and offer support. Forums and dedicated Rodin Coil websites are often good places to find trusted templates.
6. Wire Gauge Compatibility:
- While most templates are generic, some might imply a certain wire gauge. Consider the spacing of the winding paths. If they're very close together, a thinner wire (e.g., 26-30 AWG) will be necessary. Wider paths allow for thicker wire.
7. Core Material Integration:
- Is the templet designed for a specific core material (e.g., 3D printed plastic, wooden toroid, ferrite core)? Some templates might have specific markings for mounting holes or core features.
- *Personal Scenario:* I once chose a beautiful, intricate templet only to realize it was designed for a 3D-printed core I didn't have. Had to improvise with a hand-carved wood core, which was a challenge!
8. Community Endorsement:
- Check forums or online groups. Has this specific rodin coil printable templet been used successfully by others? Are there examples of coils built from it? This social proof can be very reassuring.
9. Download Format:
- Most will be PDFs, which are easy to print. Some might be image files (JPG, PNG). Ensure the resolution is high enough for clear printing.
Materials & Tools: Gearing Up for Your Coil Build

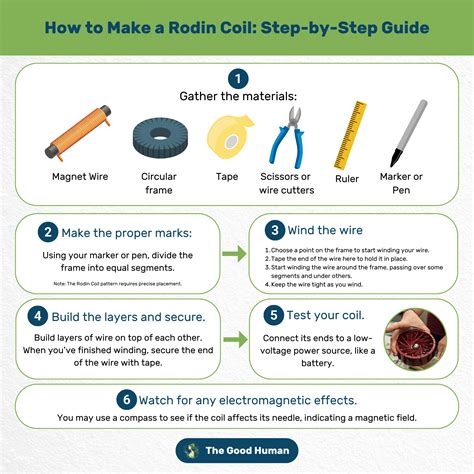
Before you even think about printing your rodin coil printable templet, you need to gather your arsenal. Building a Rodin Coil is a hands-on endeavor, and having the right materials and tools will make the process much smoother and more enjoyable.
Here’s a comprehensive list of what you’ll likely need:
1. The Rodin Coil Printable Templet:
- Printed Template: Make sure it's printed to scale on sturdy paper (cardstock is ideal) or transparent adhesive film if you're applying it directly to a core.
2. Core Material:
- Toroidal Core: This is the most common. Options include:
- Wood: Easy to work with, non-conductive. You can buy pre-made wooden toroids or cut one yourself.
- Plastic (3D Printed): Excellent for precision. Many creators share STL files for 3D printing custom Rodin Coil cores.
- Ferrite/Iron Powder: Used for high-frequency applications, but generally more advanced and expensive.
- Cardboard: Great for a first, low-cost experiment. You can cut and stack cardboard rings to form a toroid.
- Flat Coil Base: For simpler designs, a piece of acrylic, PVC, plywood, or even thick cardboard will suffice.
3. Wire:
- Magnet Wire (Enamelled Copper Wire): This is insulated copper wire, crucial for coil winding.
- Gauge: Typically 22 AWG to 30 AWG. Thinner wire (higher gauge) allows for more turns in a smaller space but has higher resistance. Thicker wire (lower gauge) is easier to handle but takes up more space. *I usually prefer 26 AWG for most projects – it's a good balance of flexibility and manageable thickness.*
- Length: You'll need a *lot* more than you think. A typical small Rodin Coil can require hundreds of feet, sometimes even a few thousand feet, depending on the number of turns. Always overestimate.
4. Adhesive:
- Super Glue (Cyanoacrylate): For tacking down initial wires and securing layers.
- Hot Glue Gun: Great for securing sections, holding wires in place temporarily, and providing insulation.
- Epoxy Resin: For permanently potting and protecting the coil once completed, making it very durable.
- Electrical Tape: For securing wires and insulation.
5. Cutting Tools:
- Hobby Knife/X-Acto Knife: For precise cutting of the templet or core material.
- Scissors: For general cutting.
- Wire Strippers: For removing enamel from the ends of the magnet wire to make connections.
6. Marking & Measuring Tools:
- Ruler/Measuring Tape: For verifying templet scale and wire length.
- Fine-Tip Marker/Pencil: For marking on the core or templet.
7. Soldering Equipment (Optional but Recommended):
- Soldering Iron: For making strong, reliable electrical connections.
- Solder: Lead-free is generally preferred.
- Desoldering Braid/Pump: For correcting mistakes.
8. Power Supply:
- DC Power Supply: Variable voltage (e.g., 0-30V) and current (e.g., 0-5A) is ideal for experimentation.
- Batteries: For simple testing (e.g., 9V or AA batteries).
9. Multimeter:
- Essential for checking continuity, resistance, and voltage.
10. Safety Gear:
- Safety Glasses: Always protect your eyes, especially when cutting or soldering.
- Gloves: Can help prevent finger fatigue and protect against adhesives.
11. Magnets:
- Neodymium Magnets: For testing the magnetic field of your finished coil.
Step-by-Step: Winding Your Rodin Coil with Precision
This is where your rodin coil printable templet truly shines! Winding a Rodin Coil requires patience, precision, and adherence to the template's guidelines. Don't rush, and enjoy the meditative process.
Here’s a detailed step-by-step guide:
1. Prepare Your Core and Templet:
- Print and Verify: Print your chosen rodin coil printable templet to the correct scale. Measure the scale bar to ensure accuracy.
- Attach Templet (if applicable): If your core is flat, carefully glue the printed templet onto its surface. For toroidal cores, you might wrap a flexible printed templet around it, or use the templet as a guide to draw the winding paths directly onto the core.
- Prepare Core: Ensure your core is clean, smooth, and ready for winding. If it's wood, you might want to sand it lightly.
- *Personal Scenario:* The first time I used a templet, I didn't let the glue dry completely before winding. The templet shifted, and I had to unwind half the coil! Learn from my mistake: patience is key.
2. Prepare Your Wire:
- Measure (Roughly): Estimate the length of wire you'll need. It's always better to have too much than too little. Spool out a generous amount from your main roll.
- Strip Ends: Strip about 1/2 inch of enamel from both ends of your measured wire. Use fine-grit sandpaper or a wire stripper with care to avoid breaking the delicate wire.
3. Identify Start Point and First Wind:
- Locate Start: Find the clearly marked "START" point on your rodin coil printable templet.
- Anchor Wire: Secure the stripped end of your wire to the core near the start point. A small dab of super glue or a piece of electrical tape works well. Leave a few inches free for later connections.
- Follow Path: Begin winding the wire along the first indicated path on the templet. Pay close attention to the winding direction arrows.
4. Winding the First Layer (The Vortex Pattern):
- Precision is Key: Guide the wire tightly and neatly along the templet's grooves or lines. Each turn should lie flat and snug against the previous one.
- Maintain Tension: Keep consistent tension on the wire as you wind. Too loose, and it will unravel; too tight, and you risk stretching or breaking the wire.
- Follow the Numbers: If your templet labels the 1, 2, 4, 8, 7, 5 paths, follow them meticulously. You'll often be winding in a figure-eight pattern, crisscrossing the toroid.
- Secure Periodically: As you complete sections or turns, use small dabs of super glue or hot glue to secure the wire in place. This prevents it from shifting as you continue.
- *Expert Tip:* Some experienced builders use a small, rounded tool (like a blunt screwdriver or a plastic stylus) to gently press the wire into place, ensuring it follows the template precisely.
5. Winding Additional Layers (if applicable):
- Layer Transition: If your rodin coil printable templet indicates multiple layers, the transition from one layer to the next is crucial. The templet should show how the wire moves from an inner path to an outer path, or from one winding direction to another.
- Build Up Evenly: Try to keep the layers as even and flat as possible. Bumps or uneven winding can affect the coil's performance.
6. Finishing the Winding:
- Locate End: Once you've completed