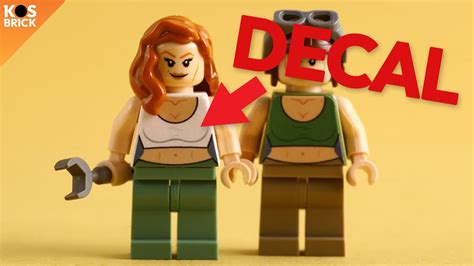
Oh, the joy of LEGO! That satisfying click as bricks connect, the endless possibilities of creation, the stories waiting to unfold. But let's be honest, sometimes, just sometimes, the official LEGO minifigure collection leaves a tiny void in our brick-built hearts. You have this incredible idea for a character – perhaps a custom superhero, a historical figure, your favorite band member, or even a minifig version of yourself – but alas, the perfect torso simply doesn't exist. That's where the magic of printable LEGO torso designs comes in. It's the ultimate secret weapon for any LEGO enthusiast who dreams of taking their minifigure collection from great to utterly legendary.
Trust me, I’ve been there. I remember painstakingly trying to draw a tiny logo onto a blank torso with a marker, only for it to look like a toddler's doodle. The frustration was real! Then I discovered the world of custom printing, and it was like unlocking a whole new dimension of creativity. This isn't just about sticking a picture on plastic; it’s about bringing your wildest minifigure visions to life, making them truly unique, and giving your brick-built worlds personalities they never had before. This comprehensive guide is your personal blueprint to mastering the art of custom LEGO torso designs, whether you're a complete beginner or looking to refine your expert techniques. We're going to dive deep into every aspect, from the spark of an idea to the final, professional-looking minifig, ensuring your creations not only stand out but also stand the test of time. Get ready to transform your minifigures and, in doing so, transform your entire LEGO experience.
Table of Contents

- [The Art of the Blank Canvas: Why Printable Torsos?](#the-art-of-the-blank-canvas-why-printable-torsos)
- [Digital Design Demystified: Crafting Your Vision](#digital-design-demystified-crafting-your-vision)
- [Printing Perfection: Choosing Your Method & Materials](#printing-perfection-choosing-your-method--materials)
- [From Screen to Minifig: Applying Your Designs Like a Pro](#from-screen-to-minifig-applying-your-designs-like-a-pro)
- [Theme Park of Imagination: Iconic & Popular Torso Ideas](#theme-park-of-imagination-iconic--popular-torso-ideas)
- [Beyond the Basic: Advanced Techniques & Special Effects](#beyond-the-basic-advanced-techniques--special-effects)
- [The Custom Creator's Toolkit: Essential Gear & Software](#the-custom-creators-toolkit-essential-gear--software)
- [Sharing Your Masterpieces: Community & Commerce](#sharing-your-masterpieces-community--commerce)
- [Troubleshooting & TLC: Keeping Your Minifigs Flawless](#troubleshooting--tlc-keeping-your-minifigs-flawless)
- [How to Choose the Best Printable LEGO Torso Design Approach for Your Needs](#how-to-choose-the-best-printable-lego-torso-design-approach-for-your-needs)
- [Common Pitfalls to Avoid in Custom LEGO Torso Printing](#common-pitfalls-to-avoid-in-custom-lego-torso-printing)
- [Advanced Tips for Expert Customizers](#advanced-tips-for-expert-customizers)
- [Conclusion: Your Minifig Legacy Awaits!](#conclusion-your-minifig-legacy-awaits)
---
The Art of the Blank Canvas: Why Printable Torsos?
Every great artist starts with a blank canvas, and for us LEGO customizers, that canvas is often a pristine, unadorned minifigure torso. The appeal of printable LEGO torso designs isn't just about filling a gap in your collection; it's about pure, unadulterated creative freedom. Imagine being able to conjure any character, any uniform, any intricate detail your mind can conceive, and then seeing it come to life on a tiny plastic figure. It’s a powerful feeling, and one that resonates deeply with the core spirit of LEGO itself: "Play On."
Here's why diving into the world of custom printable torsos is an absolute game-changer for your LEGO hobby:
1. Unleashing Unbound Creativity: The official LEGO catalog, while vast, can't cover every niche. Want a minifig of your pet wearing a tiny sweater? A custom uniform for your fictional space federation? A replica of your favorite vintage band t-shirt? Printable torsos make it all possible.
2. Personalizing Your Collection: Beyond fictional characters, you can create minifigs of yourself, your family, your friends, or even your local sports team. These become incredibly personal, cherished pieces that tell your unique story.
3. Filling Gaps in Themes: Sometimes, LEGO releases a fantastic set, but a key character or variant is missing. Custom torsos allow you to complete your themes, ensuring every minifig in your display contributes to the narrative.
4. Creating Unique Armies & Factions: For builders who love MOCs (My Own Creations) or elaborate dioramas, custom torsos are essential for building distinct armies, civilian populations, or rival factions that truly stand out.
5. Restoring Damaged Minifigs: Over time, beloved minifigs can suffer wear and tear, with printed details fading or scratching. Custom printing offers a fantastic way to restore them to their former glory, giving them a new lease on life.
6. Developing Design Skills: The process of creating custom torso designs, from initial concept to digital execution, hones your graphic design skills, even if you're a beginner. It's a fun, practical way to learn.
7. Cost-Effectiveness (Sometimes): While specialized parts can be expensive on the secondary market, printing your own designs can be a more affordable way to achieve a unique look, especially if you plan to make multiple copies.
8. The "Wow" Factor: There's a special kind of satisfaction that comes from showing off a custom minifig and seeing the surprise and admiration in others' eyes. "You *made* that?!" is a common, and very rewarding, reaction.
9. Educational for Kids (and Adults!): It’s a fantastic way to introduce children to graphic design, basic engineering (understanding dimensions), and the joy of personalizing their toys. For adults, it's a creative outlet that combines multiple hobbies.
10. Community Engagement: Sharing your custom designs online, discussing techniques, and getting feedback from fellow enthusiasts is a vibrant part of the LEGO community. It connects you with like-minded creators.
11. Personal Scenario: The Missing Expedition Team: I once built an elaborate arctic research base, but the official LEGO minifigs didn't quite capture the rugged, specialized look I envisioned for my expedition team. With custom printable torsos, I designed unique logos for their jackets, detailed utility belts, and even frost-bitten scarves, elevating the entire MOC. It transformed generic explorers into a cohesive, story-driven unit!
12. Personal Scenario: The Ultimate Fan Tribute: My best friend is a huge fan of a very niche retro video game. For his birthday, I created a minifig of the game's protagonist with a custom-designed torso that perfectly replicated his pixelated outfit. The look on his face was priceless – it was a unique, heartfelt gift that no store-bought item could ever match.
---
Digital Design Demystified: Crafting Your Vision

Before any ink hits paper (or plastic!), your printable LEGO torso design needs to exist digitally. This is where your imagination takes tangible form, albeit on a screen. Don't be intimidated by the phrase "digital design"; there are tools and techniques for every skill level, and the learning curve is often more fun than frustrating. The key is understanding the canvas you're working with.
Here are the essential steps and considerations for crafting your digital torso designs:
1. Understanding LEGO Torso Dimensions: This is crucial! A standard LEGO minifigure torso is approximately 15.8mm wide and 16.5mm tall. However, the printable area is slightly smaller due to the arm sockets and neck post. It's often best to work with templates.
2. Finding and Using Templates: Search online for "LEGO torso template printable" or "minifig torso decal template." Many generous customizers share these. They'll show you the precise safe areas for printing on the front, back, and sometimes even the sides.
3. Basic Design Software (Free & Accessible):
- GIMP (GNU Image Manipulation Program): A powerful, open-source alternative to Photoshop. Great for raster graphics (pixel-based images).
- Inkscape: Another open-source gem, focusing on vector graphics (scalable images that don't lose quality). Ideal for sharp lines, logos, and text.
- Canva: User-friendly, web-based, and excellent for quick designs, especially if you're layering images and text.
- Paint.NET: A simple, free image editor for Windows, good for basic layering and text.
4. Advanced Design Software (Professional Tools):
- Adobe Photoshop: Industry standard for raster graphics, offering unparalleled control for complex textures, shading, and photo manipulation.
- Adobe Illustrator: The go-to for vector graphics. Essential for creating crisp logos, intricate patterns, and designs that need to scale without pixelation.
5. Vector vs. Raster Graphics:
- Raster (e.g., JPEG, PNG, GIF): Made of pixels. Great for photos, gradients, and detailed textures. Can become pixelated when scaled up. Use high-resolution images (300 DPI or higher) for tiny prints.
- Vector (e.g., SVG, AI, EPS): Made of mathematical paths. Always sharp and scalable without losing quality. Ideal for logos, text, and crisp lines.
6. Creating Unique Logos & Emblems: Start with simple shapes and gradually add detail. Think about what your character represents. A shield, a stylized letter, a symbol – keep it bold for minifig scale.
7. Designing Front & Back Details: Don't forget the back! A custom torso looks much more professional with details on both sides – a continuation of a jacket, a different logo, or even a name tag.
8. Adding Arm & Hand Details (Optional but impactful): While trickier, some customizers extend designs to the arms. This usually involves printing separate decals for the arms or using direct printing methods. It adds an incredible level of detail.
9. Color Matching LEGO Palettes: LEGO has a specific color palette. While you might not find exact matches in your software, try to get as close as possible. Referencing official LEGO color charts online (e.g., BrickLink's color guide) can help you select appropriate RGB/HEX values.
10. Text & Font Selection for Minifigs: Choose clear, legible fonts. Sans-serif fonts usually work best at small scales. Avoid overly intricate fonts that become unreadable when shrunk. Bold text generally holds up better.
11. Iterative Design: Sketch, Digitize, Refine: Don't expect perfection on the first try. Sketch your ideas on paper, then digitize them. Print a test sheet on regular paper to check sizing and layout before using expensive decal paper.
12. Personal Scenario: The Case of the Blurry Badge: I once designed a police force for my LEGO city and spent ages creating a detailed badge in Photoshop. When I printed it, it was a blurry mess. I learned that for crisp, tiny details like badges, switching to Illustrator and creating a vector graphic was the only way to get that professional sharpness. It was a frustrating but invaluable lesson in choosing the right tool for the job.
---
Printing Perfection: Choosing Your Method & Materials

Once your digital printable LEGO torso design is flawless, it's time to bring it into the physical world. This is where the rubber meets the road, or rather, where the ink meets the special paper. The method and materials you choose will significantly impact the final look, durability, and ease of application. This isn't a one-size-fits-all situation; your choice will depend on your budget, desired finish, and available equipment.
Here are the primary methods and materials, broken down for clarity:
### A. Waterslide Decals (My personal preference for seamlessness!)
1. What it is: A thin, transparent film with your design that "slides" off a backing paper when wet and adheres to the surface. It's incredibly thin, creating a near-seamless look.
2. Pros: Extremely thin, virtually invisible edges, high detail, flexible on curved surfaces.
3. Cons: Can be fragile during application, requires clear coat sealing, multi-step process.
4. Printer Type: Both inkjet and laser printers can be used, but require specific decal paper.
5. Materials:
- Clear Waterslide Decal Paper: For light-colored torsos. The white areas in your design will be transparent, showing the torso color underneath.
- White Waterslide Decal Paper: For dark-colored torsos. Your printer cannot print white ink, so the white paper provides a solid white background for your design. This makes colors pop on dark surfaces.
- Inkjet vs. Laser Paper: Ensure you buy the correct type for your printer. Inkjet decals *must* be sealed with a clear spray before soaking, or the ink will run. Laser decals are more durable and generally don't require pre-sealing.
- Clear Coat Spray: Essential for inkjet decals (to prevent ink bleed) and highly recommended for all decals (to protect the design and provide a smooth, durable finish). Look for acrylic-based, non-yellowing clear coats.
- Small Scissors/Craft Knife: For precise cutting.
- Bowl of Water: For soaking the decals.
- Tweezers & Cotton Swabs: For handling and positioning.
6. Personal Scenario: The "Invisible" Suit: I once wanted to create a sleek, futuristic suit for a minifig, complete with glowing lines. Waterslide decals were perfect because their thinness made the design look almost painted on, truly disappearing into the plastic. The effect was exactly what I envisioned for a high-tech uniform.
### B. Sticker Paper / Adhesive Vinyl
1. What it is: Self-adhesive paper or vinyl that you print on, cut out, and stick directly to the torso.
2. Pros: Easiest and fastest method, durable (especially vinyl), no clear coat needed (though recommended for paper).
3. Cons: Visible edges (can look chunky), less flexible on curves, may peel over time.
4. Printer Type: Inkjet or laser.
5. Materials:
- Full-Sheet Label Paper: Standard sticker paper, often white.
- Clear Sticker Paper: For a more integrated look, but white areas in your design will be transparent.
- White Vinyl Sticker Paper: More durable and water-resistant than paper, often used for outdoor decals.
- Craft Cutter (e.g., Cricut, Silhouette): Highly recommended for precise cuts, especially for intricate designs, making the edges much less noticeable.
- Hobby Knife/X-Acto Knife: For manual cutting.
6. Personal Scenario: The Quick & Dirty Team Uniforms: When I needed to quickly make about 20 custom team uniforms for a LEGO sports league, I opted for white vinyl sticker paper. While not as seamless as decals, the speed and durability were key. I printed a sheet, cut them out with a craft knife, and had a whole team ready in under an hour.
### C. Direct UV Printing (Professional-grade, usually outsourced)
1. What it is: A specialized printer uses UV light to cure ink directly onto the plastic surface, creating a highly durable, permanent print. This is how official LEGO minifigs are printed.
2. Pros: Most durable, professional finish, high detail, feels like a factory print.
3. Cons: Very expensive equipment, usually outsourced to customizers or specialized printing services. Not a DIY method for most hobbyists.
4. Printer Type: Specialized UV flatbed printer.
5. Materials: None (beyond the minifig torso itself and the ink).
6. Personal Scenario: The Ultimate Collectible: For a special anniversary, I wanted to create a truly unique minifig for my spouse that looked absolutely official. I commissioned a customizer who used direct UV printing. The result was indistinguishable from a genuine LEGO print, making it a cherished, high-quality collectible.
### D. Other Considerations for Printing:
1. Printer Settings: Always set your printer to its highest quality setting ("photo paper" or "best quality").
2. Color Accuracy: Colors on your screen may not perfectly match the printed output. Do test prints on plain paper first to check colors and alignment.
3. Gloss vs. Matte Finish: Waterslide decals usually have a slight sheen, which you can adjust with your clear coat (gloss, satin, or matte). Sticker paper's finish depends on the paper itself.
4. Lighting: Ensure you have good lighting when printing and applying to catch any imperfections.
5. Ventilation: If using spray clear coats, always do so in a well-ventilated area or outdoors.
---
From Screen to Minifig: Applying Your Designs Like a Pro
You've poured your creativity into your printable LEGO torso design, chosen your perfect printing method, and now comes the moment of truth: application. This step is where patience, a steady hand, and a little bit of technique truly pay off. A perfectly printed design can be ruined by a hasty application, so take your time and follow these steps.
### For Waterslide Decals:
1. Prepare Your Workstation: Clear, clean, well-lit surface. Gather small scissors/craft knife, a bowl of lukewarm water, tweezers, cotton swabs, paper towels, and your clear coat spray (if using inkjet paper).
2. Seal Your Inkjet Prints (Crucial for Inkjet!): If you used inkjet waterslide paper, you *must* spray it with 2-3 light, even coats of clear coat spray (e.g., Mod Podge Acrylic Sealer, Krylon Crystal Clear). Let each coat dry completely (usually 15-30 minutes) before applying the next. This prevents the ink from running when wet. Skip this step for laser decals.
3. Cut Your Decal: Carefully cut out your design as close to the edges as possible. The less clear film you leave around the design, the more seamless it will look. A craft knife on a cutting mat can achieve very precise cuts.
4. Prepare the Torso: Ensure the LEGO torso is clean and dry. A quick wipe with a microfiber cloth is usually sufficient. Some customizers lightly sand the torso with very fine grit sandpaper (e.g., 2000 grit) to give the decal more to "grip," but this is optional and should be done *very* carefully.
5. Soak the Decal: Place the cut decal into the bowl of lukewarm water. It will curl up initially, then flatten out. Wait until the decal film can easily slide off the backing paper (usually 30-60 seconds, check your paper's instructions). Don't oversoak!
6. Apply the Decal:
- Remove the decal from the water and place it gently onto the torso where you want it.
- Hold the backing paper in place with one hand/finger, and with the other, carefully slide the decal off the backing paper onto the torso.
- Once the decal is on the torso, gently remove the backing paper.
7. Position and Smooth:
- Using a damp cotton swab or your fingertip (gently!), carefully slide and adjust the decal into its final position. You have a short window before it starts to adhere.
- Once positioned, gently smooth out any water or air bubbles from the center outwards. Use the cotton swab to absorb excess water. Be delicate, as wet decals are very fragile.
8. Dry and Cure: Let the decal dry completely. This can take several hours, or even overnight. Avoid touching or moving the torso during this time.
9. Apply Final Clear Coat (Highly Recommended): Once completely dry, apply 2-3 light coats of clear coat spray to the entire torso. This seals the decal, protects it from wear, and gives it a uniform finish (gloss, satin, or matte, depending on your preference). Allow each coat to dry thoroughly. This step is crucial for durability and a professional look.
- My Anecdote: My first attempt with waterslide decals was a total mess. I rushed the clear coat sealing on my inkjet print, and the moment it hit the water, the ink bled into a colorful puddle. It was a disheartening moment, but it taught me the absolute necessity of patience and proper sealing!
### For Sticker Paper / Adhesive Vinyl:
1. Prepare Your Workstation: Clean, dry surface. Gather small scissors/craft knife, cutting mat, and tweezers.
2. Cut Your Design: Cut out your design from the sticker paper. For the best results, aim for very precise, clean cuts. If you have a craft cutter (like a Cricut or Silhouette), this is where it shines, providing perfectly smooth edges.
3. Prepare the Torso: Ensure the LEGO torso is clean and dry.
4. Peel and Apply: Carefully peel the backing off your sticker. Try to only touch the edges to avoid fingerprints on the adhesive.
5. Position Carefully: This is where sticker paper differs significantly from decals – once it's down, it's down! Align your sticker perfectly before letting it touch the torso. Start by touching one edge or the center, then gently lay the rest of the sticker down.
6. Smooth Out Bubbles: Use a credit card, a plastic spudger tool, or your fingertip to gently smooth out any air bubbles from the center outwards.
7. Optional Clear Coat: While not strictly necessary for durability (especially with vinyl), a light clear coat can help protect the sticker edges and integrate the design more seamlessly with the torso's finish.
- My Anecdote: I once tried to apply a large sticker to a torso freehand and ended up with a huge air bubble right in the middle of a character's face. It looked like a minifig with a tumor! Now, I always start by applying one edge first, then slowly lowering the rest while smoothing.
### General Application Tips for Both Methods:
- Practice on Scrap Pieces: Before working on your final torso, practice cutting and applying on spare pieces of plastic or old torsos.
- Good Lighting is Key: Work under bright, even light to spot any dust, bubbles, or misalignment.
- Patience, Patience, Patience: This cannot be stressed enough. Rushing will lead to mistakes.
- Cleanliness: Dust and fingerprints are the enemy of a perfect finish. Wash your hands thoroughly before starting.
- Storage: Store finished custom minifigs carefully to prevent scratching or peeling, especially if not clear-coated.
---
Theme Park of Imagination: Iconic & Popular Torso Ideas
Now for the fun part – brainstorming! Your printable LEGO torso design is a canvas for literally anything you can imagine. But sometimes, a little inspiration goes a long way. This section is designed to spark your creativity, offering a "theme park" of ideas from various popular culture touchstones and classic LEGO themes.
Here are 10-12 diverse and inspiring ideas for your next custom torso project:
1. Superhero/Villain Customizations:
- Idea: Create obscure comic book characters, alternate universe versions of popular heroes, or your own original crime fighters. Think unique chest emblems, utility belts, and textured suits.
- Personal Scenario: My nephew was obsessed with a specific minor villain from a superhero cartoon who never got a LEGO minifig. I designed a custom torso with his distinct logo and tattered cape details, and it made his day!
2. Retro Video Game Characters:
- Idea: Design pixel-perfect torsos for classic 8-bit or 16-bit heroes and villains. This often involves careful pixel art recreation.
- Example: A classic arcade character's sprite, complete with bold colors and simple lines.
3. Historical Figures & Eras:
- Idea: From ancient Romans to Victorian-era explorers, medieval knights with unique heraldry, or even famous scientists. Research period-accurate clothing and symbols.
- Example: A detailed Roman legionary's segmented armor, or a Renaissance noble's intricate tunic design.
4. Sci-Fi & Fantasy Factions:
- Idea: Develop unique uniforms for your custom space marines, alien races, wizard guilds, or dystopian rebels. Focus on distinctive insignias, armor plating, and futuristic textiles.
- Example: A sleek, minimalist uniform for a utopian space federation, or rugged, patched armor for a band of post-apocalyptic survivors.
5. Sports Teams & Athletes:
- Idea: Recreate jerseys for your favorite real-world sports teams (local or professional), or invent your own LEGO sports league with custom logos and team colors.
- Example: A basketball jersey with a player number and team logo on the front and back, or a soccer kit with sponsor details.
6. Everyday Heroes & Professions:
- Idea: Think beyond police and firefighters. Custom torsos for paramedics, chefs, delivery drivers, baristas, musicians, artists, or even your local mail carrier.
- Example: A chef's jacket with a tiny embroidered logo, or a musician's band t-shirt with tour dates on the back.
7. Pop Culture Icons (Movies, TV, Music):
- Idea: Replicate iconic outfits from beloved movies, TV shows, or music videos. This could be a specific character's costume, a band's concert attire, or a movie prop replica.
- Example: The distinct jacket of a cult movie protagonist, or a band's album art on a minifig's shirt.
8. Fantasy Creatures & Monsters (Humanoid):
- Idea: For humanoid creatures like goblins, orcs, vampires, or even unique mythological beings, design torsos that reflect their culture, armor, or natural markings.
- Example: A tribal pattern for a forest-dwelling elf, or skeletal armor details for an undead warrior.
9. Your Own Personal Brand/Logo:
- Idea: If you have a personal brand, YouTube channel, or a small business, create a minifig wearing your logo! It's a fun, quirky way to promote yourself.
- Example: Your YouTube channel's logo on the front, and your social media handles on the back of a minifig's t-shirt.
10. Holiday & Seasonal Themes:
- Idea: Design festive torsos for Christmas, Halloween, Easter, or any holiday. Think ugly sweaters, spooky costumes, or spring-themed outfits.
- Example: A minifig wearing a tiny Santa suit with a sack print, or a ghost costume with chains.
11. "Plain Clothes" with Personality:
- Idea: Sometimes simple is best. Design torsos with subtle textures, patterns, or simple graphic tees that add character without being overly complex.
- Example: A flannel shirt pattern, a striped sweater, or a plain t-shirt with a small, quirky graphic.
12. Thematic MOC Enhancers:
- Idea: Create torsos specifically designed to enhance a large MOC. For a space station, design crew uniforms; for a medieval village, design peasant clothes or merchant outfits.
- Personal Scenario: I built a detailed steampunk airship and needed a crew. I designed custom torsos with intricate gears, cogs, and brass-buttoned vests, giving my crew a truly cohesive and immersive look that perfectly matched the MOC's aesthetic.
---
Beyond the Basic: Advanced Techniques & Special Effects
Once you've mastered the fundamentals of printable LEGO torso design and application, you might find yourself yearning for more. This is where advanced techniques come into play, allowing you to push the boundaries of what's possible and create truly jaw-dropping custom minifigures. These methods require more patience, specialized tools, and sometimes a willingness to experiment, but the results are incredibly rewarding.
Here are some advanced techniques and special effects to elevate your custom torsos:
1. Partial Waterslide Decals for Layering: Instead of one full