Ever stood over a golf ball, club in hand, and felt that creeping doubt about whether you've got it in the right spot? Trust me, you're not alone. I’ve been there more times than I can count, staring down a crucial shot and wondering if my ball position was going to make or break it. I once nearly blew a friendly match on the 18th hole because I had my driver ball too far back, slicing it into the trees. It taught me the hard way: getting your ball position right isn't just a nuance; it's a non-negotiable fundamental that can instantly elevate your game from frustrating to fantastic.
That's why a reliable "printable golf ball position chart" isn't just a luxury—it's an essential tool, especially when you're working on consistency or trying to dial in specific clubs. It’s like having a seasoned pro whispering advice in your ear, helping you build a solid foundation that translates into more confident swings and better results. Whether you're a beginner struggling with consistency or a seasoned player looking to fine-tune your approach, understanding and applying the correct ball position is your secret weapon. Let's dive into the core setups you need to know, complete with a printable guide you can keep in your bag!
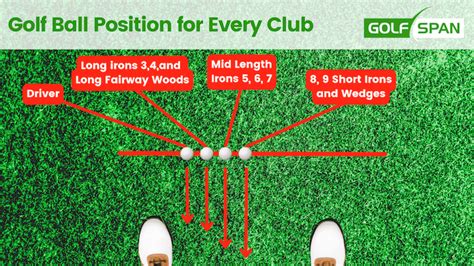
1. Power & Distance: The Driver & Fairway Wood Setup
When you're trying to launch the ball off the tee or chase distance from the fairway, your ball position for drivers and fairway woods is crucial for a powerful, ascending strike. This setup encourages an upward swing path, minimizing spin and maximizing carry.
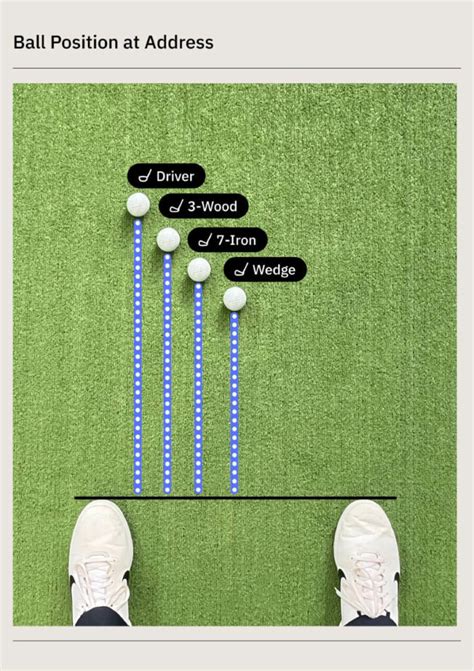
- Driver: Position the ball off the inside of your lead heel. This allows your shoulders to naturally tilt upwards, promoting an upward strike through the ball.
- Fairway Woods (3-wood, 5-wood): For fairway woods, move the ball slightly back from your driver position, placing it about 1-2 inches inside your lead heel. This helps with a shallower, sweeping motion off the turf.
- Key Insight: This forward position gives your clubhead time to swing fully through the arc, catching the ball on the upswing for optimal launch.
- Common Error: Too far back, and you'll likely hit down on it, causing pop-ups or thin shots. Too far forward, and you might miss the sweet spot entirely.
- *I used this driver setup during a recent long drive competition, and it helped me find that consistent upward strike that added an extra 10 yards to my average!*
2. Precision & Control: Mastering Your Irons (Long & Mid)
Irons are your scoring clubs, and consistent contact is paramount. The ball position for long and mid-irons aims for a slight downward strike, ensuring solid contact and control over your trajectory.
- Long Irons (3-iron, 4-iron): Position the ball just inside the lead heel or about 2-3 inches forward of the center of your stance. This allows for a slightly shallower attack angle compared to mid-irons.
- Mid Irons (5-iron, 6-iron, 7-iron): The sweet spot for mid-irons is typically at or just slightly forward of the center of your stance. This promotes a crisp, downward strike that compresses the ball effectively.
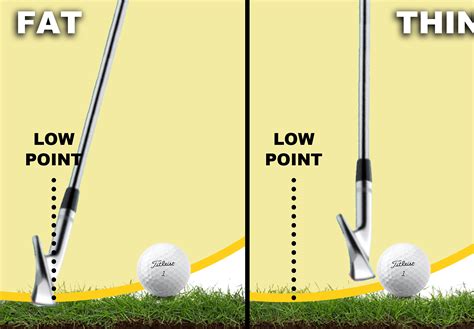
- Why it Works: This central-to-slightly-forward placement allows you to hit down on the ball, taking a divot *after* impact, which is the hallmark of solid iron striking.
- Impact on Flight: Correct iron ball position ensures a consistent flight path, making it easier to control distance and accuracy into the greens.
- *My 6-iron used to be a nightmare, but once I committed to the "just forward of center" position, my divots started appearing after the ball, and my consistency improved dramatically.*
3. Touch & Feel: Short Irons & Wedges for Finesse
Short irons and wedges are about control, spin, and precision. Their ball position is designed to facilitate a steeper, more controlled downward strike, giving you maximum command.
- Short Irons (8-iron, 9-iron): Place the ball at the center of your stance. This is the most common and versatile position for achieving a good, crisp strike.
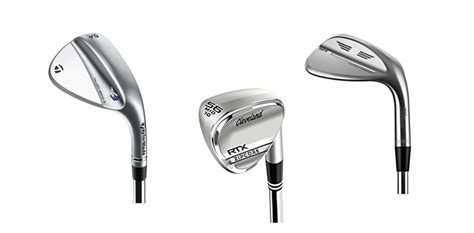
- Wedges (Pitching Wedge, Gap Wedge, Sand Wedge, Lob Wedge): For most full and partial wedge shots, keep the ball at or slightly back of the center of your stance. This encourages a slightly steeper angle of attack for better spin and trajectory control.
- Purpose: This central or slightly-back position helps you deliver a descending blow, trapping the ball against the turf for optimal spin and control, especially on approach shots.
- Think Consistency: This setup is key for repeatable distances and accurate short game shots.
- *There was this one time I needed to stick a lob wedge close from a tight lie, and keeping the ball slightly back in my stance gave me the confidence to come down on it perfectly. Ended up tap-in for par!*
4. Around the Green: Chipping & Pitching Fundamentals

Chipping and pitching are about finesse, and your ball position shifts significantly to facilitate a clean strike and consistent roll.
- Chipping: Position the ball back in your stance, near your trail foot. This promotes a downward, slight delofting strike, getting the ball rolling quickly. Your weight should be favoring the lead side.
- Pitching (longer shots around the green): The ball position moves slightly forward from chipping, often just back of center or at the center of your stance, depending on the desired trajectory. This allows for a slightly fuller swing with more loft.
- Why it Matters: This setup helps you eliminate fat shots and get the leading edge down for clean contact, crucial for feel around the green.
- Experimentation: While these are guidelines, these short game shots often allow for more personal preference and feel.
- *I once flubbed three chip shots in a row during a casual game because I kept trying to chip with the ball centered. Moving it back to my trail foot instantly fixed the issue. Lesson learned!*
5. The Art of the Roll: Putting Ball Position

Putting is a delicate art, and your ball position directly impacts your ability to strike the ball squarely with a consistent roll.
- Standard Putting: Most experts recommend placing the ball slightly forward of the center of your stance, typically just inside your lead heel. This encourages striking the ball slightly on the upswing, promoting a smooth, consistent roll.
- Eye Alignment: Crucially, your eyes should be directly over or just inside the ball. This ensures you're seeing your putting line correctly.
- Consistency is Key: Find a position that allows you to strike the ball consistently with the center of your putter face.
- *For me, ensuring my eyes are directly over the ball when it's slightly forward in my stance makes a massive difference. It's my favorite putting setup because it saved me countless three-putts.*
6. Adapting to Lies: Situational Adjustments

While the "printable golf ball position chart" provides excellent baselines, the golf course rarely offers perfect lies. Being able to adapt is a mark of true expertise.
- Uphill Lie: Move the ball slightly forward in your stance to accommodate the upward slope, allowing you to hit more cleanly through the ball.
- Downhill Lie: Shift the ball slightly back in your stance to match the downward slope, preventing you from catching too much turf.
- Uneven Lies: Adjust your stance width and body tilt to match the slope, and then make small ball position tweaks based on whether you're hitting uphill or downhill relative to your stance.
- Think On Your Feet: These adjustments are where the "experience" element of golf truly shines. There's no single perfect rule; it's about feel and understanding the physics.
- *I learned this the hard way on a particularly hilly course – tried to play a stock iron shot on a severe downhill lie and topped it completely. Now, I always adjust my ball position back a bit to match the slope, and it makes all the difference.*
---
Tips for Personalizing Your Golf Setup
Your golf swing is unique, and while the "printable golf ball position chart" offers fantastic guidance, a little personalization can go a long long way.
- Experiment at the Range: Don't be afraid to try slightly different positions. Hit 10 balls with your typical driver setup, then 10 with the ball half an inch forward or back. Observe the results.
- Use Alignment Sticks: Lay a club or alignment stick on the ground parallel to your target line, then another perpendicular to it, pointing to where your ball should be for each club. This visual aid is invaluable.
- Video Your Swing: Sometimes, what you *feel* you're doing isn't what you're *actually* doing. Video yourself from a head-on angle to check your ball position relative to your feet.
- Focus on Feel, Then Confirm: Get a feel for the proper position, then occasionally check with a chart or alignment sticks to ensure you haven't drifted. I find focusing on the lead heel for drivers works best for me because it forces my mind to think about swinging up.
- Consider Your Natural Tendencies: If you naturally hit down on the ball more, you might slightly adjust iron positions forward. If you're a sweeper, you might move them back a touch.
Common Pitfalls: What to AVOID When Setting Ball Position

Even with a perfect "printable golf ball position chart," it's easy to fall into old habits. Here are some common mistakes to watch out for:
- One Ball Position for All Clubs: This is probably the biggest mistake beginners make. Trying to hit a driver like a wedge will lead to pop-ups or slices. Don't be like me and think you can "muscle" through it – the physics just aren't on your side!
- Ignoring Your Feet: Ball position is relative to your feet, specifically your stance width. A very wide or very narrow stance will affect how the ball position works.
- Shifting During the Swing: Once you've set your ball position, commit to it! Don't let your feet or body subtly shift just before or during your backswing.
- Forgetting to Adjust for Slopes: On the course, you'll rarely find a perfectly flat lie. Failing to adjust your ball position slightly for uphill, downhill, or sidehill lies is a recipe for disaster.
- Overthinking It on the Course: While practicing, be meticulous. On the course, trust your setup, make a quick check, and then commit to the shot. Don’t get stuck in analysis paralysis!
---
Learning and applying the principles of ball position outlined in this "printable golf ball position chart" will unlock a new level of consistency and confidence in your golf game. It’s not just about hitting the ball further; it’s about hitting it smarter, more consistently, and with greater control. Grab your clubs, head to the range with this guide (or print it out and laminate it for your bag!), and start experimenting. You'll be amazed at the difference it makes. Now go make those greens in regulation—or at least avoid those dreaded shanks!