Oh, the mesmerizing dance of light through colored glass! There’s something truly magical about stained glass, isn't there? It’s an art form that transforms simple pieces of glass into breathtaking masterpieces, casting vibrant hues across your space. For many, the very thought of creating something so intricate can feel daunting, a skill reserved for master artisans with years of experience. But what if I told you that the journey into this enchanting world is far more accessible than you might imagine? What if I told you that with the right guidance and, crucially, the right printable beginner stained glass patterns, you could be creating your own radiant works of art sooner than you think?
I remember my own first foray into stained glass. I was captivated by a suncatcher I saw at a local craft fair – a simple, elegant hummingbird. I thought, "Surely, I could never make something like that." But the seed was planted. I bought a basic toolkit, watched countless YouTube videos, and then hit the biggest roadblock: finding patterns that were truly, genuinely *beginner-friendly*. Many promised simplicity, but then threw complex curves and tiny pieces at me. It was frustrating, almost enough to make me give up before I’d even begun. That’s why I’m so passionate about this topic – because I want to spare you that initial struggle and equip you with everything you need to confidently dive into the glorious world of stained glass. This isn’t just an article; it’s the comprehensive guide I wish I’d had, a warm hand extended to help you navigate those exciting first steps.
In this expansive guide, we’re going to demystify the process of finding, selecting, and using printable beginner stained glass patterns. We’ll explore a treasure trove of design ideas, delve into the practicalities of preparing your patterns, and equip you with the knowledge to overcome common hurdles. Whether you're dreaming of a simple geometric suncatcher, a charming little animal, or a delicate floral design, you'll find the inspiration and actionable advice you need right here. Get ready to transform your creative aspirations into tangible, shimmering realities.
---
Table of Contents

- [The Absolute Basics: Getting Started with Your First Pattern](#the-absolute-basics-getting-started-with-your-first-pattern)
- [Nature's Embrace: Floral & Botanical Beginner Patterns](#natures-embrace-floral--botanical-beginner-patterns)
- [Animal Kingdom Adventures: Cute & Simple Critter Patterns](#animal-kingdom-adventures-cute--simple-critter-patterns)
- [Geometric Wonders: Mastering Shapes & Lines](#geometric-wonders-mastering-shapes--lines)
- [Festive & Seasonal Fun: Holiday-Themed Patterns for Beginners](#festive--seasonal-fun-holiday-themed-patterns-for-beginners)
- [Everyday Charm: Household & Hobby-Inspired Designs](#everyday-charm-household--hobby-inspired-designs)
- [Beyond the Page: Customizing & Adapting Beginner Patterns](#beyond-the-page-customizing--adapting-beginner-patterns)
- [Digital Delights: Where to Find & Download Your Next Pattern](#digital-delights-where-to-find--download-your-next-pattern)
- [The Art of the Cut: Preparing Your Pattern for Success](#the-art-of-the-cut-preparing-your-pattern-for-success)
- [Problem-Solving Patterns: Troubleshooting Common Beginner Challenges](#problem-solving-patterns-troubleshooting-common-beginner-challenges)
- [How to Choose the Best Printable Beginner Stained Glass Patterns for Your Needs](#how-to-choose-the-best-printable-beginner-stained-glass-patterns-for-your-needs)
- [Common Pitfalls to Avoid When Using Beginner Stained Glass Patterns](#common-pitfalls-to-avoid-when-using-beginner-stained-glass-patterns)
- [Advanced Tips for Experts: Elevating Your Stained Glass Journey Beyond Beginner Patterns](#advanced-tips-for-experts-elevating-your-stained-glass-journey-beyond-beginner-patterns)
- [Conclusion: Your Stained Glass Journey Awaits!](#conclusion-your-stained-glass-journey-awaits)
---
The Absolute Basics: Getting Started with Your First Pattern
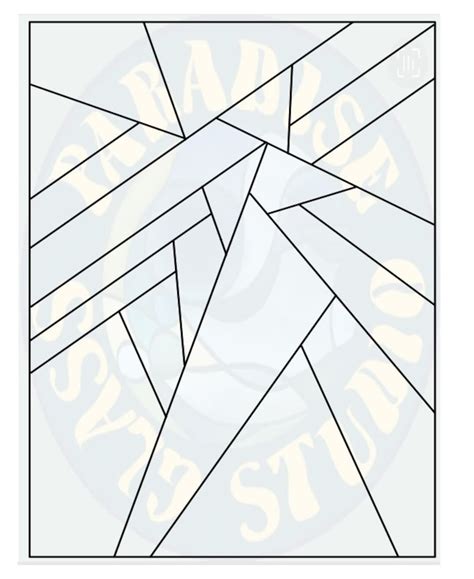
When you’re just dipping your toes into the incredible world of stained glass, the most important thing is to start simple. Seriously, don’t look at those elaborate Tiffany lamps just yet! Your first few projects are about building confidence, getting a feel for the tools, and understanding the fundamental techniques. This is where truly printable beginner stained glass patterns shine – they strip away complexity and focus on the core skills.
Here are some essential concepts and pattern types for absolute beginners:
1. Straight Lines are Your Best Friend: Forget curves for a moment. Patterns made primarily of straight lines are the easiest to cut accurately. Think squares, rectangles, triangles, and simple diamonds.
2. Minimal Pieces, Maximum Impact: A pattern with fewer pieces means less cutting, less grinding, and less foiling. Your first project could literally be just 3-5 pieces.
3. Simple Shapes First: Circles, squares, and triangles are the building blocks. A suncatcher made of two overlapping circles and a straight line for a hanging tab is a fantastic first project.
4. No Internal Cuts (Yet!): Internal cuts, where you cut *inside* a piece of glass, are challenging. Beginner patterns should avoid these entirely. All cuts should start and end at the edge of the glass.
5. Generous Gaps: Look for patterns that have clear, wide lines indicating where the solder lines will be. This "solder gap" is crucial for foiling and soldering without pieces overlapping.
6. Symmetry for Simplicity: Symmetrical patterns are often easier to visualize and assemble. A simple star, cross, or geometric design with repeating elements can be very forgiving.
7. Suncatchers Over Panels: Start with small suncatchers that don't require structural reinforcement or framing. They're quicker to complete and offer immediate gratification.
8. The "One-Line" Rule: If you can cut a piece of glass with a single score line, it’s probably a good beginner piece. If it requires multiple intersecting lines or turns, save it for later.
9. Practice Pieces: Before you even commit to a pattern, print it out and practice cutting on scrap glass. This helps you get a feel for your cutter and build muscle memory.
10. Pre-Printed Guides: Some beginner patterns come with pre-numbered pieces and even suggested glass colors. These are incredibly helpful for visual learners and keeping track of everything.
11. "My first project was a simple square within a square," I often tell aspiring artists. "I thought it was boring, but completing it gave me the confidence to move on to something slightly more complex, like a triangle." That small win was huge!
12. Don't underestimate the power of a basic star. I once helped a friend who was convinced she had no artistic talent. We found a printable beginner stained glass pattern for a five-point star, and by the end of the day, she had a glittering piece of art she was proud of. It truly felt like a breakthrough moment for her, and it all started with a simple pattern.
Nature's Embrace: Floral & Botanical Beginner Patterns
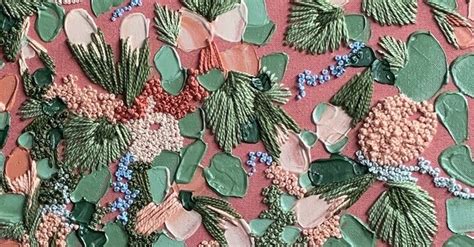
Once you've mastered the absolute basics, the natural world offers a boundless source of inspiration. Floral and botanical printable beginner stained glass patterns are incredibly popular, allowing you to bring the beauty of the outdoors inside. While some can be incredibly intricate, there are plenty designed with simplicity in mind.
Here’s how to approach nature-inspired patterns for beginners:
1. Single Flower Silhouettes: Start with a simple flower like a tulip or a daisy, focusing on its overall shape rather than individual petals. Think of it as a flat, two-dimensional outline.
2. Broad Petals and Leaves: Look for flowers with large, rounded, or elongated petals that are easy to cut. Avoid intricate details or delicate tendrils.
3. Basic Leaf Shapes: Simple leaf designs, like an oak leaf or a heart-shaped leaf, are excellent practice for gentle curves.
4. Mushroom Caps: A classic mushroom design often involves a simple dome for the cap and a straight stem, making it a surprisingly beginner-friendly botanical choice.
5. Simple Vines or Branches: A single, curving vine with a few attached leaves can introduce you to cutting longer, flowing lines without too many sharp turns.
6. Clusters of Berries/Grapes: These are often made of multiple small circles, which are great for practicing consistent scoring.
7. Sunflower Outline: A sunflower can be simplified to a large central circle with triangular or rounded petals radiating outwards.
8. Minimalist Cacti: A simple, blocky cactus shape with a few arms is a fantastic way to experiment with green glass without too much complexity.
9. Two-Tone Designs: Choose patterns that use only two or three different colors of glass to simplify your material selection and focus on the cutting.
10. Consider the "Flow": When looking at a floral pattern, imagine the path your glass cutter would take. Does it flow smoothly, or are there sudden, sharp angles that might cause difficulty?
11. I remember a friend struggling with a complex rose pattern and getting incredibly frustrated. I suggested she try a simple three-petal tulip instead. The relief on her face when she successfully cut those smooth curves was palpable. Sometimes, less truly is more, especially when you're building foundational skills.
12. My personal favorite for a truly relaxing project is a simple leaf. I often print out various leaf shapes – from a broad maple leaf to a slender willow leaf – and just focus on getting those smooth, natural curves. It’s a wonderful way to unwind and practice control, and the results are always beautiful, even if they aren't perfect.
Animal Kingdom Adventures: Cute & Simple Critter Patterns
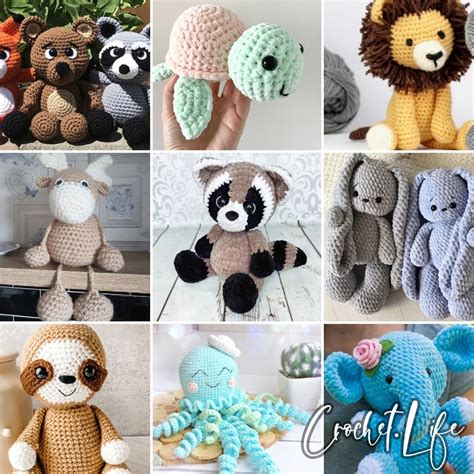
Animals are endlessly inspiring, and thankfully, many adorable creatures can be simplified into fantastic printable beginner stained glass patterns. The key here is focusing on iconic silhouettes and avoiding tiny, fiddly details like individual toes or fur textures.
Here are some animal patterns perfect for your early stained glass projects:
1. Butterflies with Bold Wings: Choose a butterfly pattern with large, distinct wing sections that are easy to cut. Avoid intricate details or vein lines within the wings initially.
2. Simple Bird Silhouettes: A flying bird with outstretched wings or a perched bird in profile, made from just a few pieces, can be charming. Think plump bodies and simple tails.
3. Fish Shapes: A basic fish outline often involves a few gentle curves for the body and simple fins. Great for experimenting with blue and green glass!
4. Ladybugs: These are usually two large semi-circles for the wings, a smaller circle for the head, and maybe a few small circular spots. Very manageable.
5. Bees: A simple bee can be a striped oval body, two basic wing shapes, and a small head.
6. Penguins: Their distinct, blocky shape makes them surprisingly straightforward – a large white oval for the belly, black for the body, and small pieces for feet and beak.
7. Cats (Simplified Profile): A basic sitting or standing cat silhouette, perhaps just two or three pieces, can capture their essence without complex details.
8. Snails: A snail shell offers a great opportunity to practice cutting a spiral or a series of concentric circles, paired with a simple body.
9. Dragonflies: Similar to butterflies, look for dragonflies with large, blocky wings rather than delicate, veined ones.
10. The "Cartoon" Approach: Think about how animals are drawn in simple cartoons – often with exaggerated, clear shapes. These are the best for translating into beginner stained glass.
11. I once made a simple fish suncatcher for my niece, using a pattern I found online. It had just four pieces: body, tail, and two fins. Seeing her light up when the sunlight caught it made all the tiny frustrations of learning worth it. That little fish still hangs in her window!
12. My cat, Mittens, inspired me to create a super basic cat silhouette. It was just a head, body, and tail, cut from three pieces of black glass. It might not have been a masterpiece, but it captured her spirit perfectly and was a wonderful way to practice my curves. It's now my go-to gift for fellow cat lovers who are just starting out.
Geometric Wonders: Mastering Shapes & Lines

Ah, geometry – the unsung hero of beginner stained glass! Before you can tackle complex scenes, you need to master the fundamentals of cutting and fitting shapes. Geometric printable beginner stained glass patterns are the perfect training ground, allowing you to focus purely on precision and technique without the added pressure of recreating a recognizable object.
Dive into the world of shapes with these ideas:
1. Squares and Rectangles: The absolute starting point. Practice cutting perfect straight lines and 90-degree angles. Assemble them into simple grids or checkerboard designs.
2. Triangles: Equilateral, isosceles, right-angled – triangles offer a fantastic way to practice diagonal cuts and sharp points. Combine them to form stars or abstract patterns.
3. Circles and Semi-circles: Mastering the circle cutter is a game-changer. Start with large circles, then move to smaller ones. Combine full circles with semi-circles to create moon phases or sun designs.
4. Diamonds/Rhombuses: These introduce angled cuts that aren’t 90 degrees, helping you develop a feel for different scoring pressures.
5. Hexagons and Octagons: More complex polygons offer a satisfying challenge once you’re comfortable with simpler shapes. They look impressive when assembled.
6. Simple Grids/Panels: Create a basic square or rectangular panel by joining multiple smaller squares or rectangles. This teaches you about structural integrity and consistent solder lines.
7. Abstract Intersections: Overlapping geometric shapes (e.g., a square partially intersecting a circle) create interesting negative space and teach you about fitting non-standard angles.
8. Stacked Shapes: Layering different sized circles or squares to create a 3D effect (though still a flat panel) can add visual interest.
9. "Stained Glass Window" Effect: Use very simple geometric patterns to mimic the look of traditional stained glass windows, perhaps using just two or three types of glass.
10. Mondrian-Inspired: Think Piet Mondrian’s famous paintings – bold black lines, primary colors, and simple rectangular blocks. These are incredibly satisfying and look sophisticated.
11. My very first project was a series of four simple squares. I thought it would be easy, but getting those lines perfectly straight and the corners crisp was a real test of patience! It taught me so much about grinding and fitting that I wouldn’t trade that experience for anything.
12. I remember spending an entire afternoon just practicing cutting circles. It felt repetitive, but honestly, it was a game-changer for my technique. Now, when I see a pattern with circles, I don't panic. That practice, born from simple geometric printable beginner stained glass patterns, truly paid off.
Festive & Seasonal Fun: Holiday-Themed Patterns for Beginners
There's something uniquely rewarding about creating stained glass pieces that celebrate the seasons or holidays. They make perfect gifts and add a special sparkle to your home. Many holiday-themed printable beginner stained glass patterns are designed with simplicity in mind, using iconic shapes that are easy to recognize and cut.
Here are some festive and seasonal ideas to get you started:
1. Christmas Stars & Snowflakes: Simple five or six-pointed stars and basic snowflake outlines are classic and easy to cut. Avoid intricate snowflake details initially.
2. Christmas Trees (Simplified): A basic triangle for the tree and a small rectangle for the trunk make for a charming, quick project.
3. Halloween Ghosts & Pumpkins: A classic ghost silhouette (think Casper!) or a simple round pumpkin with cut-out eyes and mouth are fantastic and fun.
4. Easter Eggs: Oval shapes are excellent for practicing smooth curves. You can even make a set of multi-colored eggs.
5. Hearts for Valentine's Day: The iconic heart shape is a wonderful way to practice symmetrical curves and create a heartfelt gift.
6. Shamrocks for St. Patrick's Day: A simple three-leaf clover is surprisingly easy, often made of three rounded sections and a small stem.
7. Leaves for Autumn: Simple maple, oak, or sycamore leaf shapes in warm autumn colors are perfect for seasonal decor.
8. Sun Suncatchers: A large circle with simple triangular rays is a bright, cheerful pattern suitable for summer.
9. Candy Canes: Simple stripes in a curved shape offer a fun challenge for slightly more confident beginners.
10. Themed Ornaments: Many holiday patterns are designed specifically as small ornaments, meaning fewer pieces and quicker completion times.
11. Last Christmas, I decided to make small stained glass stars as gifts for my family. Each star was a five-point design, and I used different colored glass for each. It was such a joy to see them hang these on their trees, knowing I had created them with my own hands. That feeling of shared joy is what makes this hobby so special.
12. My annual tradition now is to make a new Halloween suncatcher. One year, I tried a simple bat silhouette – just two wings and a body. It hangs in my window every October, and it always makes me smile. It’s a fun, low-pressure way to celebrate the season while honing my skills.
Everyday Charm: Household & Hobby-Inspired Designs
Sometimes, the best inspiration comes from the mundane or the things we love. Household items and hobby-related objects can be simplified into delightful printable beginner stained glass patterns, making unique decorations or personalized gifts. These patterns often use a combination of simple geometric and gentle organic shapes.
Here are some ideas drawn from everyday life and hobbies:
1. Coffee Mugs: A simple mug profile with a handle is an excellent way to practice a curved line for the cup and a distinctive handle shape.
2. Teapots: Similar to mugs, a teapot can be simplified to a body, spout, and handle, offering a chance to work on different types of curves.
3. Houses/Cottages: A basic house outline (square body, triangle roof) is a classic beginner pattern. You can even add a simple door and window.
4. Tools (e.g., Hammer, Wrench): Iconic tool silhouettes can be surprisingly simple, often relying on straight lines and clear, distinct shapes. Perfect for the DIY enthusiast.
5. Books: A stack of books, or a single open book, can be represented by simple rectangles and trapezoids.
6. Music Notes: A basic whole note or quarter note is a straightforward shape, often involving a circle and a straight line.
7. Sports Balls: A basketball, soccer ball, or baseball can be simplified to a circle with a few distinct lines.
8. Simple Vehicles: A basic car, boat, or airplane silhouette can be broken down into a few main pieces. Think cartoon versions.
9. Puzzles Pieces: A single interlocking puzzle piece is a fantastic way to practice cutting both inward and outward curves.
10. Lighthouses: A lighthouse can be simplified to a tapering cylinder with a small top section, offering a good exercise in straight lines and gentle angles.
11. I made a simple coffee mug suncatcher for my friend, who is a huge coffee lover. It was just three pieces, but she absolutely adored it because it was so personal. It taught me that even the simplest designs can carry immense sentimental value.
12. As a keen gardener, I decided to try making a small watering can. It was surprisingly manageable, mostly straight lines and a few gentle curves for the spout and handle. It hangs in my kitchen window now, a little reminder of my other passion, and it started with a straightforward printable beginner stained glass pattern.
Beyond the Page: Customizing & Adapting Beginner Patterns
Once you've gained a bit of confidence with existing printable beginner stained glass patterns, you might start feeling the itch to make them truly *your own*. Adapting and customizing patterns is a natural progression that allows for greater creative expression. While still keeping things beginner-friendly, these techniques empower you to personalize your projects.
Here’s how you can go beyond simply printing and cutting:
1. Scaling Up or Down: Most digital patterns can be resized. Want a smaller suncatcher or a larger panel? Adjust the print settings. Just be mindful that shrinking too much can make pieces too tiny to cut easily, and enlarging too much might require stronger glass or lead came instead of foil.
2. Color Swaps: The easiest customization! Don't feel bound by the suggested colors. Experiment with different shades, textures (e.g., iridescent, streaky, opaque), and opacities to completely change the mood of a pattern.
3. Combining Elements: Take elements from two different simple patterns and combine them. For example, add a simple leaf from one pattern to a basic flower from another.
4. Adding a Border: Take a simple central design and add a straightforward rectangular or circular border around it. This adds an extra piece or two but gives a finished look.
5. Simplifying Complexities: If you find a pattern you love but it has one or two tricky elements, redraw those sections to be simpler. For instance, turn tiny fingers into a solid hand shape.
6. Mirroring: Print a pattern and then print its mirror image. This can create interesting symmetrical effects or allow you to make a pair of matching pieces.
7. Texturizing with Etching Cream (Post-Solder): Once your piece is finished, you can use etching cream on certain areas to add texture or a frosted look, creating contrast without changing the pattern itself. (Always follow safety guidelines for etching cream!)
8. Adding Wire Embellishments: Incorporate simple wire details *after* soldering, like a curled tendril on a leaf or a small beaded antenna on a butterfly.
9. Creating a Series: Use a single, simple pattern (like a square or a circle) and create a series of them, each with a different color scheme or a small, unique internal design.
10. Personalized Touches: Add a small initial or a simple number to a design if the pattern allows for a small, flat area.
11. My favorite trick is to print a pattern in grayscale. This allows me to really focus on the shapes, and then I can experiment with color combinations using actual glass samples before committing. It's like a little puzzle every time.
12. I once took a super basic bird silhouette and decided to make it my own. I found some streaky blue glass that reminded me of a robin’s egg, and instead of a plain black eye, I added a tiny iridescent piece. It was still a beginner pattern, but those small personal touches made it feel truly unique, and it’s become one of my favorite pieces.
Digital Delights: Where to Find & Download Your Next Pattern

The internet is a vast ocean of creative resources, and finding printable beginner stained glass patterns is no exception. While browsing, remember to prioritize patterns that clearly state they are for beginners or have visibly simple lines and few pieces. Always check the source for reviews or community feedback if possible.
Here are some excellent digital avenues to explore for your next stained glass adventure:
1. Dedicated Stained Glass Pattern Websites: Many sites specialize solely in stained glass patterns, offering free and paid options. Look for sections specifically labeled "Beginner," "Easy," or "Free Patterns."
2. Pinterest: A visual goldmine! Search for "easy stained glass patterns," "beginner suncatcher patterns," or "free stained glass patterns for beginners." Always click through to the original source to ensure it’s printable and legitimate.
3. Etsy & Creative Market: Many talented artists and designers sell their digital patterns here. While some are paid, the quality is often excellent, and you can support independent creators. Look for bundles of beginner patterns.
4. Crafting Blogs & Forums: Many stained glass enthusiasts share free patterns on their blogs or within online communities. These often come with personal tips and step-by-step instructions.
5. YouTube Channels: Some stained glass YouTubers offer downloadable patterns linked in their video descriptions, often accompanying a tutorial on how to make the piece. This is great for visual learners.
6. Glass Supplier Websites: Reputable online glass suppliers sometimes offer free patterns as a bonus for their customers, or as a way to promote their products.
7. Public Domain Resources: Search for "public domain stained glass patterns" or "vintage stained glass patterns." Be cautious here, as many older patterns might be complex, but you can often find simple geometric or floral designs that can be adapted.
8. Design Software Communities: If you use design software (even simple ones like Canva or Google Drawings), you might find users sharing templates or pattern ideas.
9. Facebook Groups & Online Communities: Join stained glass crafting groups. Members often share free patterns they've created or found, and you can ask for recommendations.
10. Creative Commons Licenses: When searching for free patterns, look for those with Creative Commons licenses that allow for personal use and printing.
11. I vividly remember stumbling upon a forum post where someone shared a collection of very basic animal patterns, labeled specifically for beginners. It was like finding a hidden treasure chest! That’s where I got the pattern for the simple ladybug I mentioned earlier, and it sparked so much joy.
12. My personal go-to is often Etsy for paid patterns. While I love free resources, investing a few dollars in a high-quality, clearly designed printable beginner stained glass pattern from a reputable seller can save hours of frustration. The instructions are usually clearer, and the lines are crisp, which is a game-changer when you’re just starting out.
The Art of the Cut: Preparing Your Pattern for Success
Finding the perfect printable beginner stained glass pattern is just the first step. The way you prepare and use that pattern is absolutely critical to your success. A well-prepared pattern acts as your roadmap, guiding every score and cut. This stage is where precision and patience truly pay off.
Here’s how to effectively prepare your patterns for cutting:
1. Print at 100% Scale: Ensure your printer settings are set to "actual size" or "100% scale" to maintain the pattern’s intended dimensions. Do not select "fit to page," as this will distort the size.
2. Use Quality Paper: Print on sturdy paper (cardstock is ideal) that won't easily tear or warp when you trace or glue. Regular printer paper works, but cardstock offers more durability.
3. Make Copies: Always print at least two copies of your pattern. One is for cutting out the individual paper pieces (your "working pattern"), and the other is for your "master pattern" or "layout pattern," which you'll use to reassemble your glass pieces.
4. Cut Pattern Pieces Accurately: Use sharp scissors to cut out each individual piece of your working pattern. Cut precisely along the *inside edge* of the lines to account for the thickness of your copper foil (the "gap" or "grind line").
5. Number Your Pieces: Before cutting, number each piece on both your working pattern and your master pattern. This prevents confusion, especially for patterns with similar-looking shapes.
6. Directional Arrows (Optional but Recommended): For glass with a distinct grain or swirl, draw arrows on your pattern pieces to indicate the desired direction of the glass grain.
7. Glue (Temporary Adhesive): Use a temporary adhesive (like a glue stick or rubber cement) to attach the paper pattern piece to your chosen glass. This prevents slipping during cutting.
8. Clean Lines: Ensure the printed lines on your pattern are clear and crisp. Fuzzy lines will lead to inaccurate cuts.
9. Consider Light Box Use: If you have a light box, you can place your glass over the pattern and trace the lines directly onto the glass with a marker, instead of gluing paper pieces. This is often preferred by more experienced artists but can work for beginners too.
10. Grind Line Awareness: Remember that the lines on your pattern represent the *solder lines*. When you cut your glass, you're essentially cutting *alongside* these lines, leaving a small gap for the foil and solder. This concept is fundamental to good stained glass.
11. I once skipped numbering my pattern pieces on a relatively simple suncatcher. Big mistake! Two hours later, I was trying to fit what I thought were identical pieces, only to find they were subtly different. Since then, numbering is the *first* thing I do after printing. Learn from my chaos!
12. My personal ritual involves making a "pattern sandwich." I'll have the master pattern laid out, then my cut glass pieces go directly on top of their corresponding spots. It helps me visualize the progress and ensures everything is fitting together as it should. It's a simple step, but it really reduces my stress levels.
Problem-Solving Patterns: Troubleshooting Common Beginner Challenges

Even with the best printable beginner stained glass patterns, you'll encounter challenges. That's part of the learning process! The key is to recognize common pitfalls and know how to address them. Don't get discouraged; every seasoned stained glass artist has faced these exact issues.
Here are some common problems beginners face with patterns and how to solve them:
1. Glass Not Fitting Together (Gaps or Overlaps):
- Problem: Pieces are too big or too small, leaving wide gaps or causing overlaps.
- Solution: This is almost always due to inaccurate cutting or grinding. Ensure you're cutting precisely on the correct side of the pattern line (the "inside" edge). Grind pieces slowly and check fit frequently. Remember, the foil takes up space, so a slight gap is okay.
2. Jagged or Uneven Edges After Cutting:
- Problem: Your score line wasn't consistent, or you forced the break.
- Solution: Practice your scoring technique on scrap glass. Apply even pressure, maintain a consistent speed, and ensure your cutter wheel is sharp. Use grozing pliers to carefully nip away small, stubborn bits, but avoid large nips.
3. Pattern Pieces Tearing When Cutting:
- Problem: Using thin paper or applying too much pressure when tracing/cutting paper.
- Solution: Print on heavier paper or cardstock. Be gentle when cutting out paper pieces. If a piece tears, use clear tape to mend it, or ideally, print another copy of the pattern.
4. Difficulty Transferring Pattern to Glass:
- Problem: Paper slips, or marker rubs off.
- Solution: Use reliable temporary adhesive (glue stick). For tracing, use a permanent marker designed for glass (like a Sharpie) and let it dry before handling. A light box can also help.
5. Losing Track of Pieces:
- Problem: Especially with patterns that have many similar shapes.
- Solution: Number *all* your pattern pieces, and number your glass pieces as you cut them. Lay out your master pattern and place the glass pieces directly onto it as you work.
6. "My Lines Aren't Straight!" (Or Curves Aren't Smooth):
- Problem: Inconsistent hand pressure or cutter angle.
- Solution: Practice, practice, practice! Use a straight edge for straight lines. For curves, rotate the glass as you score. It's a skill that develops over time. Don't be afraid to scrap a piece of glass and try again.
7. Pattern Not Printing Correctly (Size Issues):
- Problem: The printed pattern isn't the intended size.
- Solution: Always check your printer settings and ensure "actual size" or "100% scale" is selected. Print a test page with a ruler icon (if provided) to verify dimensions.
8. Wasting Glass on Mistakes:
*