Have you ever scrolled through social media, admiring those perfectly personalized t-shirts, adorable custom baby onesies, or witty mugs, and thought, "I wish I could make something like that"? Or maybe you’re a small business owner looking to add that unique, handmade touch to your product line without breaking the bank on expensive equipment. Trust me, I’ve been there. I remember vividly the frustration of trying to find the perfect gift for my notoriously hard-to-shop-for cousin, knowing a generic store-bought item just wouldn't cut it. That’s when I stumbled into the wonderful world of heat transfer printable materials, and honestly, it felt like discovering a secret superpower! This wasn't just about crafting; it was about bringing ideas to life, one custom print at a time. This guide is born from countless hours of experimenting, a few (okay, many) ruined shirts, and the sheer joy of seeing a vision come to life.
This isn't just a guide; it's your comprehensive companion to unlocking the full potential of heat transfer printable materials. We’re going to dive deep, from understanding the different types of printable media to mastering the art of application, troubleshooting common snags, and even dreaming up ways to turn your passion into profit. Whether you’re a complete novice staring at your printer wondering where to begin, or a seasoned crafter looking for advanced tips to elevate your game, you’ll find actionable insights, insider secrets, and a whole lot of creative inspiration within these pages. So, grab a cup of your favorite beverage, get comfy, and prepare to transform your creative ideas into tangible, personalized masterpieces. Let’s make some magic happen!
---
Table of Contents

- [Unveiling the World of Heat Transfer Printable Materials: What Are They?](#unveiling-the-world-of-heat-transfer-printable-materials-what-are-they)
- [Choosing Your Canvas: Fabrics and Surfaces Best Suited for Heat Transfers](#choosing-your-canvas-fabrics-and-surfaces-best-suited-for-heat-transfers)
- [The Printer's Playground: Picking the Right Machine and Ink for Your Prints](#the-printers-playground-picking-the-right-machine-and-ink-for-your-prints)
- [The Pressing Point: Mastering Heat Application with Irons and Heat Presses](#the-pressing-point-mastering-heat-application-with-irons-and-heat-presses)
- [Design Alchemy: Crafting Your Vision with Software and Creativity](#design-alchemy-crafting-your-vision-with-software-and-creativity)
- [Troubleshooting Tales: Common Snags and How to Smooth Them Out](#troubleshooting-tales-common-snags-and-how-to-smooth-them-out)
- [Longevity & Love: Caring for Your Heat Transferred Creations](#longevity-love-caring-for-your-heat-transferred-creations)
- [Beyond Apparel: Creative Projects to Spark Your Imagination](#beyond-apparel-creative-projects-to-spark-your-imagination)
- [From Hobby to Hustle: Turning Your Heat Transfer Skills into a Small Business](#from-hobby-to-hustle-turning-your-heat-transfer-skills-into-a-small-business)
- [The Horizon of Heat Transfer: Innovations and Future Trends](#the-horizon-of-heat-transfer-innovations-and-future-trends)
- [How to Choose the Best Heat Transfer Printable for Your Needs](#how-to-choose-the-best-heat-transfer-printable-for-your-needs)
- [Common Pitfalls to Avoid](#common-pitfalls-to-avoid)
- [Advanced Tips for Experts](#advanced-tips-for-experts)
- [Conclusion](#conclusion)
---
Unveiling the World of Heat Transfer Printable Materials: What Are They?
At its core, heat transfer printable refers to specially coated papers or vinyl sheets that allow you to print a design using a standard inkjet or laser printer, and then transfer that design onto a material (usually fabric) using heat and pressure. It’s like a temporary tattoo for your clothes, but much more durable! The magic happens when the heat activates the ink or coating on the paper, bonding it permanently to the fibers of your chosen item. But it's not a one-size-fits-all world. There are several key players, each with its own strengths and ideal applications.
1. Inkjet Heat Transfer Paper (Light Fabrics):
- What it is: Designed for white or light-colored fabrics, this paper typically has a clear, thin polymer coating that holds the ink. When applied, the clear areas of the paper become transparent, allowing the fabric color to show through.
- Best for: T-shirts, tote bags, pillowcases, and anything light-colored where you want a soft hand feel.
- My experience: This was my first foray into the world of heat transfers. I remember printing a vibrant floral design for a plain white t-shirt for my niece's birthday. The print was crisp, and the shirt felt surprisingly soft – she loved it!
- Pro Tip: Always mirror your image before printing! If you forget, your text will be backward, and trust me, you don’t want to make that mistake on a custom order.
- Hypothetical Scenario: A friend wanted a specific quote on a baby onesie for a shower gift. Using inkjet light fabric paper, I could achieve a soft, flexible print that wouldn't irritate the baby's skin.
2. Inkjet Heat Transfer Paper (Dark Fabrics):
- What it is: Unlike light fabric paper, this type has a white, opaque backing. This white layer acts as a base for your print, preventing the dark fabric color from showing through and dulling your design. You print directly (not mirrored) onto this white surface.
- Best for: Black, navy, dark gray, or any colored fabrics where you need your design to pop.
- My experience: I once tried to use light fabric paper on a black t-shirt. The result? A muddy, barely visible design. Switching to dark fabric paper was a revelation – the colors were vibrant and stood out beautifully. It felt like finally seeing in color after years of black and white.
- Consideration: Dark fabric paper tends to have a slightly thicker feel or "hand" on the fabric compared to light fabric paper.
- Hypothetical Scenario: For a local band, I created custom black t-shirts featuring their logo. The opaque nature of the dark fabric transfer paper ensured their bright, intricate logo truly stood out against the dark background, making them look professional.
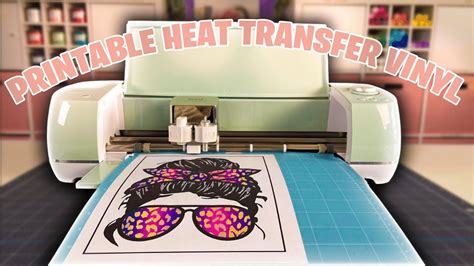
3. Heat Transfer Vinyl (HTV) - Printable:
- What it is: While most HTV is solid colored and cut with a craft cutter (like a Cricut or Silhouette), there's also printable HTV. This material combines the durability and stretch of vinyl with the ability to print full-color designs. You print directly onto it, then cut it out (often with a "print-then-cut" feature on a cutting machine), and finally press it.
- Best for: Apparel where durability, stretch, and intricate full-color designs are paramount, like sportswear or custom uniforms.
- My experience: I was skeptical at first, thinking it would feel too stiff. But after making some personalized gym towels with vibrant logos, I was blown away by how well it held up to washes and stretches. This is my go-to for anything that needs to last!
- Key Feature: Often requires "kiss-cutting" (cutting only the vinyl layer, not the backing) before weeding.
- Hypothetical Scenario: A client running a marathon needed custom team shirts with complex, multi-colored graphics. Printable HTV was the perfect solution, offering both the detailed print quality and the necessary stretch for athletic wear.
4. Sublimation Paper:
- What it is: This is a different beast entirely. Sublimation uses special inks that, when heated, turn directly from a solid into a gas (sublime), permanently dyeing the fibers of polyester-based materials or specially coated items. It’s not a transfer *onto* the surface, but *into* it.
- Best for: Polyester fabrics (at least 65% poly for best results), mugs, phone cases, keychains, and other hard goods with a poly-coating. The result is truly permanent, vibrant, and has no "hand" (you can't feel the print).
- My experience: The first time I saw a sublimation print, I couldn’t believe how seamless it was. I made a custom mug for my dad with a photo of his favorite fishing spot, and it looked like it was professionally printed from the factory. No peeling, no cracking – just pure, vibrant color.
- Crucial Note: Requires a specialized sublimation printer and ink.
- Hypothetical Scenario: For a family reunion, I designed matching mugs with a custom emblem and individual names. Sublimation ensured that the vibrant colors and sharp details would endure countless washes, becoming cherished keepsakes.
5. Laser Heat Transfer Paper:
- What it is: Similar in concept to inkjet transfer paper but designed specifically for laser printers. It comes in varieties for both light and dark fabrics.
- Best for: Businesses or individuals who already own a laser printer and want to produce durable, high-quality transfers, especially good for fine lines and text.
- My experience: While I primarily use inkjet, I once helped a friend who had a laser printer. The prints were incredibly sharp, especially for intricate designs with tiny details. It’s a great option if you need crisp lines.
- Consideration: Can be more expensive than inkjet paper, and some laser toners might not adhere as well as others.
Each type of heat transfer printable offers a unique pathway to creativity. Understanding these differences is the first crucial step to choosing the right tool for your specific project and ensuring your personalized creations look fantastic and last a long time.
Choosing Your Canvas: Fabrics and Surfaces Best Suited for Heat Transfers
The magic of heat transfer printable materials truly shines when paired with the right canvas. Just like a painter chooses their surface, you need to select the perfect fabric or item to ensure your design not only looks great but also adheres correctly and lasts. Not all materials are created equal when it comes to heat and ink!
1. Cotton (100% Cotton):
- Pros: The most popular choice, especially for inkjet transfer papers (both light and dark). It’s breathable, comfortable, and absorbs ink well.
- Cons: Can shrink, and some types of transfer paper might feel slightly stiffer on 100% cotton compared to blends.
- Best for: T-shirts, hoodies, tote bags, aprons, baby onesies. My favorite soft T-shirts are usually 100% cotton, and they take prints beautifully.
- Hypothetical Scenario: My niece's school needed custom t-shirts for their annual field day. 100% cotton shirts were the ideal choice for comfort and breathability for the kids, and inkjet transfers adhered perfectly.
2. Cotton/Polyester Blends (e.g., 50/50, Tri-blends):
- Pros: Offers a good balance of comfort, durability, and less shrinkage than 100% cotton. Often results in a softer feel for the transfer.
- Cons: For sublimation, you need a higher polyester content (ideally 65% or more) for vibrant, permanent results.
- Best for: Athletic wear, fashion tees, and items where you want a slightly more durable or softer feel than pure cotton. I once made a vintage-style band tee on a tri-blend, and the print settled into the fabric beautifully, giving it that perfectly worn-in look.
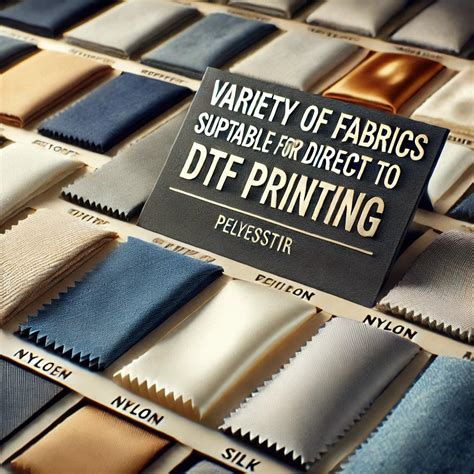
3. 100% Polyester:
- Pros: Essential for sublimation printing, as the polyester fibers are what the dye sublimes into. Excellent for wicking moisture, making it ideal for sportswear.
- Cons: Can be trickier with traditional iron-on transfers, as it's more heat-sensitive and prone to scorching if the heat is too high.
- Best for: Athletic jerseys, moisture-wicking shirts, flags, banners. If you’re doing a sports team, this is your go-to.
- Hypothetical Scenario: A local running club commissioned me to create custom tech shirts for their members. 100% polyester was critical for its moisture-wicking properties, and sublimation ensured the club's vibrant logo was seamlessly integrated into the fabric without any added bulk.
4. Canvas & Denim:
- Pros: Very durable and holds up well to heat. Great for bags, jackets, and art projects.
- Cons: Can be thick, requiring more pressure during transfer. The textured surface might affect the smoothness of some transfers.
- Best for: Tote bags, denim jackets, wall hangings, creative patches. I love adding custom designs to denim jackets for a unique fashion statement.
5. Wood (Coated):
- Pros: With special sublimation coatings or specific transfer papers, wood can be a fantastic canvas for personalized signs, plaques, or coasters.
- Cons: Requires a specific type of wood (light-colored, smooth) and often a pre-treatment or coating.
- Best for: Custom signs, photo plaques, personalized gifts. Imagine a custom family tree on a wooden plaque!
6. Ceramic (Coated Mugs, Tiles):
- Pros: Perfect for sublimation, offering incredibly vibrant, dishwasher-safe results.
- Cons: Requires sublimation coating and specific mug presses or oven techniques.
- Best for: Coffee mugs, custom tiles, photo coasters. I've made so many personalized mugs for gifts; they're always a hit!
7. Metal (Coated):
- Pros: Similar to ceramic, coated metal can be sublimated for stunning, durable results.
- Cons: Requires special coatings and precise heat control.
- Best for: Keychains, dog tags, metal signs, personalized business cards.
8. Neoprene:
- Pros: Ideal for custom mousepads, can koozies, and laptop sleeves. Takes sublimation well.
- Cons: Can be sensitive to very high heat if not managed properly.
- Best for: Promotional items, personalized tech accessories.
9. Paper/Cardstock:
- Pros: Certain transfer papers can be used to create temporary tattoos or even metallic foil effects on paper for invitations or crafts.
- Cons: Not as durable as fabric transfers, mainly for decorative purposes.
- Best for: DIY temporary tattoos, unique greeting cards, scrapbooking elements.
10. Leather (Real and Faux):
- Pros: Can accept certain specialized heat transfer vinyls, allowing for custom designs on bags, wallets, or patches.
- Cons: Very heat sensitive; requires low temperatures and short press times to avoid scorching or damaging the material.
- Best for: Personalized patches, labels for bags, custom leather accessories. A personalized leather journal cover can be a truly exquisite gift.
Understanding your canvas is just as important as understanding your heat transfer printable material. A little research into the material composition of your chosen item will save you headaches, wasted materials, and ensure your custom creations are a success every single time.
The Printer's Playground: Picking the Right Machine and Ink for Your Prints
Your printer isn't just a machine; it's the gateway to bringing your digital designs into the physical world, especially when working with heat transfer printable materials. Choosing the right printer and understanding its ink requirements is absolutely crucial for achieving crisp, vibrant, and long-lasting transfers.
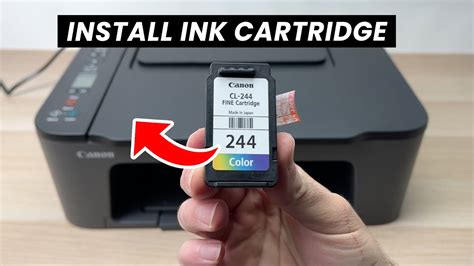
1. Inkjet Printers (The Most Common Choice):
- Why it's popular: Most household printers are inkjets, making them an accessible starting point. They use liquid ink, which is ideal for most standard heat transfer papers.
- Best for: Inkjet heat transfer paper (both light and dark fabric), and sometimes printable HTV.
- Key Consideration: Look for printers that use dye-based inks for the most vibrant colors, especially important for photos. Pigment-based inks can also work but might result in slightly less vibrant colors on some papers. My trusty Epson EcoTank has been a workhorse for years, its refillable tanks saving me a fortune on ink!
- My Experience: I've had great success with a mid-range Canon inkjet for vibrant photo transfers. The key was ensuring I used the correct paper settings for "glossy photo paper" or "heavy matte" to get enough ink saturation.
- Hypothetical Scenario: A local charity needed quick, colorful t-shirts for a fundraising event. My standard inkjet printer, loaded with vibrant dye-based inks and paired with good quality inkjet transfer paper, allowed me to produce dozens of shirts efficiently and affordably.
2. Sublimation Printers (Specialized for Dye-Sublimation):
- Why it's specialized: These printers use unique sublimation inks that convert from a solid to a gas when heated, permanently bonding with polyester materials. You cannot use regular inkjet or laser inks for sublimation.
- Best for: Sublimation paper for polyester fabrics, coated mugs, metals, etc.
- Key Consideration: You either buy a dedicated sublimation printer (like Sawgrass Virtuoso) or convert a new, unused Epson EcoTank or similar inkjet printer by filling its tanks with sublimation ink. Once a printer has regular ink, it's very difficult to convert it for sublimation.
- My Experience: Converting an Epson EcoTank to sublimation was a game-changer for my mug-making side hustle. The initial investment felt steep, but the quality of the prints and the permanence on mugs quickly paid for itself.
- Pro Tip: Always wear gloves when handling sublimation ink; it stains!
- Hypothetical Scenario: I wanted to launch a line of custom, dishwasher-safe pet bowls. A dedicated sublimation printer was essential to ensure the designs were not only vibrant but also durable enough to withstand daily use and washing.
3. Laser Printers (For Laser Transfer Paper):
- Why it's an option: If you already own a laser printer, it can be convenient. Laser transfer papers use toner, which can offer very sharp lines and durability on some fabrics.
- Best for: Laser heat transfer paper (light or dark fabric).
- Key Consideration: Not all laser printers are created equal for transfers. Some cheaper models might not have sufficient fusing temperature or toner composition to adhere well. Check compatibility before buying paper.
- My Experience: I’ve seen fantastic results with professional-grade color laser printers for detailed, text-heavy transfers for business branding on t-shirts. The crispness of the lines is truly impressive.
- Pro Tip: Be aware that laser transfers can sometimes have a slightly stiffer hand feel than inkjet transfers, depending on the paper.
4. Ink Types: Dye vs. Pigment vs. Sublimation:
- Dye-based Inks: Offer vibrant colors and are great for photos. They are water-soluble, which means they can bleed if exposed to moisture before transferring. Most standard inkjet transfer papers work well with dye inks.
- Pigment-based Inks: More water-resistant and fade-resistant than dye inks. They sit on top of the paper rather than soaking in. Can be used with some transfer papers but might appear slightly less vibrant than dye inks.
- Sublimation Inks: The only ink for sublimation printing. They are designed to turn into a gas and bond with polyester fibers.
- Toner (for Laser Printers): A dry powder that is fused onto the paper using heat. Excellent for sharp text and graphics.
Understanding your printer and its ink is paramount. Don’t skimp on ink quality; cheap inks can lead to faded, dull, or non-adhering transfers. Investing a little more in the right printer and ink from the start will save you countless headaches and wasted heat transfer printable materials down the line.
The Pressing Point: Mastering Heat Application with Irons and Heat Presses
Once your design is printed on your heat transfer printable material, the next crucial step is applying it to your chosen item. This is where heat and pressure come into play, literally bonding your creation to its canvas. While a household iron can get you started, a dedicated heat press offers unparalleled control and professional results.
1. The Household Iron (Beginner-Friendly, but with Caveats):
- Pros: Accessible, inexpensive, and you probably already own one. Great for small, simple projects or trying out the technique before investing.
- Cons: Uneven heat distribution, inconsistent pressure, and often not hot enough for optimal adhesion, especially on larger designs. This can lead to peeling, cracking, or dull transfers over time.
- How to use: Set to the highest heat setting (usually "cotton" or "linen") with no steam. Press firmly, using your body weight, moving the iron constantly in small circles for 60-90 seconds over the entire design area. Pay extra attention to edges.
- My Experience: My very first attempts at heat transfer printable were with an iron. I made a custom shirt for a friend’s band, and while it looked okay initially, some areas started peeling after a few washes. It taught me the importance of consistent heat and pressure the hard way.
- Pro Tip: Iron on a hard, flat surface (like a wooden table with a pillowcase over it), not an ironing board, which is too soft and uneven.
- Hypothetical Scenario: I wanted to make a quick, personalized gift for a last-minute birthday party – a custom tote bag. My household iron was perfect for this small, immediate project, proving its worth for casual, low-stakes crafting.
2. Clamshell Heat Presses (The Workhorse):
- Pros: Affordable entry into dedicated heat presses. Easy to use, takes up less space than swing-away models. Provides consistent, even heat and pressure.
- Cons: The top platen comes straight down, which can make placing thick items (like hoodies or hats) a bit tricky, as you might need to adjust them to fit evenly.
- How to use: Set precise temperature and time. Place item on bottom platen, position transfer, close top platen, and lock down. The machine does the rest.
- My Experience: Upgrading to a clamshell press was a game-changer. My transfers became consistently flawless, vibrant, and durable. It took the guesswork out of pressing.
- Consideration: Available in various sizes (e.g., 9x12, 15x15, 16x20 inches). A 15x15 is a versatile starting point.
- Hypothetical Scenario: When I started getting custom t-shirt orders from local businesses, the clamshell heat press became my invaluable partner. Its consistent pressure and temperature ensured every single shirt looked professional, building my reputation for quality.
3. Swing-Away Heat Presses (Versatility & Precision):
- Pros: The top platen swings away, offering full access to the bottom platen. This makes it easier to position items, work with thicker materials, and prevent accidental burns. Excellent for sublimation, as it allows for precise placement without bumping the paper.
- Cons: Takes up more counter space and is generally more expensive than clamshell models.
- How to use: Similar to clamshell, but the top platen swings out of the way before pressing.
- My Experience: For intricate sublimation projects, especially on larger items or multiple items at once, the swing-away press is a dream. It minimizes errors and maximizes efficiency.
4. Mug Presses (Specialized for Cylindrical Items):
- Pros: Designed specifically for mugs, water bottles, and other cylindrical items. Provides even heat and pressure around the entire surface, crucial for preventing ghosting or faded spots on sublimation mugs.
- Cons: Single-purpose machine, so it’s an additional investment if you only do apparel.
- Best for: Sublimation mugs, tumblers, water bottles. My subjective opinion? A dedicated mug press is absolutely essential for anyone serious about making custom mugs; don’t even try with a regular heat press for cylindrical items!
- Hypothetical Scenario: A local coffee shop wanted custom branded mugs. A mug press was the only way to achieve consistent, high-quality, full-wrap designs that would withstand daily use in a commercial setting.
5. Cap Presses (For Hats):
- Pros: Designed to apply transfers perfectly onto the curved surface of hats and caps.
- Cons: Another single-purpose machine.
- Best for: Custom baseball caps, beanies.
6. Understanding Heat & Pressure Settings:
- Temperature: Crucial for activating the adhesive or sublimation dyes. Too low, and it won't stick; too high, and it can scorch the fabric or damage the transfer. Always follow the heat transfer printable manufacturer's recommendations.
- Time: The duration of the press. Too short, and it won't bond; too long, and it can overcook the transfer, leading to dullness or scorching.
- Pressure: Essential for forcing the transfer material into the fabric fibers. Too little, and it won't adhere properly; too much, and it can thin out the transfer or damage the fabric.
Mastering the pressing process is where your heat transfer printable projects truly come to life. While an iron is a good starting point, a heat press will elevate your creations from hobbyist attempts to professional-grade masterpieces, saving you time, frustration, and wasted materials in the long run.
Design Alchemy: Crafting Your Vision with Software and Creativity
Before your heat transfer printable magic can happen, you need a design. This is where your creativity meets technology, transforming abstract ideas into printable artwork. The right software and design principles can make all the difference between a good transfer and a truly stunning one.
1. Canva (Beginner-Friendly & Versatile):
- Pros: Extremely intuitive, drag-and-drop interface. Offers thousands of templates, fonts, and graphic elements. Great for quick designs, social media graphics, and simple text-based apparel.
- Cons: Limited advanced features compared to professional software. Cannot create true vector graphics.
- Best for: Non-designers, quick projects, social media promotions, simple quote designs.
- My Experience: I often start with Canva for quick mock-ups or if a client wants a simple text design with a pretty font. It’s incredibly fast to get an idea from concept to print-ready.
- Pro Tip: Use Canva Pro for access to more premium elements and the ability to resize designs easily.
- Hypothetical Scenario: A friend needed a last-minute custom t-shirt for a themed party. Using Canva, I quickly combined a fun font with a pre-made graphic, creating a party-perfect design in under 15 minutes that was ready for the heat transfer printable.
2. PicMonkey / Adobe Express (Mid-Range & User-Friendly):
- Pros: More powerful than Canva with additional editing tools, but still relatively easy to learn. Good for photo editing and combining images with text.
- Cons: Subscription-based, still not as robust as full professional suites.
- Best for: Photo-heavy designs, more complex collages, slightly more intricate graphic elements.
3. Adobe Photoshop (Image Manipulation Powerhouse):
- Pros: Industry-standard for raster (pixel-based) image editing. Unparalleled control over photos, effects, and detailed graphics. Great for full-color photographic transfers.
- Cons: Steep learning curve, subscription required, primarily for raster images, not ideal for crisp lines of vector graphics unless working with Smart Objects.
- Best for: Photo transfers, complex graphic designs with shading and textures, mock-ups.
- My Experience: When I need to clean up a high-resolution photo for a sublimation mug or create a distressed effect on a design, Photoshop is my go-to. It’s where I can truly fine-tune every pixel.
4. Adobe Illustrator (Vector Graphics Master):
- Pros: Industry-standard for vector graphics. Designs are scalable to any size without losing quality, making it ideal for logos, text, and sharp line art. Essential for printable HTV that requires precise cutting.
- Cons: Steep learning curve, subscription required, not ideal for photo editing.
- Best for: Logos, typography, intricate line art, designs that need to be resized frequently, designs for printable HTV. My subjective opinion is that if you're serious about creating crisp, scalable designs, Illustrator is a non-negotiable tool.
- Hypothetical Scenario: A small startup approached me for their brand merchandise, requiring their intricate logo on various items from t-shirts to caps. Designing their logo in Adobe Illustrator ensured that no matter the size of the heat transfer printable, the logo remained perfectly crisp and professional.
5. CorelDRAW (Alternative Vector & Raster Tool):
- Pros: A strong alternative to Adobe products, offering both vector and some raster capabilities. Popular in the screen printing and signage industries.
- Cons: Can be expensive, might have a different workflow than Adobe for those used to it.
- Best for: Professional graphic design for a wide range of applications, including transfers.
6. Silhouette Studio / Cricut Design Space (Craft Cutter Companions):
- Pros: Free (basic versions) with your cutting machine purchase. Designed to work seamlessly with your cutter for "print-then-cut" functions, especially for printable HTV.