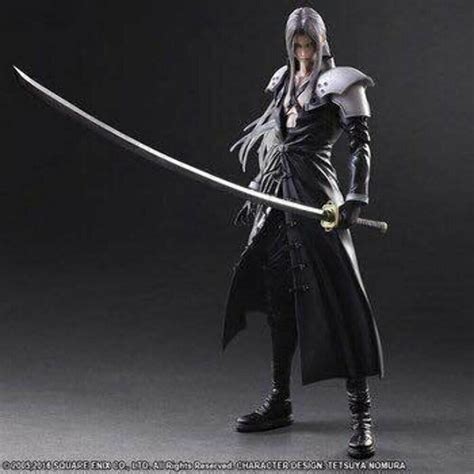
Ever dreamed of wielding Cloud Strife's colossal Buster Sword or donning Lightning's sleek armor? For us Final Fantasy fanatics, bringing those iconic designs to life isn't just a hobby—it's a pilgrimage. And thanks to the magic of 3D printing, it’s more accessible than ever. I remember my first attempt at a custom Gunblade; it looked more like a melted toy than Squall's elegant weapon. Trust me, learning from my trial-by-fire (and plastic) will save you hours of heartache and wasted filament!
This isn't just about pushing a button; it's about passion, precision, and a whole lot of post-processing. Whether you’re a seasoned cosplayer looking to upgrade your build techniques or a total newbie eager to print your first materia, this guide is your go-to resource. We'll dive deep into everything you need to know to transform pixels into stunning, wearable 3D printable Final Fantasy costumes. Get ready to level up your cosplay game!
---
Character-Specific Prop & Armor Builds: From Concept to Creation
Embarking on a new Final Fantasy cosplay often starts with a single, iconic piece. Precision here is key to capturing the essence of your chosen character, whether it's the intricate details of a summons' staff or the battle-worn texture of a warrior's gauntlet.
- Focus on Key Silhouettes: Start by identifying the most recognizable elements. For a Vincent Valentine cosplay, his Cerberus handgun is non-negotiable.
- Segmenting for Success: Large props like Barret's gun-arm will need to be printed in multiple, manageable pieces. Plan your cuts strategically to minimize seams. *I once tried to print a full-size Buster Sword hilt in one go and failed spectacularly due to warping. Lesson learned!*
- Detailing Smaller Components: Even tiny buckles or embellishments for a Tifa Lockhart costume add authenticity. Don't overlook them!
- Reinforcement Points: Design in channels for internal supports (e.g., metal rods) for items like long staffs or swords to prevent breakage, especially for something like a Rydia staff.
- Layering Armor: Think about how individual armor plates for a Paladin Cecil will overlap and connect. Each piece needs to contribute to the overall flexibility and fit.
- Hollowing for Wearability: For helmets or large gauntlets, hollowing out the model reduces weight and saves material, making it more comfortable to wear at a con.
- Attachment Mechanisms: Plan for how pieces will join together – magnets, bolts, or clips are far better than just glue for a durable Cloud Strife shoulder pauldron.
- Reference, Reference, Reference: Use multiple in-game screenshots and concept art for accurate details. Missing a small gem on a Yuna staff can throw off the entire look.
- Scaling Test Prints: Print a small, low-detail version of a complex piece (like a Sephiroth wing segment) to test scale before committing to the full print.
- Consider LED Integration: If your prop, like a Prompto pistol, requires lighting, design internal channels for wires and battery packs early in the modeling process.
Choosing Your Weapon (and Armor!): Filaments & Materials for Authenticity
The material you choose is as crucial as the design itself. Different filaments offer unique properties that can make or break the look and durability of your 3D printable Final Fantasy costumes.
- PLA (Polylactic Acid): The Cosplay Workhorse: Affordable, easy to print, and great for detailed pieces. Ideal for most props and rigid armor sections like a simple chocobo head.
- PETG (Polyethylene Terephthalate Glycol): For Durability: Stronger and more flexible than PLA, making it good for parts that might take a bit more abuse, like the edges of a shield.
- ABS (Acrylonitrile Butadiene Styrene): The Advanced Choice: Known for its strength and ability to be smoothed with acetone vapor, giving a professional, seamless finish, great for a high-gloss Lightning armor piece.
- Flexible Filaments (TPU): For Wearable Comfort: Use these for parts that need to bend or flex, such as straps or soft armor details for a Red XIII mask.
- Wood-Filled PLA: Can give a textured, natural look suitable for ancient relics or parts of an Eorzean-style staff. *I used this for a Gandalf-esque staff once; it sands beautifully!*
- Metal-Filled Filaments: While heavy, these can be polished to achieve a genuine metallic sheen, perfect for smaller, intricate jewelry or keyblades.
- Resin (SLA/DLP Printing): For Hyper-Detail: If you have a resin printer, this is your go-to for incredibly fine details on items like intricate jewelry, tiny buckles, or character faces.
- Experiment with Blends: Some filaments combine properties, like silk PLA for a shiny, almost metallic look right off the print bed, fantastic for shiny armor accents.
- Color Matching: While painting is inevitable, starting with a filament color close to your desired final hue can save you paint layers and time.
- Material Strength vs. Weight: Consider the overall weight of your costume. Heavy materials might look good, but they can be uncomfortable for a long day at a convention.
The Perfect Fit: Scaling, Slicing, and Printing for Wearable Cosplay
Getting your 3D printable Final Fantasy costume pieces to fit perfectly isn’t just about looking good; it's about comfort and mobility. Proper scaling and slicing are foundational to a successful wearable piece.
- Measure Thrice, Print Once: Seriously, measure yourself (or the wearer) meticulously! For armor, measure arm circumference, leg circumference, torso length, etc. *I once printed a shoulder piece that was way too small because I eyebared it. Don't be me!*
- Software Scaling: Most 3D modeling software (Blender, Fusion 360) and slicers allow you to scale models. Learn to use these tools accurately.
- Slicing Orientation: How you orient your model on the print bed affects strength, support needs, and print time. Think about layer lines and stress points.
- Infill Percentage: For armor, 15-20% infill is usually sufficient for strength without adding too much weight. Props might need more, especially if they’ll be handled often.
- Support Structures: Use supports wisely. Overhangs often need them, but excessive supports mean more post-processing. Tree supports can be great for complex geometry.
- Layer Height: Finer layer heights (e.g., 0.1mm-0.15mm) produce smoother results with less visible layer lines, ideal for highly detailed areas like a weapon hilt.
- Print Speed vs. Quality: Faster prints save time but can compromise detail and surface finish. Balance this based on the part's visibility.
- Test Prints for Fit: Print small sections or rings to test the fit on your body before committing to the full piece. A small test ring for a bracer can save hours.
- Splitting Models for Smaller Beds: If your printer bed is too small for a piece, use modeling software to strategically cut the model into smaller, printable sections that can be reassembled later.
- Warping Prevention: For larger pieces, ensure your print bed is level, clean, and at the correct temperature. Adhesives like gluestick or hairspray can prevent corner lifting.
Beyond the Print Bed: Post-Processing for a Flawless Final Fantasy Finish
A raw 3D print is just the beginning. The magic truly happens in the post-processing, transforming plastic into convincing metal, weathered leather, or glowing crystal. This is where your 3D printable Final Fantasy costume truly comes alive.
- Sanding, Sanding, Sanding: The most tedious but crucial step. Start with coarse sandpaper (100-200 grit) to remove major layer lines, gradually moving to finer grits (400-600) for a smooth finish.
- Priming: A good primer (spray filler primer is fantastic) fills in minor imperfections and provides a uniform base for painting. It also highlights areas that still need sanding.
- Filling Gaps and Seams: Use wood filler, Bondo automotive filler, or 3D printing specific fillers to hide seams where pieces were joined. Sand smooth once dry.
- Painting Techniques: Learn about base coating, airbrushing, dry brushing, and weathering. Each technique adds depth and realism to your props and armor.
- Weathering & Battle Damage: For a battle-hardened Cloud or Squall, use dark washes, silver rub-n-buff, and even a Dremel to create realistic chips and scratches.
- Clear Coats & Sealants: Protect your hard work! A matte or gloss clear coat will seal the paint and protect it from wear and tear during conventions.
- Adding Glimmer: For gems or crystal details like those on an Eorzean summoner's staff, use clear resin pours or translucent filaments, then back-light with LEDs.
- Attachment Hardware: Beyond just gluing, consider bolts, magnets, elastic straps, or Velcro for robust and reusable attachment of armor pieces.
- Fabric Integration: For pieces like capes or soft armor sections, consider how they will attach to your rigid 3D prints seamlessly.
- Practice on Scraps: Before committing to your main piece, practice your sanding, priming, and painting techniques on failed prints or test pieces. *This is my favorite strategy because it saved me countless times from ruining a near-perfect print!*
Dodging Disaster: Troubleshooting Common 3D Printing Cosplay Woes
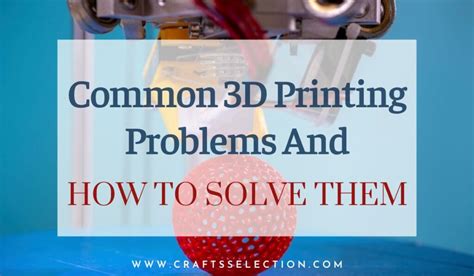
Even seasoned veterans run into issues. Knowing how to troubleshoot common 3D printing problems can save your 3D printable Final Fantasy costumes from the trash heap and ensure your deadlines are met.
- Warping and Bed Adhesion:
- Problem: Corners lifting off the print bed.
- Solution: Ensure a level bed, correct bed temperature, use adhesives (gluestick, hairspray), or an enclosure for ABS.
- *Don't be like me and ignore warping on a large armor piece – you'll regret it when it's half-done!*
- Layer Shifting:
- Problem: Layers suddenly offset horizontally.
- Solution: Check belt tension, ensure stepper motor drivers aren't overheating, reduce print speed.
- Clogged Nozzle:
- Problem: Filament stops extruding or comes out thin.
- Solution: Perform a "cold pull," clear with a needle, or replace the nozzle.
- Under/Over Extrusion:
- Problem: Gaps in layers or blobs on the surface.
- Solution: Calibrate E-steps, check filament diameter settings in your slicer, ensure consistent extruder tension.
- Stringing/Blobs:
- Problem: Fine strings or small blobs on the print surface.
- Solution: Adjust retraction settings (distance and speed), lower nozzle temperature slightly.
- Poor First Layer:
- Problem: Filament not sticking, uneven lines.
- Solution: Re-level your bed, adjust Z-offset, ensure proper bed temperature.
- Supports Not Removing Cleanly:
- Problem: Supports fused to the print, leaving rough surfaces.
- Solution: Adjust support interface settings (gap, density), use different support patterns, or dual-extrusion with dissolvable supports.
- Print Stopping Mid-Way:
- Problem: Printer suddenly halts.
- Solution: Check power supply, SD card corruption, or thermal runaway protection triggering.
- Model Errors (Non-Manifold Edges):
- Problem: Slicer can't properly process the model, leading to weird prints.
- Solution: Use a 3D modeling software's "repair" function or online tools like MeshMixer/3D Builder.
- "Printer Gremlins":
- Problem: Everything seems fine, but prints still fail sporadically.
- Solution: Sometimes, just restarting your printer and slicing software, or even a full firmware update, can fix inexplicable issues.
The Mognet Connection: Finding & Sharing 3D Printable Final Fantasy Costume Files
You don't have to be a 3D modeling wizard to create stunning 3D printable Final Fantasy costumes. The community is a treasure trove of shared files and resources.
- Thingiverse & MyMiniFactory: These are massive repositories for 3D models, and you'll find countless free and paid Final Fantasy prop files, from Buster Swords to intricate earrings.
- Etsy & CGTrader: Many talented artists sell high-quality, pre-modeled STL files here, often for specific character costumes or hard-to-find props.
- Patreon & Cults3D: Support 3D artists who create exclusive cosplay models. This is a great way to get unique designs and often helps fund future creations.
- Cosplay Forums & Discord Servers: Join communities dedicated to Final Fantasy cosplay or 3D printing. Members often share their own models, offer advice, and collaborate on projects.
- Sketchfab: While not primarily a file repository, many artists upload their 3D models here, sometimes with download options. Great for inspiration!
- Finding Specific Character Files: Use specific search terms like "Tifa Lockhart glove 3d print" or "Sephiroth wing STL" to narrow your search.
- Licensing & Attribution: Always respect the creator's licensing. If a model is free, check if attribution is required for non-commercial use.
- Requesting Models: If you can't find a specific prop, consider commissioning a 3D artist to create it for you.
- Remixing and Customizing: Some models are open for modification. Learn basic 3D modeling skills to adjust existing files to fit your needs, like adding battle damage or custom engravings.
- Sharing Your Own Creations: Once you've mastered a design, consider sharing your own 3D printable Final Fantasy costumes files with the community! It's how the knowledge base grows.
Your First Materia Slot: Essential Tips for Beginner FF Cosplayers

Stepping into the world of 3D printable Final Fantasy costumes can feel like learning a new spell list. Don't worry, even the strongest heroes started with basic Cure.
- Start Small & Simple: Don't aim for a full Bahamut cosplay on your first print. Begin with a single prop, like a Potion bottle, a simple chocobo feather, or a small piece of armor.
- Understand Your Printer: Read your printer's manual, watch YouTube tutorials specific to your model, and learn its quirks. Every printer is a little different.
- Learn Your Slicer Software: Cura, PrusaSlicer, Simplify3D – these programs turn your 3D model into printer instructions. Spend time learning their settings.
- Calibrate, Calibrate, Calibrate: Regularly calibrate your printer's E-steps, bed level, and temperature settings. This solves many common issues.
- Use Quality Filament: Cheap filament can lead to endless headaches. Invest in reputable brands, especially for your first projects.
- Join Online Communities: The 3D printing and cosplay communities are incredibly supportive. Ask questions, share your progress, and learn from others' experiences. Reddit (r/3Dprinting, r/cosplay), Facebook groups, and Discord servers are goldmines.
- Post-Processing is Key: Understand that the print is just step one. Budget time and learn techniques for sanding, priming, and painting. This is where a 3D printable Final Fantasy costume truly transforms.
- Don't Fear Failure: You WILL have failed prints. It's part of the learning process. Learn from them, adjust, and try again. Each failure is a step towards mastery.
- Safety First: When sanding, painting, or using any tools, always wear appropriate safety gear like masks, gloves, and eye protection.
- Have Fun! At the end of the day, this is a creative outlet and a way to celebrate a beloved franchise. Enjoy the process of bringing your favorite characters to life!
---
Tips for Personalizing Your 3D Printed FF Cosplay Message
Making your 3D printable Final Fantasy costume truly yours goes beyond just faithful recreation. It's about injecting your personality and adding a unique touch that makes it stand out.
- Add "Easter Eggs": Include a subtle nod to your favorite side quest, a specific quote, or a hidden symbol only true fans would recognize. This is my go-to approach for small teams, like my regular cosplay group!
- Battle Damage with a Story: Instead of random scuffs, imagine a specific battle your character endured and apply damage accordingly. Perhaps a scorched mark from Ifrit, or a slice from a rival's blade.
- Custom Engravings: Use your 3D modeling software to emboss or engrave your initials, a meaningful date, or even a line of dialogue onto a prop or armor piece.
- LEDs for Effect: Strategic LED placement can make a prop glow with materia power, or add a sinister glint to a villain's eye. Think about the source of your character's power.
- Hybrid Materials: Combine your 3D prints with other materials like EVA foam for larger, lightweight sections, or real leather for straps and detailing, adding textural variety.
- Unique Color Variants: While staying true to the character, sometimes a subtle shift in a metallic shade or adding a slightly aged patina can give your costume more depth.
- Comfort Customization: Personalize the internal padding of helmets or armor pieces with soft fabrics, memory foam, or even cooling gel inserts for long convention days.
- Personalized Stand/Display: Create a custom 3D printed stand for your prop when not in use, incorporating elements of the game world or your character's emblem.
- Signature Markings: If your character has a distinct symbol or sigil, incorporate it into unexpected places on your costume where it makes sense.
Common Pitfalls: What to AVOID When Printing Final Fantasy Cosplay Parts
Navigating the world of 3D printable Final Fantasy costumes can be fraught with peril. Avoid these common mistakes to save time, filament, and your sanity!
- Ignoring Scale: Don't just hit print! Always double-check dimensions against your own body measurements. Printing a helmet too small means it's useless unless you're cosplaying a Moogle.
- Over-Reliance on Supports: While supports are necessary, don't use them indiscriminately. They add print time, use more filament, and can leave ugly marks if not managed properly.
- Skipping Test Prints: Jumping straight into a 20-hour print without testing smaller sections for fit, adhesion, or detail quality is a recipe for heartbreak.
- Neglecting Post-Processing: A raw 3D print looks like plastic. Without sanding, priming, and painting, your epic sword will look like a toy from the bargain bin. This is the difference between "homemade" and "handcrafted."
- Ignoring Filament Storage: Leaving filament exposed to humidity can ruin it, leading to brittle prints and poor adhesion. Store it in a dry box!
- Underestimating Time & Cost: Large, intricate costumes require significant time for printing, post-processing, and painting, plus the cost of materials. Plan accordingly.
- Using Non-Cosplay Friendly Materials: While some industrial materials are strong, they might be too heavy, brittle, or difficult to work with for wearable cosplay. Stick to known good options.
- Not Calibrating Your Printer: A poorly calibrated printer will produce inconsistent results, no matter how good your file is. It’s like trying to wield a gunblade with a rusty trigger.
- Trying to Print Everything in One Piece: Unless it's a very small item, attempting a massive print in a single go often leads to warping, failures, and wasted material. Segment your models!
- Forgetting Safety: Painting in an unventilated area or sanding without a mask can be detrimental to your health. Don’t be like me and think "just a little bit won't hurt" – it always does!
---
There you have it, adventurer! A comprehensive guide to embarking on your journey with 3D printable Final Fantasy costumes. From selecting the perfect filament to mastering the art of post-processing, you now have the materia slots filled with knowledge. Remember, every master once started as a novice, fumbling with their first spell.
The satisfaction of wearing something you painstakingly crafted, piece by piece, is unparalleled. So, go forth, gather your resources, fire up your printers, and bring your favorite heroes and villains to life. Now go make their day—or survive that hunt!